How to Use a Laptop as a Second Monitor [Step-by-Step]
As useful as laptops are, over time you’ll have a collection of old mobile PCs collecting dust as you upgrade over the years. You might be stumped on what to do with them, but there is a great way to make them functional again.
Today, we’re diving deep into recycling your old laptop PCs, and show you how to use a laptop as a second monitor! We’ll show you how to connect both Windows laptops and desktops as well as macOS laptops and desktops, as well as a method to connect the two!
1. Can You Use a Laptop as a Second Monitor?
Yes, you can use a laptop as a second monitor with built-in solutions for both Windows and macOS operating systems. By using built-in software or external hardware, you can easily connect your laptop to the computer as a second monitor.
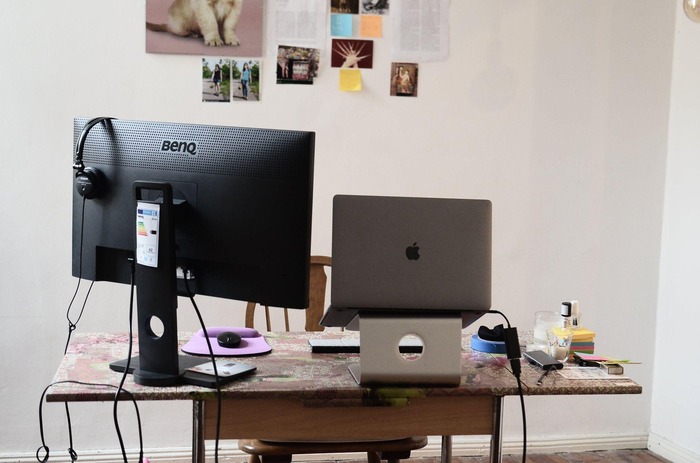
This works exactly as it would if you connected your laptop to another monitor, which you can use to either mirror or extend your PC’s display. This way, you get a lot more screen real estate without needing to invest in a new monitor.
However, there are a few things to keep in mind. This method works for Windows 10 and Windows 11. Since we’re using wireless methods that rely on your Wi-Fi connection, if you can’t maintain a stable connection, you’ll notice frequent disruption or disconnects.
We’d recommend keeping both your desktop and laptop as near as possible to your home Wi-Fi router. It’s best if you can connect an ethernet cable directly to your desktop and laptop for the best performance.
2. How to Use a Laptop as a Second Monitor?
Now we’ll show you how to use your laptop as a second monitor for both Windows PCs, and macOS PCs, and we’ve also included a snappy way to connect Windows and macOS PCs cross-platform.
Windows Desktop and Windows Laptop
The first method is to use a laptop as a second monitor by using two Windows PCs. This method uses Miracast, which is a standard casting protocol available on most modern Windows PCs and Android devices.
To use this method, both PCs need to be on Windows 10 or Windows 11. Before you get started, make sure both PCs are connected to the same Wi-Fi network and there are no pending Windows updates.
Then, follow the steps below to set up a laptop as a second monitor on Windows 11/10:
- Step 1.Press the Win and I keys at the same time on the Second Windows Laptop to open the Settings app.
- Step 2.Select ‘System’ from the left-hand menu.
- Step 3.Scroll down and find the ‘Projecting to this PC’ option.
- If you don't see the option for 'Projeting to this PC', you can add the feature by clicking 'Optional features > Add an optional feature > View features > Wireless Display > Install. After installing, you can restart the laptop and start from Step 1.
- Step 4.On the 'Projecting to this PC' page, change the settings for the ‘Some Windows and Android devices can project to this PC when you say it’s OK’
- Step 5.Change the setting to ‘Available everywhere on secure networks’.
- Step 6.On your Primary Windows desktop, tap on the Windows key + K. Alternatively, open the Quick Settings panel and select ‘Cast’.
- Step 7.Select your Windows laptop from the list and wait for your desktop to connect.
- Step 8.Wait for a while, and you can cast your primary desktop screen to the second laptop.
- Step 9.Now, you can configure the Display settings on the primary desktop. Go to Settings > System > Display, and choose 'Extend these displays'. Alternatively, you can press the Win and P keys at the same time and choose 'Extend'.
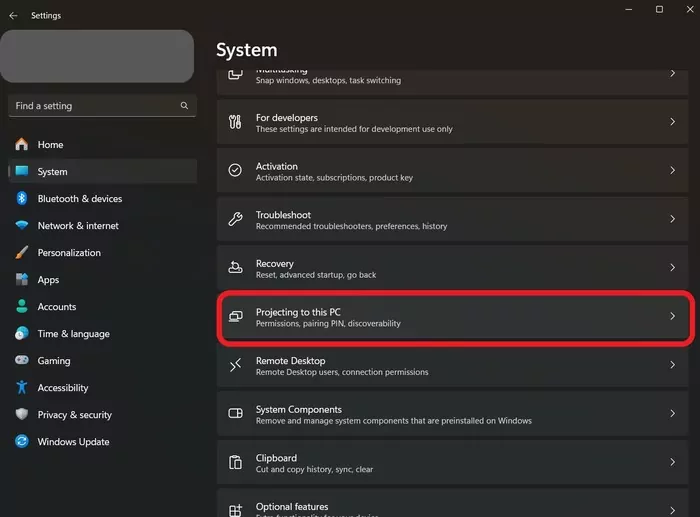
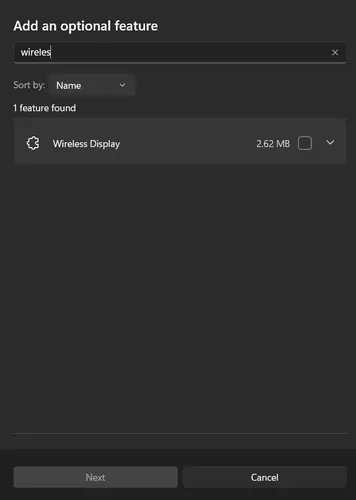
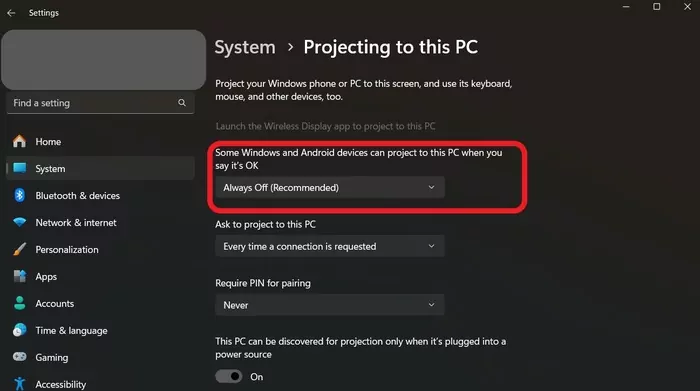
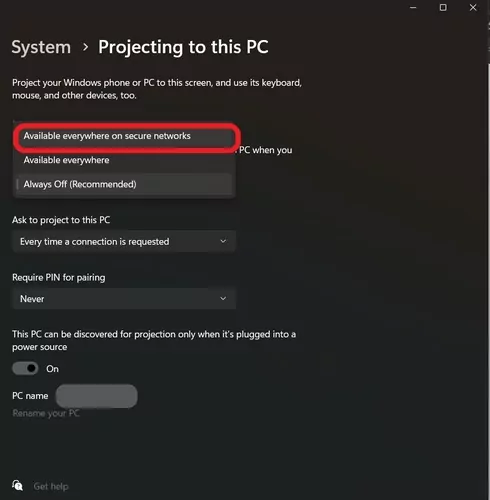
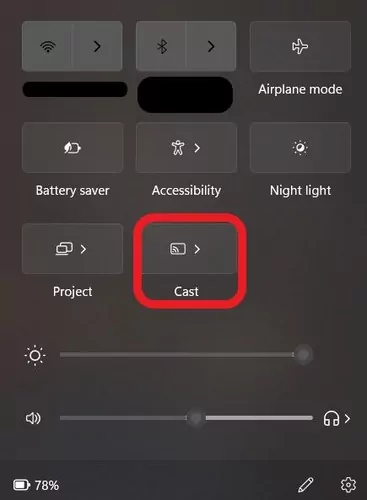
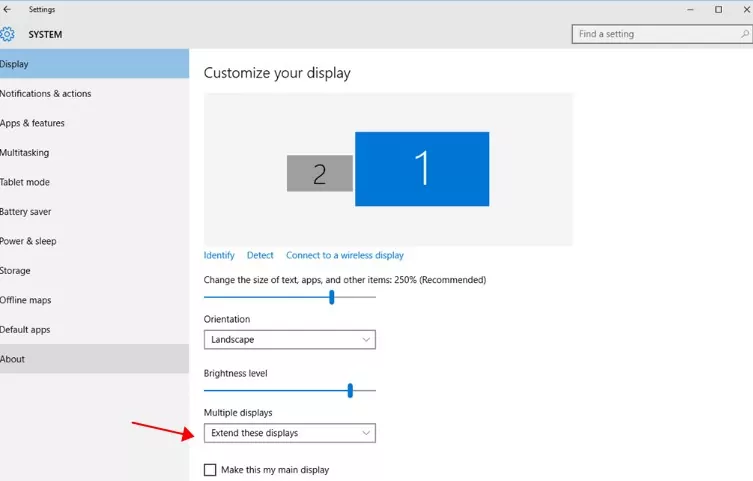
Once done, you can now extend the primary Windows desktop to the second laptop, and finally use the laptop as your second screen.
You can go to the Display settings and adjust the screen resolution and orientation.
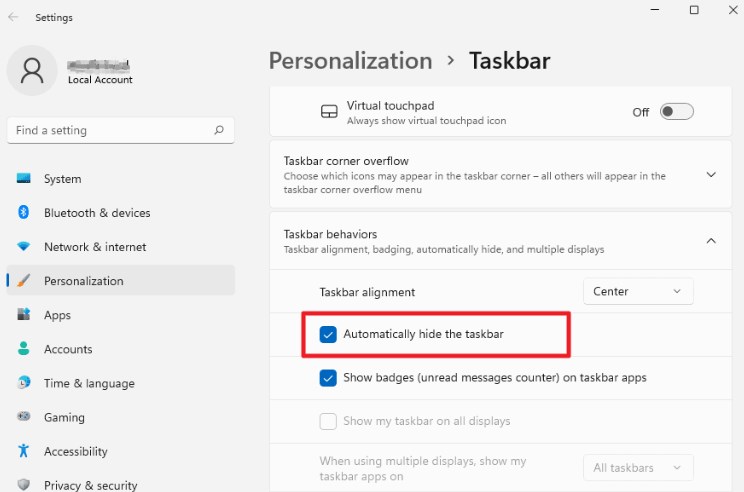
Additionally, you can even hide the taskbar on the second screen in order not to get confused. Simply right click the Task Bar to choose Task Bar Settings > Taskbar behaviors > Tick for Automatically hide the taskbar.
macOS Desktop and macOS Laptop
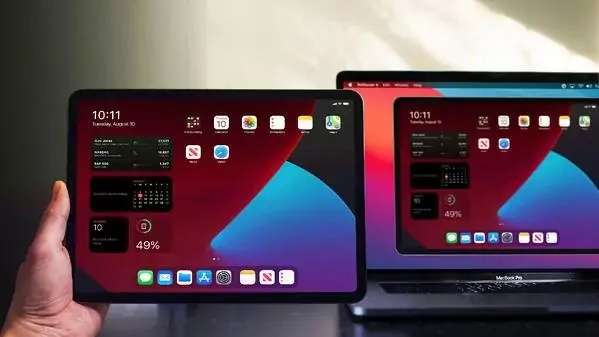
Fortunately, the method to connect a Mac desktop and use another Mac laptop as a second monitor is easier than on Windows. This method utilizes Apple’s latest AirPlay Receiver feature to mirror your Mac desktop’s screen to a MacBook.
But you’ll need to enable this setting first before you can connect the two. Additionally, keep in mind that this feature is only available on select Mac devices running macOS Monterey or newer.
Here’s a list of devices that support Mac-to-Mac screen mirroring:
- Mac Mini (2020 model or newer)
- MacBook (2018 model or newer)
- MacBook Pro (2018 model or newer)
- MacBook Air (2018 model or newer)
- iMac introduced (2019 model or newer)
- Mac Pro (2019 model or newer)
Once you’ve verified you meet the above requirements, here’s how to enable AirPlay Receiver on your MacBook laptop:
- Step 1.Make sure 'AirPlay Receiver' is turned on for both Mac devices. It's located in System Preferences > Sharing > AirPlay Receiver.
- Step 2.On the Primary desktop, click 'Control Centre' on the upper right, and choose 'Screen Mirroring'.
- Step 3.Find your MacBook laptop and select it from the list.
- If prompted with a 4-digit AirPlay Code, enter it into your Mac.
- Step 4.Now, you can mirror your primary macOS device to the macOS laptop.
- Step 5.Next, on the Primary desktop, click System Preferences > Display.
- Step 6.Select the second laptop screen and choose 'Use as Extend'.
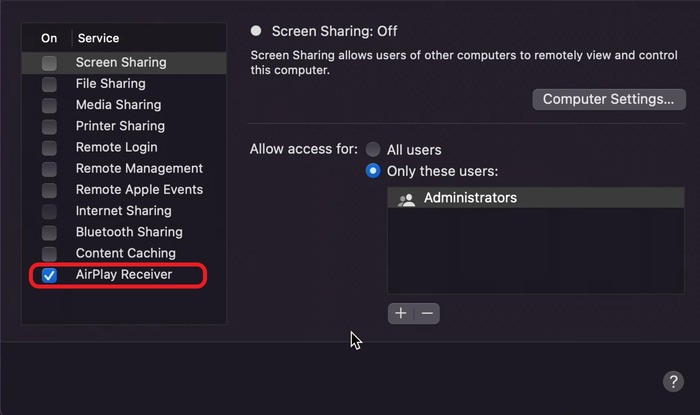
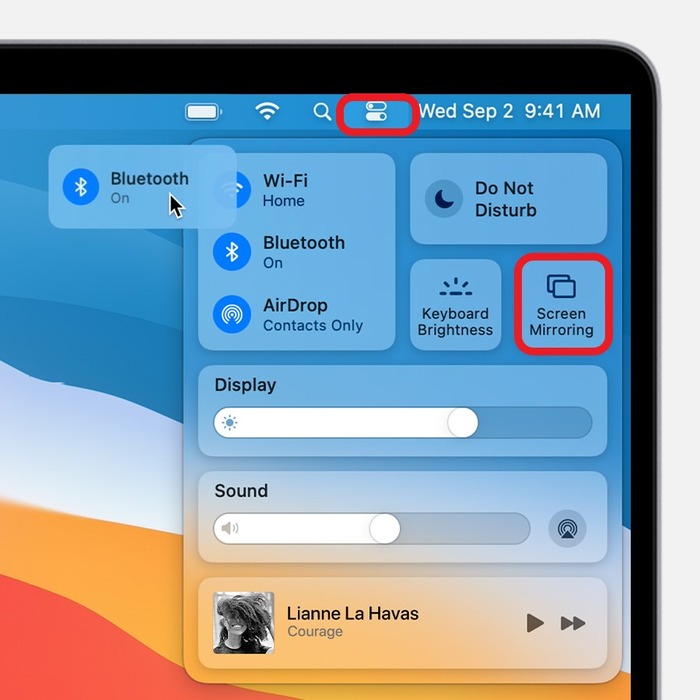
This way, you can use your macOS laptop as a second screen for the primary computer. If your primary Mac device has a touch bar, the touch bar will also work for the second screen on the laptop.
Use Laptop as Second Monitor with HDMI
Your final option to use a laptop as a second monitor is to use a trustworthy HDMI cable. Depending on your PC and what ports it uses, you may require a different cable. For example, Apple’s Macs mainly use Thunderbolt and USB-C with DisplayPort, and Windows laptops typically house HDMI ports.
What You Need:
- Video Capture Device
- HDMI Cables
- HDMI Adapter (optional)
- Step 1.Check the ports on your primary laptop/desktop and see what ports it has (HDMI, VG, or DisplayPort). Then do the same thing for the second laptop (as the second screen), and determine if you need an adapter (USB to HDMI or USB to VGA) or not.
- Step 2.Connect the HDMI cables between the primary computer, the video capture device, and the second laptop. You can check the image below to learn how to connect.
- Step 3.Make sure the devices and cables are connected properly and install the appropriate drivers if prompted.
- Step 4.Wait for seconds, and your primary computer will recognize your second laptop as a screen. Now on your second laptop, open the Camera app, and change the camera, and it will change to the USB camera. Now the laptop displays the extended screen from your primary computer.
- Step 5.After connecting, you will need to adjust the display settings for the primary computer and the second laptop. Go to the Display settings and adjust the screen resolution and orientation.
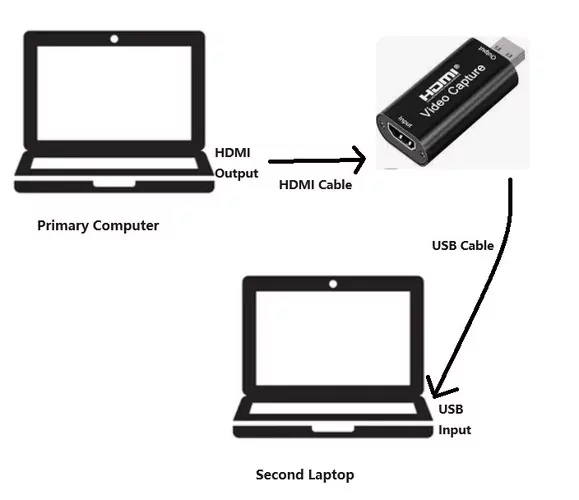
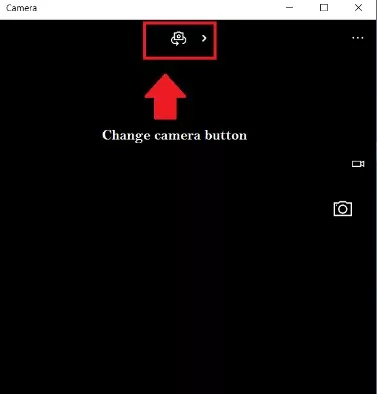
These are the instructions to use the laptop as a second screen via HDMI cables. It works for Windows 7, 8, 10, 11.
3. Why You Should Use a Laptop as a Second Monitor?
Here are a few key reasons why you should add a laptop as a second monitor to your workstation:
1) Improved Workflow & Multitasking
With a second monitor, it’s incredibly simple to view and compare documents, graphic designs, drawings, and much more. It streamlines and optimizes your workflow from switching between tabs!
2) Real-Time Notification Tracking
Your workstation can have a screen dedicated to your docs and working apps, and another for messengers or email, to quickly refer and reply to colleagues and friends!
3) Watch and Play at the Same Time
With a video guide on one screen and a game running on the other, it’s the ideal way to follow game walkthroughs, quick pull-up guides, and more!
4. Conclusion
We’ve reached the end of our guide and hopefully, you’re better informed on how to use a laptop as a second monitor. It’s a cost-effective way of expanding your screen real estate while making good use of any old laptops you have lying around.
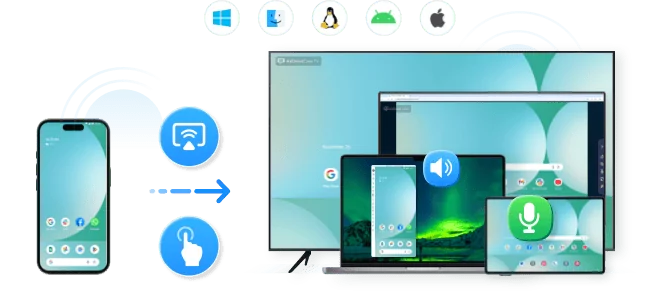
Sometimes you may want to screen mirror your computer screen to another desktop or laptop. In that case, you can try AirDroid Cast. AirDroid Cast is the perfect screen mirroring tool to enhance your workflow, with plenty of exclusive casting features like two-way audio support, crisp 1080p video quality, remote casting, and much more!





Leave a Reply.