How to Change Windows Display Settings
Your Windows display is the very first thing that connects you to the digital realm. Though Windows experience offers pretty much everything required to get started, there are still plenty of options to customize user experience. This guide breaks down these steps to help you set up your Windows Display Settings as per your requirements.
What Is Windows Display Settings?
The Windows Display Settings panel in Microsoft Windows allows users to configure how their display looks like. Users can customize both the software and hardware experience from the Windows Display Settings panel.
That said, users can have all the freedom over the software configuration side. However, they can only tinker with hardware setting up to a certain extent that is offered by the hardware itself. For example, you can only apply a certain display resolution only if your display hardware supports it.
In contrast, software settings are pretty much the same across the board regardless of the system. For example, you can apply a Night Light setting (that increases color temperature and reduces blue light emission to reduce eye strain) on almost any Windows 10/11 device.
How to Open Display Settings in Windows?
Windows operating system provides some very user-friendly and accessible methods to open Windows Display Settings in Windows. Users can follow any of the following three techniques to open the Windows Display Settings panel.
From the Settings App
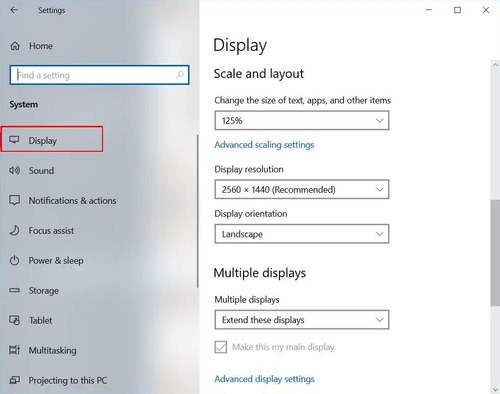
One way of opening Windows Display Settings is through the system settings app.
Start Menu (Alternatively, you can also just press Windows + I as a shortcut command) > Settings > System > Display.
From the Desktop
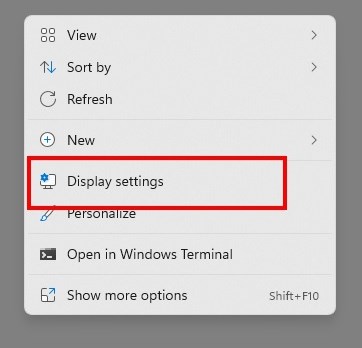
You can also open the Display settings category directly from your Desktop. To do that:
To change Windows display settings Windows 10 and Windows 11: Right click Desktop > Display settings.
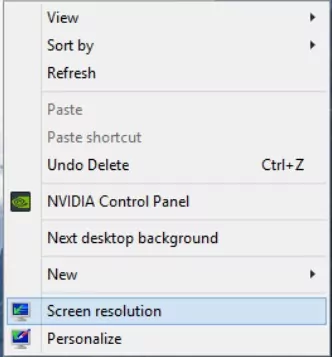
For Windows 8.1 and Windows 8: Right click Desktop > Screen resolution.
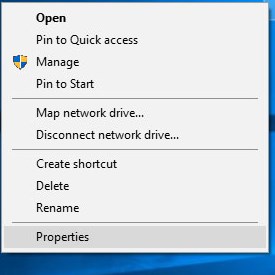
For Windows 7 & XP & Vista: Right click Desktop > Properties (or Graphics properties).
From the Run Utility
Another way of getting Windows Display Settings is by using the built-in Run utility of Windows:
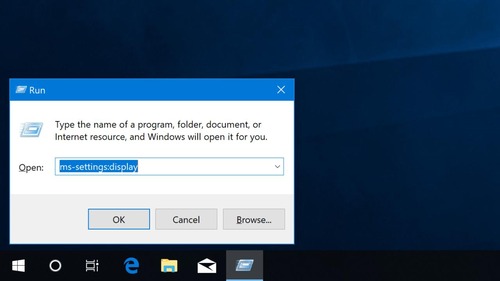
Right click Start > Run (or press Windows + R) > ms-settings:display > OK.
This Will bring out the display settings on your computer.
How to Change Display Settings in Windows
Now that you have successfully opened the display settings, it's time to go through these settings and set them as per your desires.
Display Mode
If you have multiple displays setup, you can change Display Settings in Windows by clicking on either of your displays and select Make this my main display to make it your primary display screen. Please note there can only be one primary display at a time.
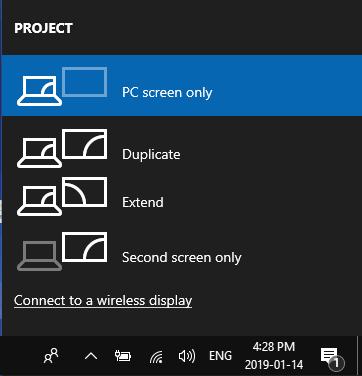
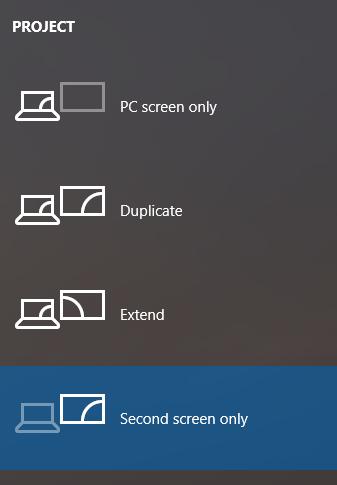
Now to configure how you want to share content on these displays, there are four different modes to pick from.
You can access the display mode settings from the methods mentioned above, or you can bring them out by pressing the Win + P key at the same time.
1PC screen only (Show only on 1)
PC screen only mode means it only shows the primary screen, no matter how many external monitors the computer has connected to. This mode works when your system is tight on hardware resources and you temporarily want to free up some hardware resources to perform other operations.
2Duplicate (Duplicate these displays)
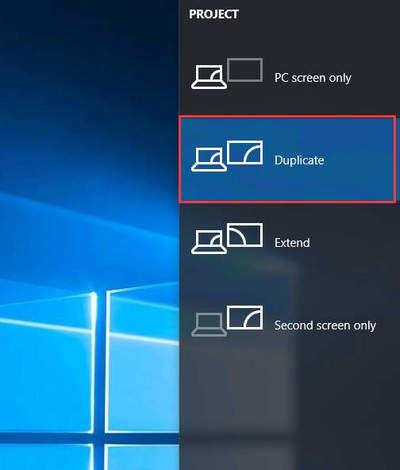
The Duplicate mode or Duplicate this displays mode means that the external monitors or screens show exactly the same content of your primary screen. By selecting Duplicate, you can share your screens with the physical audience. For instance, you can connect a projector as your secondary display and duplicate your screen to share contents with the audience while still viewing it on your primary screen.
3Extend (Extend these displays)
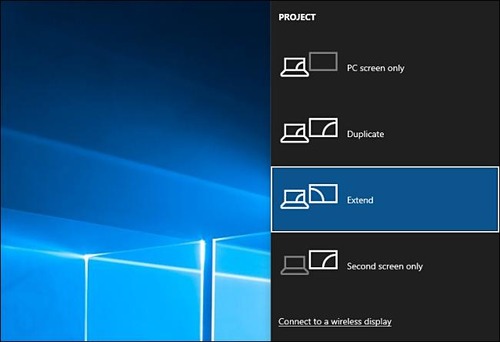
Extend mode should be one of the most familiar modes that has been used very often for Windows users. Lots of people choose this mode when they have connected a second and third monitor to the computer, and this will tremendously improve the work efficiency.
Extending Windows screen allows users to easily move across any of these displays as they would on a native display screen, which means you have more spaces to fiddle with. It is extremely useful for multitasking.
4Second Screen Only (Show only on 2)
When you see Second Screen Only, you should realize that there must be 2 monitors connected to the computer. And this mode only shows the second monitor, while the primary monitor is not showing. This mode is usually enabled when you don't usually interact with your primary display and want to spare some hardware resources.
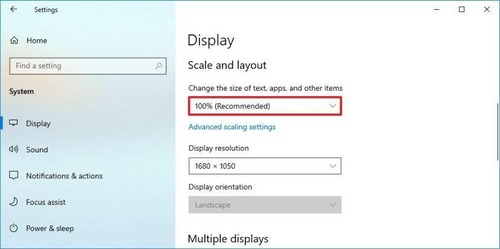
Scale and Layout
Here, you can change Display Settings in Windows to resize the text, icons, and other visual elements of the Windows operating system. This Windows Display Settings is particularly useful when users have a very high resolution screen or very low resolution screen. Then scaling up or down the contents can adjust the size of the visual elements to appear appropriately on the screen.
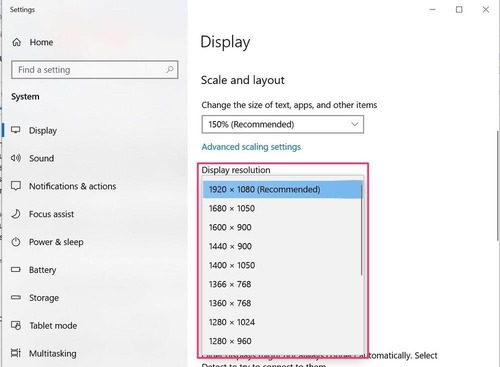
Display Resolution
Display resolution refers to the amount of physical pixels (individual dots) in each screen dimension. Display resolution is measured as the number of horizontal pixels by the number of vertical pixels.
Some commonly used resolutions are 1280 x 720, 1920 x 1080, 2560 x 1440, and 3840 x 2160. You can pick your desired screen resolutions from the list to change Display Settings in Windows.
However, remember it is recommended to choose the same display resolutions as supported by your hardware. Choosing the wrong display may cause contents to appear inappropriately or not appear at all.
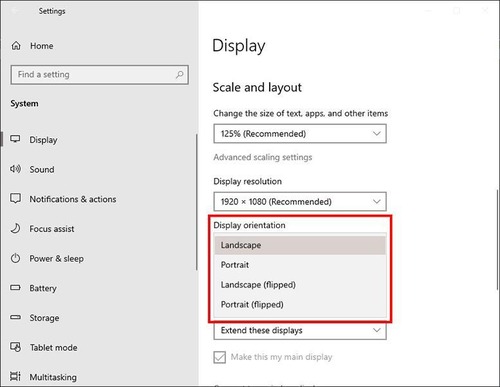
Display Orientation
This setting allows you to rotate your screen contents in either landscape or portrait modes. Display orientation is usually beneficial when you have a tablet or a screen with similar aspect ratio.
Refresh Rate
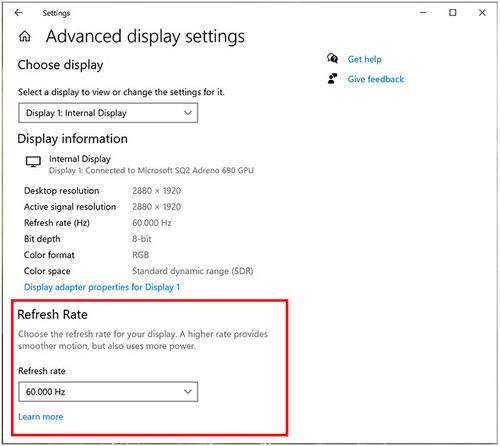
Refresh rate is referred to the number of times per second the image refreshes on the screen, which means that the refresh rate determines the fluidity of actions on your screen. The refresh rate is usually measured in Hertz (Hz). In simple terms, 60 Hz means your screen refreshes 60 times per second.
Generally speaking, the higher the refresh rate is, the better experience you get. However, you will need to choose the right refresh rate depending on your hardware specifications, such as your graphics card.
To adjust the refresh rate for your Windows screen, you can go to the Windows display settings > Advanced display settings > Refresh rate.
Power Plan
Power plan settings comprise different hardware and system settings relevant to power utilization of your device, for example, system sleep settings and display brightness.
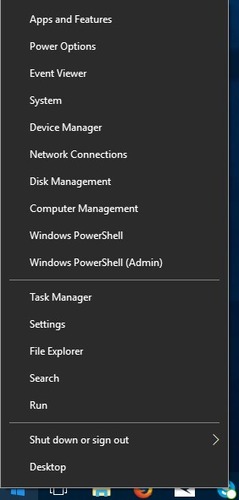
To open power options you can follow either of the following techniques:
Right click Start menu > Power Options
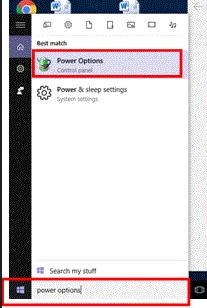
Or you can use Windows Search to open Power Options.
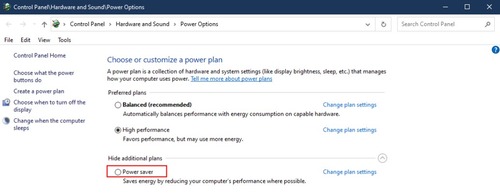
Windows offers three main power plans out of the box which are as follows:
1Power Saver
This plan is customized for efficient power management and energy savings. As a side effect you will have to sacrifice some performance in some areas. Following are some resources affected by the power saver mode:
- Improved system cooling
- Improved battery life
- Reduced screen brightness
- Reduced CPU performance
- Reduced hard drive performance
- Wifi or Bluetooth maybe disabled
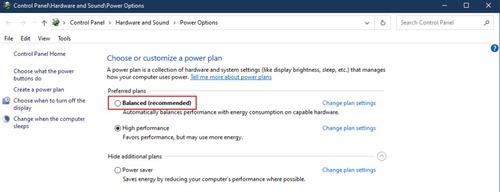
2Balanced
This is the default and recommended power plan offered by the Microsoft Windows, and as the name suggests, it balances the power consumption and performance. Some affected areas of this power plan are:
- Adaptive screen brightness
- Balanced processor power
- Balanced system cooling
- Average battery life
3High Performance
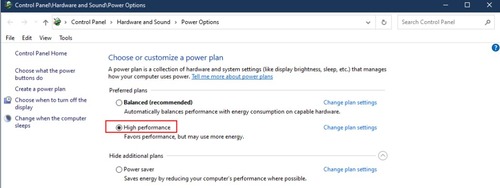
The High Performance mode is the opposite of what Power Saving mode offers. It utilizes maximum power to offer the maximum hardware performance possible. The affected areas of this plan are:
- High processor performance
- High display brightness
- Low system cooling
- Low battery life
Text Size
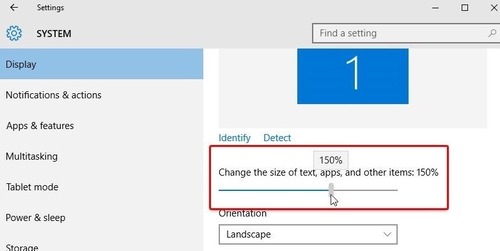
Sometimes you have a hard time reading text on your screen, even after scaling enabled. To fix this you can change the text or font size on your screen. To resize text on your screen, follow these steps:
Windows Settings > Accessibility Category > Text Size.
Adjust the Text size slider as per your requirements.
How to Setup Multiple Monitors
Multi-monitor displays are a very common trend among PC enthusiasts as it allows you to use multiple displays at the same time and configure them according to your workflow. By doing so, you will be able to improve efficiency as you are not limited to the primary screen anymore!
Steps to Setup Multiple Monitors on Windows
First of all, make sure all the display and power cables are connected properly to your required display hardware. If for some reason your display is still not getting detected, click on the Detect button and check if it works.
You can then change Windows Display Settings for multiple monitors by opening the settings window by following the above guide: How to Open Display Settings in Windows.
Configure Windows Display Settings for Multiple Monitors
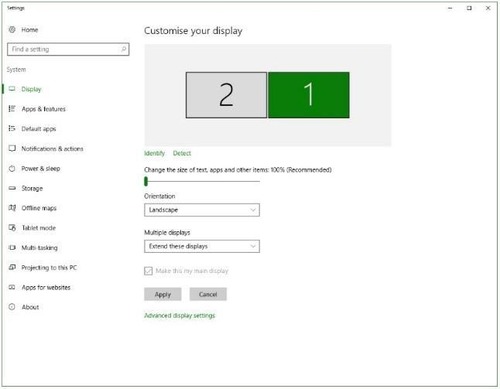
Once you have set up Windows Display Settings for multiple monitors, you can configure the Windows Display Settings for each display separately. Here's how:
- Step 1.Click on the display monitor you want to change the display setting for.
- Step 2.Clicking on the required display will allow you to change any of the available display settings individually. These changes will only affect the selected display and will not impact other displays.
Rearrange Multiple Displays on Windows
It is quite possible that you have multiple displays Windows 10 and you want to reorganize the logical display arrangements according to the physical placement of your displays. For example, you might have placed your secondary display to the left while logically it appears on the right of your primary display.
To fix this, you can go to Rearrange displays and click and drag the display on the left and drop it on the right side.
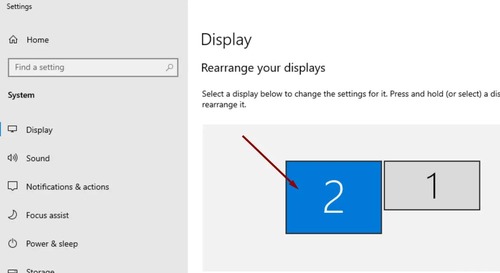
Therefore, if you want to change Windows display position Windows 10, 11, 8, or 7, you will be able to do it by following the above steps.
How to Show the Taskbar on Multiple Screens?
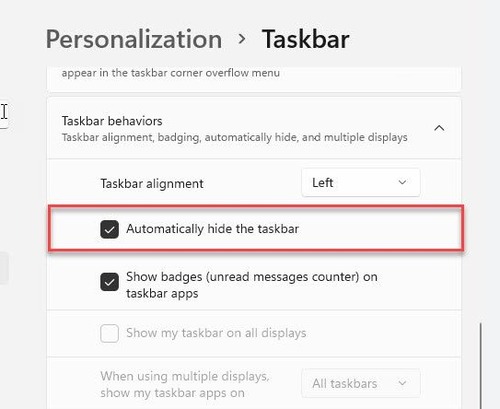
Oftentimes users want to extend the Windows taskbar across multiple screens. This not only allows quick taskbar access but also increases productivity. To expand the taskbar across all screens:
Windows Settings > Personalization > Taskbar > Taskbar behaviors > Show my taskbar on all displays
Change Background on Multiple Displays in Windows
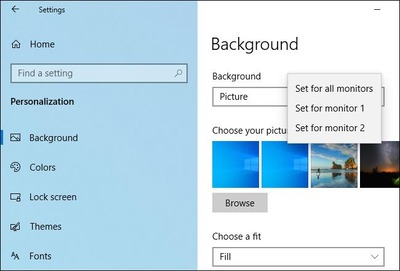
Users can also set individual backgrounds for each display. To set separate backgrounds:
- Step 1.Go to Windows Settings > Personalization > Background.
- Step 2.Then under Choose your picture select your desired background and right click on it.
- Step 3.Here you can select the option to set the background on multiple displays in Windows 10 or 11 or on a specific display of your choice.
Problems You May Have with Windows Display Settings
You may encounter some problems while fiddling with Windows display settings. But don’t worry. We will tell you how to do with the common issues.
Windows Display Settings Not Opening?
Some people would be wondering: why can’t I change my display settings? What to do when Windows display settings not opening? If you have the similar issues, try the following solutions:
1. Restart your system
Try turning it off and on again. Often this resolves display settings not opening issues.
2. Run System File Checker (SFC)
You can try running SFC command in command prompt utility.
- Step 1.Open Command Prompt by right clicking on the start menu and selecting Command Prompt or (CMD). Alternatively, you can also type in Windows Search.
- Step 2.Then type sfc/scannow and hit Enter.
- Step 3.Once the above command is executed, then type "exit" and press Enter.

3. Update your graphics driver
Another way of fixing display settings not opening is by updating graphics driver.
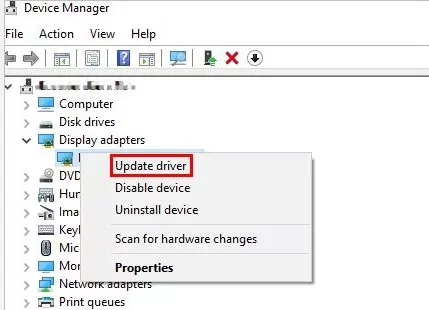
- Step 1.Open Device Manager by right clicking on the start menu and clicking on Device Manager. Alternatively, you can search for Device Manager in Windows Search.
- Step 2.Once Device Manager is launched, click on the Display Adapter installed on your system.
- Step 3.Right click on your graphics card and select Update driver.
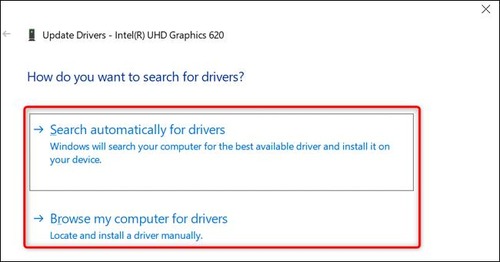
- Step 4.Now Update Drivers Wizard will be launched with two options: Search automatically for drivers and Browse my computer for drivers.
- Step 5.Clicking on Search automatically for drivers will let Windows automatically search for drivers online and install them. While clicking on Browse my computer for drivers will take you to the next step where you can browse the driver file on your system.
4. Upgrade your operating system
Although Windows 10 is still officially supported by Microsoft, it is worth noting that the latest Windows released from Microsoft is Windows 11. That is why if you are still facing display settings not opening issues for some reason, upgrading your OS might do the trick. The recommended way of upgrading to Windows 11 is to go to:
Windows Setting > Update & Security > Windows Update > Check for updates
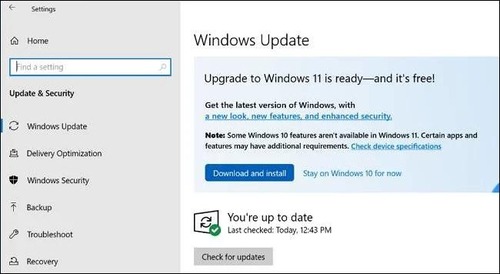
Your OS will check if your system meets the criteria to upgrade to Windows 11 and will notify you when the upgrade is available.
5. Reinstall your operating system
Another way of fixing Windows Display Settings not opening is by reinstalling the entire operating system. But before you begin, make sure to backup your important data.
- Step 1.Download the installation media from the official Microsoft repository.
- Step 2.Make a bootable USB drive with the Media Creation Tool.
- Step 3.Reboot your system to your bootable USB drive.
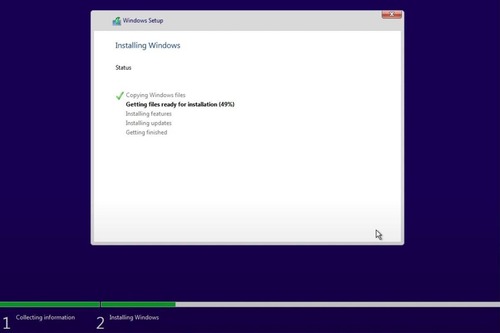
- Step 4.Follow along the Windows Installation steps and finish the Installation.
How to Restore Default Windows Display Settings?
There is no technique to reset all Windows Display Settings to default in Windows. However, you can manually go to each setting and set it back to its default value. Alternatively, you can reinstall Windows operating system to restore display settings.
Summary & FAQs about Windows Display Settings
In Windows Display Settings, users can adjust their system's display and customize their display experience as desired. While some of these options are well-configured, there are also few options that users may want to play with (such as Windows background).
This article provides a detailed guide for you to configure Windows Display settings, and you will find the information you need easily.
FAQs about Wireless Display Settings on Windows


Leave a Reply.