How to Stream on YouTube: Your Complete Guide to Get Started
It is quite easy to go live on YouTube; in fact, here is how it is done. You just need to fulfill the requirements and do it correctly; that's it. In this article on how to stream on YouTube, you will find the information you need on the process. Moreover, you will find the solution to all the problems you face regarding YouTube Live.
Part 1: YouTube Livestreaming Requirements
Going live on YouTube is slightly different from uploading recorded content on YouTube. What stops most people from going live on YouTube is the set of requirements that many people fail to meet. So, if you plan to learn how to stream on YouTube using your screen or webcam, you must meet the following requirements:
● Creating a YouTube channel and verifying it. The process is very simple, but it takes around 24 hours before you can stream on YouTube.
● Your channel must not face any livestreaming restrictions from YouTube during the last 90 days.
● Before you can stream live on YouTube from a Mobile, you must have at least 50 subscribers. However, there is no such requirement for computers.
Remember that YouTube offers privacy and security for kids. That is why users between the ages of 13 and 17 have private or unlisted default privacy settings when streaming from mobile.
Part 2: How to Go Live on YouTube
Once you meet all the requirements to stream on YouTube, your account is ready for streaming, and you only need to follow the steps below to go live whenever you want. Note that YouTube allows you to go live from mobiles and computers, and there are multiple ways of streaming. In this guide, we will cover all devices and methods that you may want to use for how to stream on YouTube:
- Step 1. Open YouTube and Click the Go Live Button
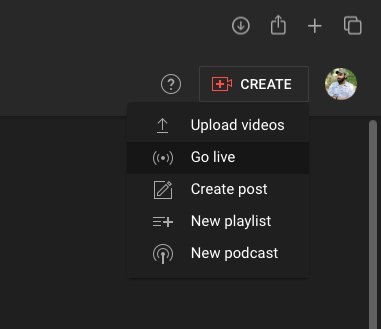
Your first step will be opening YouTube and clicking the Go Live Button. On the YouTube website, there is a Create button present on the top right that you can click to get the Go Live button. However, another way is to click your account, click YouTube Studio, and then click the Go Live button from the top right.

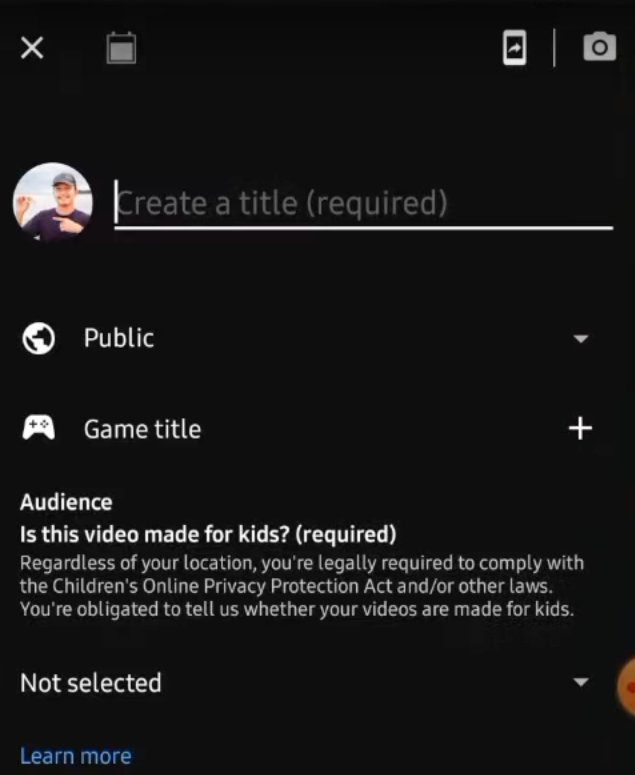
If you are using a mobile to go live on YouTube, you will need to click the + button from the bottom and swipe left under the shutter button to go live.
- Step 2. Select the Streaming Method
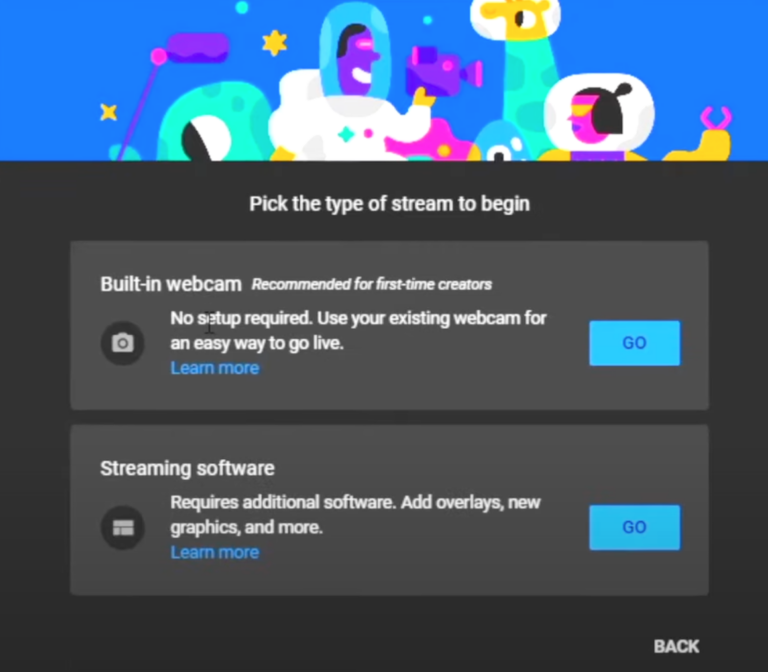
As you click Go Live, you will see a pop-up window asking for the streaming method. There are two options, which include the built-in camera and streaming software. Choose whichever method you want and click Go.

For the webcam option, you will stream yourself on YouTube through the camera. However, if you select streaming software, you can stream your gameplay or anything else on YouTube.On a mobile phone, you will not see a pop-up window for this option. Instead, there will be two options, including screen share and camera on the top right. That is where you will select your streaming method from.
- Step 3. Set Up Your Video Details
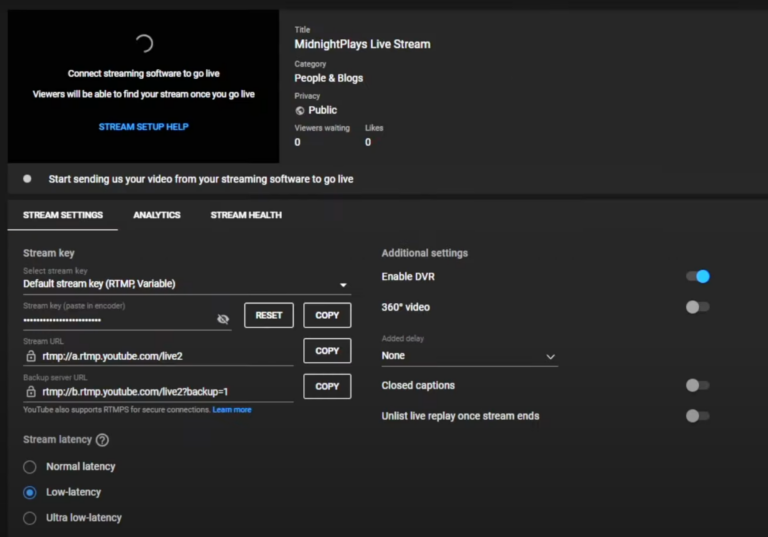
As soon as you are done with the streaming method, YouTube will start asking you for different details about the video that you are streaming. The first question will be about whether the type of content is for kids or not. If you select to stream with streaming software, you will get the following options including:
● Stream latency
● DVR
● 360-degree video
● Delay
● Closed captions
● Unlisting the life when it ends

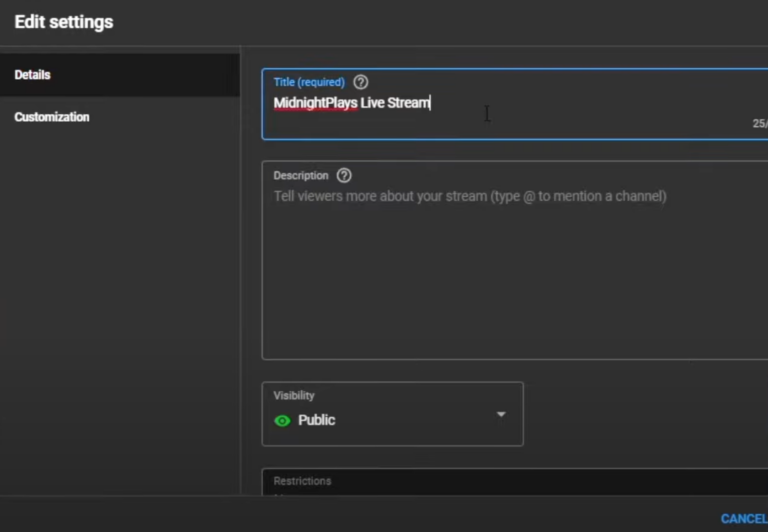
Upon clicking Edit from the top right side of the interface you can edit the Title, Description, restrictions, visibility, thumbnail, and other technicalities about your live YouTube video.

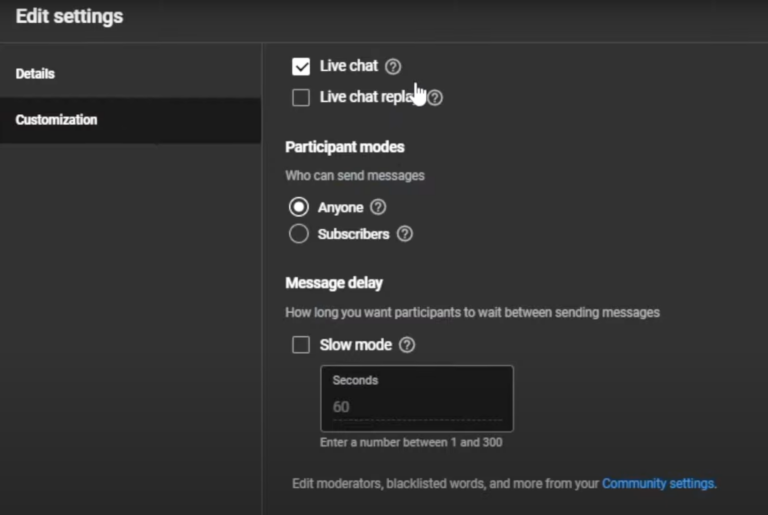
Under the Customization tab, there are some more options that you may set according to your requirements. These include Live Chat customizations, participant restrictions, message delays, etc. Even if you did not select streaming software but you wanted to stream with your webcam, you can edit these settings.

The best part is that even if you are streaming from your mobile phone on YouTube, you can edit all these settings right on the mobile phone YouTube app without needing to open the YouTube Web app. Hence, things become extremely convenient.
- Step 4. Using Stream Key with the Streaming Software
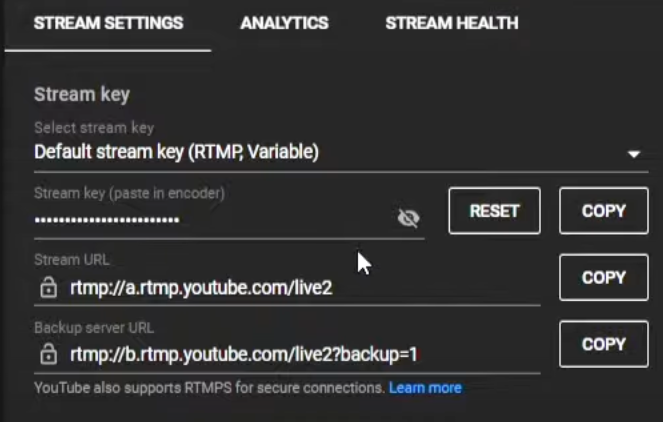
Under the stream settings tab, you will see the Stream Key option. That is where you need to copy your Stream Key from. A stream key is a key generated by YouTube to let users connect their YouTube with any compatible streaming software. This way, users can use the stream key for establishing and authenticating connection and the streaming software can easily stream the selected content.
In this example, we will use the OBS Studio, which is a great service for streaming on YouTube, and it comes with many other utilities like a recording screen. Open your OBS Studio, and under the Controls tab, you will click Settings.

Now go to Stream, and that's where you can select YouTube as your streaming service. Make sure that the server here matches the one that you selected on YouTube. Finally, insert your Stream Key in OBS and click Apply then OK. Simply click the Start Streaming button under the Control Tab, and OBS Sutido will start streaming the selected screen on YouTube with your selected settings.
If you are using a mobile phone and you want to live stream whatever is on your screen, you don't need third-party software like on a PC. Just while you are setting up your YouTube Live button, you can click the screen share button from the top instead of the camera, and YouTube will stream whatever content is available on your screen, making it very convenient.
Part 3: Solutions of Why Can’t I Stream on YouTube
There could be multiple reasons why you can't stream live on YouTube, even if you are doing everything right regarding how to stream on YouTube. Here, we will highlight those problems and discuss their solutions that you can follow as well:
1. Your YouTube Account is not verified. You must provide a phone number to receive a verification code. It helps YouTube ensure that you are a real user.
2. There are some channel strikes on your account. If your YouTube channel has some strikes or restrictions in the past, you must wait for them to be resolved.
3. If you have not enabled YouTube live streaming on your account, you must enable it and that can take up to 24 hours.
4. There is some sort of compatibility issue with your streaming software. You can resolve it by updating or replacing the streaming software
5. The streaming settings and your internet connection are not compatible. Either increase your internet speed or decrease your streaming settings;
6. If there is a temporary ban on your account, you must wait for it to expire before trying again.
7. If your content violates YouTube’s content policies, you must review it and ensure that you do not violate any policies. In some cases, you may need to wait for the restriction to expire.
With all these problems solved, you can now effortlessly stream on YouTube.
Part 4: Final Words
Were you also looking for how to stream on YouTube from your PC or Mobile? We hope that this guide has helped you with the detailed steps and now you can easily stream on your channel. Remember that the main thing here is meeting minimum requirements, and going live on YouTube will become simple for you.


Leave a Reply.