How to Use VLC to Record Screen (FREE)
We often use screen recording softwares to capture our computer screen, but most of them are either paid or have limited features.
However, if you have VLC Media Player installed on your computer, you can use it as a free screen recorder as well. Yes, the same media player you use to play videos.
Here's a complete guide on how to use VLC Media Player to record screen (with audio) on your Windows or Mac computer. Plus, you'll find some helpful tips to make your recordings even better.
- Part 1 : What is VLC Media Player?
- Part 2 :How to Use VLC to Record Screen with Audio on Windows/Mac?
- Part 3 :How to Record Your Webcam with VLC?
- Part 4 :Tips for Using VLC Media Player
- Part 5 :Bouns Tip: How to Screen Mirror iPhone on PC with Audio?
- Part 6 :Conclusion and Hot FAQs about Using VLC to Record Screen
Part 1. What is VLC Media Player and How to Enable It?
VLC is a widely used multimedia player for playing various types of media files. It is an open-source, cross-platform player that supports almost all video and audio formats.
It also has a little-known feature that allows you to record your screen and audio, which is available on both the Windows and Mac versions of VLC.
The best part is that it's completely free, so you can use it without spending anything.
That being said, the VLC record video feature is usually hidden in the user interface, and you need to enable it first. Don't worry, though, it's very easy to do.
To enable the VLC record screen and audio feature, follow these steps:
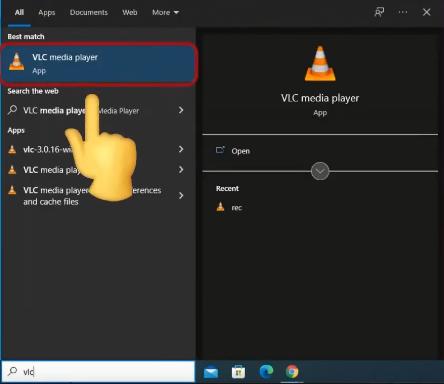
- Step 1. Launch the VLC Media Player on your desktop.
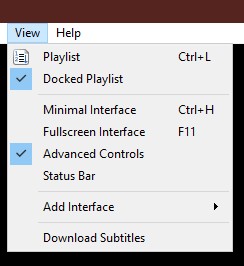
- Step 2. Go to the "View" tab and tick mark the "Advanced Controls" option.
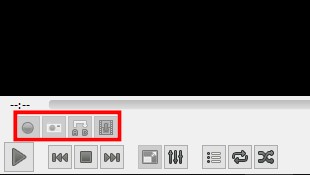
- Step 3.You will see a red "Record" button appear next to the Play button.
Part 2. How to Use VLC to Record Screen with Audio on Windows/Mac?
1. Use VLC to Record Screen with Audio on Windows
Now that the screen recording feature is enabled in VLC, it's time to figure out how to use it on Windows. Recording your screen with audio in VLC is quite straightforward, and you can easily adjust the settings to suit your needs as well.
You can adjust useful settings like video format, frame rate, and audio source. Most importantly, you also have the ability to choose a suitable video format. This means you can record your screen in your desired format without needing to convert it later.
Learn how to screen record with VLC and adjust these settings below.
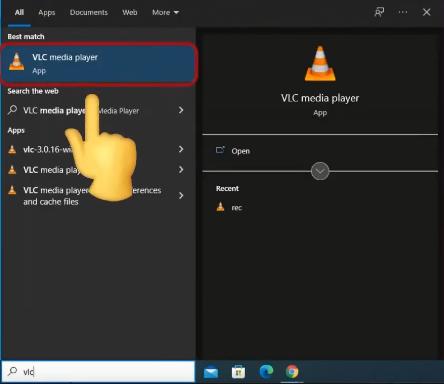
- Step 1. Open VLC media player by double-clicking its shortcut, or search for it using the Windows search bar.
- Step 2. Click "Media" on the VLC menu bar, then select "Convert/Save".
- Step 3.In the pop-up window, go to the "Capture Device" tab. Set the capture mode to "Desktop" and select the frame rate you like.
- Step 4.Click "Convert/Save" on the bottom right. Choose your file format, and decide where you want to save the video.
- Step 5.After setting it up, press "Start" to start recording your screen. To stop, press the "Stop" button on VLC media player.
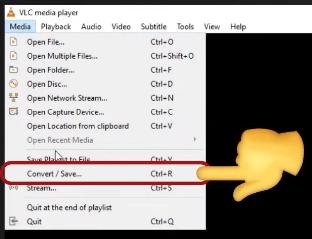
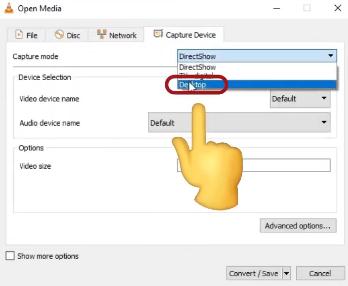
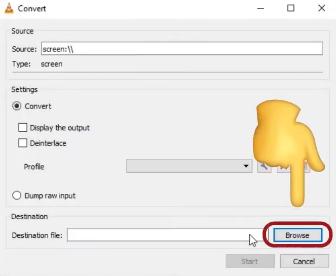
![]()
Video Tutorial: How to Use VLC to Record Screen with Audio on Windows
2. Use VLC to Record Screen with Audio on Mac
Since VLC is a cross-platform media player, you can use it to record your screen on Mac as well - just like on Windows.
Recording your screen with audio on a Mac using VLC is pretty much the same thing, the only real difference is the interface and how you navigate through the menu bar or settings.
Just follow these simple steps to record your Mac screen with VLC:
- Step 1. Let's start by opening VLC media player on your Mac. You can use Launchpad to do this.
- Step 2. Now, go to the VLC menu bar. Click on "File" and then select "Open Capture Device".
- Step 3. A new dialog box will appear. Here, you'll select "Screen" as your capture mode and choose the frame rate you want.
- Step 4. Next, hit the "Settings" button in the bottom right corner. Select your preferred video format and where you want to save your recording.
- Step 5. Click "OK" to close the settings. Then, press "Open" at the bottom right to start your recording.
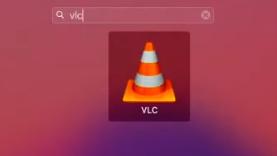
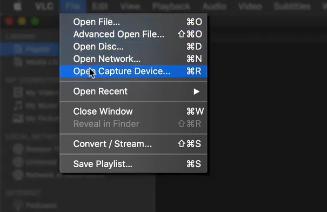
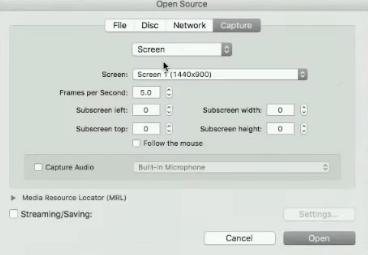
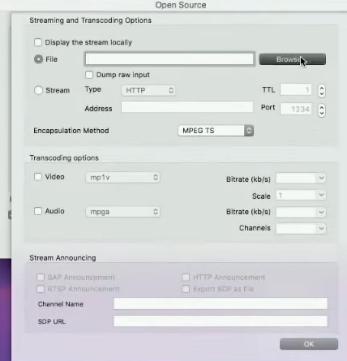
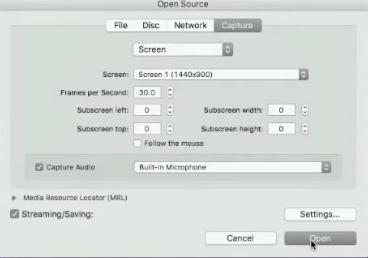
When you're done, just click the "Stop" button to finish. Your screen recording will be waiting for you in the folder you selected.
Video Tutorial: How to Use VLC to Record Screen with Audio on Mac
Part 3. How to Record Your Webcam with VLC?
Capturing your computer screen with VLC on both Windows and Mac is super easy. However, you may also want to record your webcam.
This feature is especially useful if you're recording a tutorial or presentation and want to add footage of yourself speaking. With VLC, you can easily add your webcam to the screen recording process.
Here's how you can record your webcam with VLC:
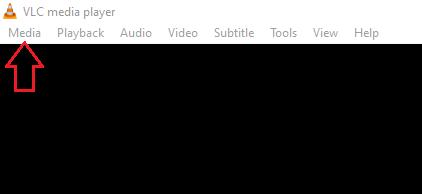
- Step 1. Open VLC Player and select the "Media" tab from the top menu.
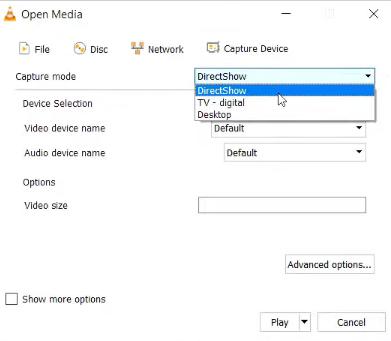
- Step 2. Click "Open Capture Device" and choose "DirectShow" for Capture Mode.
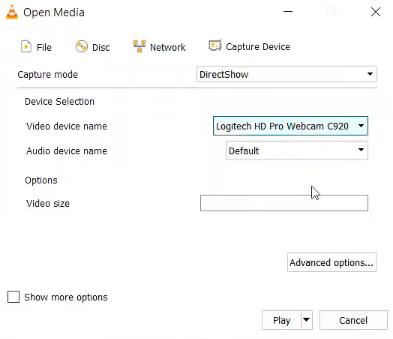
- Step 3. In the same window, select your audio and video devices. For Video Device Name, choose your webcam.
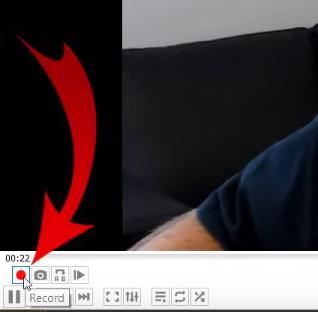
- Step 4. Adjust other settings, such as frame rate, to your preference. Then click the "Record" button.
Part 4. Tips for Using VLC Media Player
VLC has made the process of recording the desktop screen hassle-free for anyone. You no longer need to deal with watermarks or recording time restrictions that are usually associated with free screen recording tools.
To make sure your screen recording experience with VLC is even better, here are some tips you can follow:
Tips
- Adjust Frame Rate: Frame rate significantly affects the quality of your video. For basic screen recording, 5-15 fps works well, but for higher quality, aim for 30 or 60 fps.
- Webcam Advanced Options: When using the webcam, click "Advanced Options" for more control. You can tweak the video input frame rate, webcam preset frame rate, aspect ratio, and more.
- Convert Video Formats: VLC also offers a conversion tool. To change the media format, go to the Media option, select Convert/Save, then add your file and select the Convert option.
- Add Watermarks: To watermark your recording, go to Tools > Effects & Filters. Click the Video Effects tab, select "Overlay" and add the desired image or text as your watermark.
- Trim Videos: If your recording time is not perfect, you can trim it in VLC. Play the video, press the "Record" button (red dot) to start and stop recording at your favorite points.
Part 5. Bouns Tip: How to Mirror iPhone Screen on PC with Audio
Recording your screen on Win/Mac using VLC Media Player is incredibly simple. If you want to learn how to mirror your iPhone on Win/Mac with audio, don't miss out on this part.
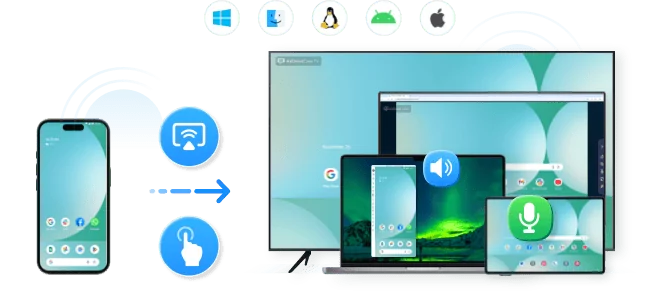
Using AirDroid Cast, a screen mirroring app, to mirror your iPhone to Win/Mac with audio is undoubtedly the best choice. It not only mirrors the content from your iPhone to your computer but also captures the internal audio from your iPhone and even transmits the sound from your iPhone's microphone. This is particularly useful for conference presentations.
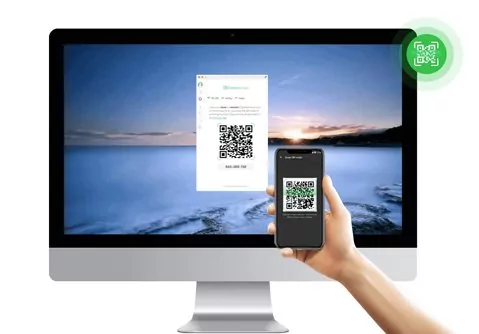
Moreover, AirDroid Cast currently offers free mirroring functionality, so if you're interested, don't hesitate to give it a try right away.
Below are some simple steps on how to mirror iPhone on Win/Mac using AirDroid Cast.
- Step 1. Download AirDroid Cast to your phone and computer from the App Store or the official website.
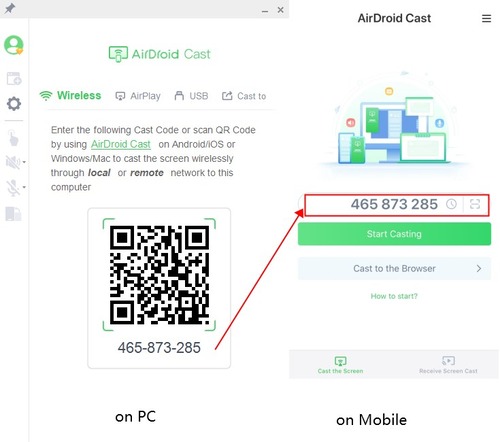
- Step 2. Open AirDroid Cast on your computer and select the "Wireless" connection option. Your computer screen will then display a QR code and a code string.
- Step 3. Open AirDroid Cast on your iPhone and tap "Cast the Screen". Then, enter the code displayed on your computer into the input field below.
- Step 4. Follow the on-screen instructions to complete the setup, and your phone will be mirrored to your computer.
- Step 5. Click the speaker icon on the left sidebar of AirDroid Cast on your computer and follow the prompts to configure the audio settings.
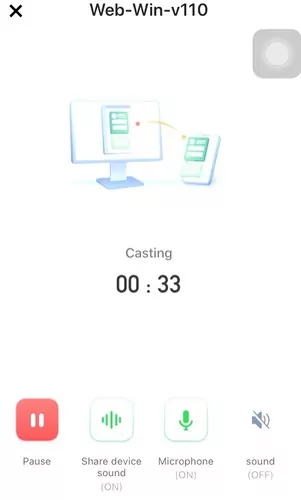
Now, you can mirror your iPhone to Win/Mac with audio.
Conclusion
VLC is the go-to media player for a lot of computer users. But, many of us don't know about its useful screen recording feature - which is absolutely free. With just a few simple clicks, VLC lets you record your computer screen along with audio on both Windows and Mac. Plus, the ability to adjust settings and select the video format of your choice provides even more convenience for users.
Hot FAQs about VLC Media Player Record Screen





Leave a Reply.