How to Disable Auto Rotate Permanently (Windows & Android)
1Disable Auto Rotate Capability
The default method to turn off auto rotation is through the device settings or quick setting panel. However, many users find that even after turning off the feature, the device still can rotate, and they don't understand. The problem can be due to many reasons, such as sensor or hardware glitches and app-specific behavior. You can also encounter this issue if certain developer settings are enabled on the device.
Whatever the cause, you can disable the auto-rotate capability. Disabling auto rotation means applying advanced methods to prevent the feature from being easily turned back on. And that's what this article is about.
It will help you fix the problem that auto rotate is off but still rotating. Unlike the standard measures, the ones discussed here are permanent or more restrictive.
2How to Disable Auto Rotate
2.1Pro Method: Third-Party Apps (Android/Windows)
Method 1. Disable Auto-rotate using an MDM tool
MDM (Mobile Device Management) tools are an excellent way to disable the auto-rotation feature. They are ideal for enterprises.
Why you should consider using an MDM tool:
- It saves you time because you're simultaneously applying the settings on all devices.
- You can disable auto-rotate remotely across all devices from a centralized location.
- Settings are consistent across all devices, which helps avoid potential errors.
AirDroid Business is one of the best MDM tools for business. With it, you can manage the screen orientation on all enterprise-owned devices with simple steps.
Let's see how this method works out step by step
Step 1 Sign in to AirDroid and go to Policy & Kiosk > Policy & Kiosk Config Files > Create Config File. Follow the prompts to complete the file's creation.

Step 2 Assign a device(s) that will apply this Config File.
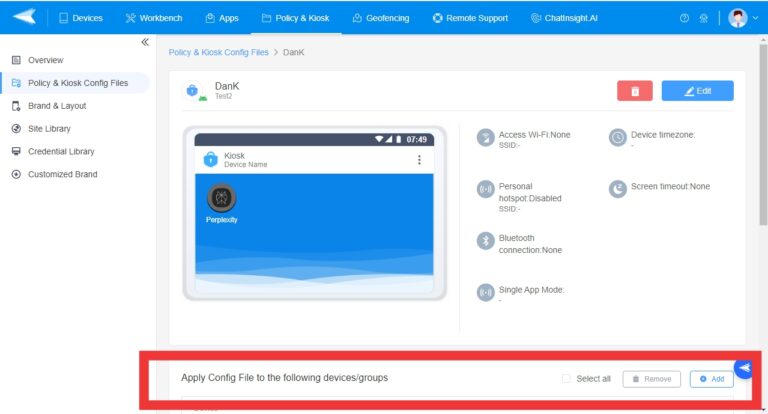
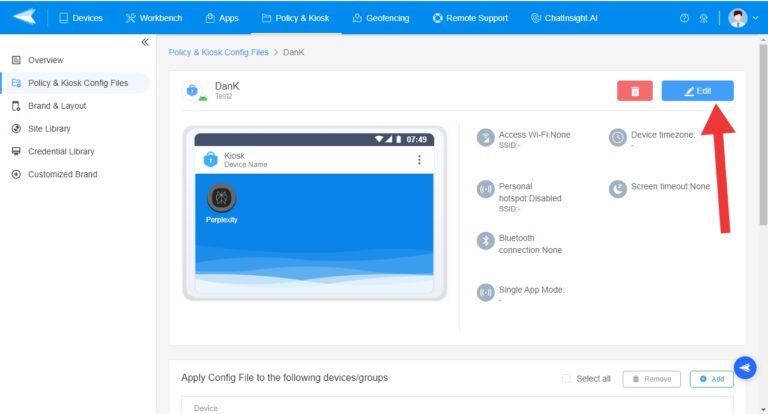
Step 3 Once you’ve added the device(s), choose Edit to open the View & Edit tab.
Step 4 In the View & Edit tab, find and disable auto rotate for the assigned Android device(s).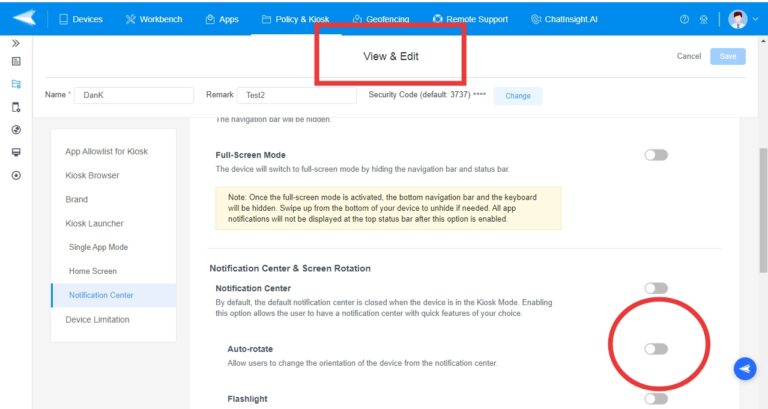
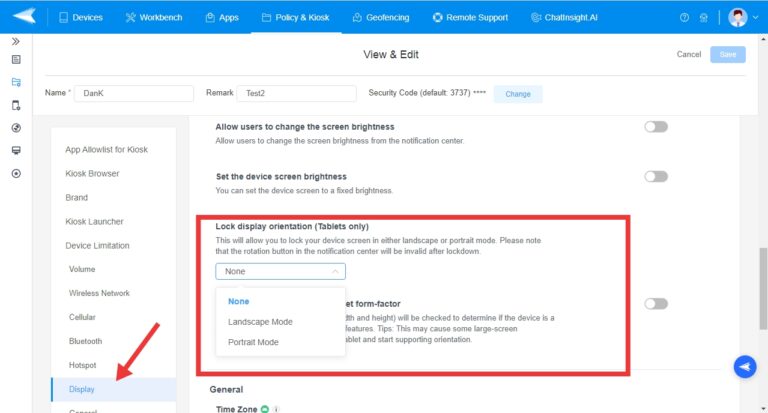
Method 2. Other Third-Party Apps (Android)
There are many non-MDM, third-party apps out there. Rotation Control is one of the most popular screen orientation apps for Android. It can enforce screen orientation settings and prevent changes.
Follow these steps:
Step 1 Go to the Play Store and install the Rotation Control app on your Android.
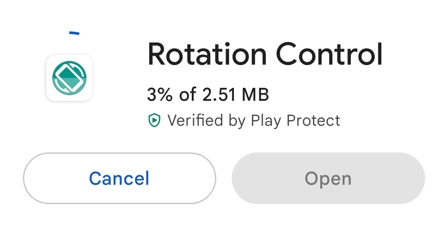
Step 2 Once installed, open the app and turn on the button next to “Allow modifying system settings.”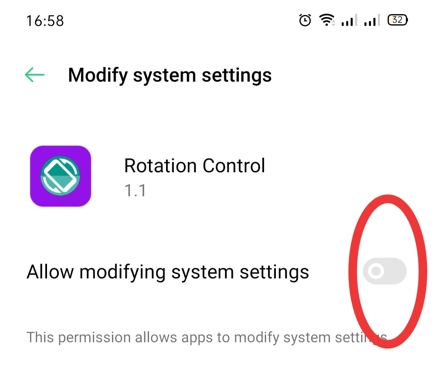
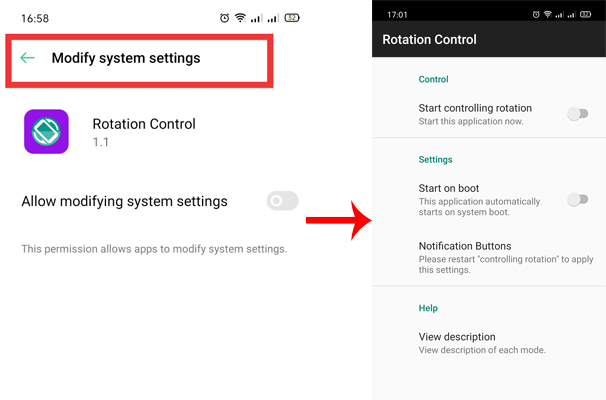
Step 3 Tap the “Modify system settings” arrow. Then, turn on the app’s control function and choose whether it should start on boot.
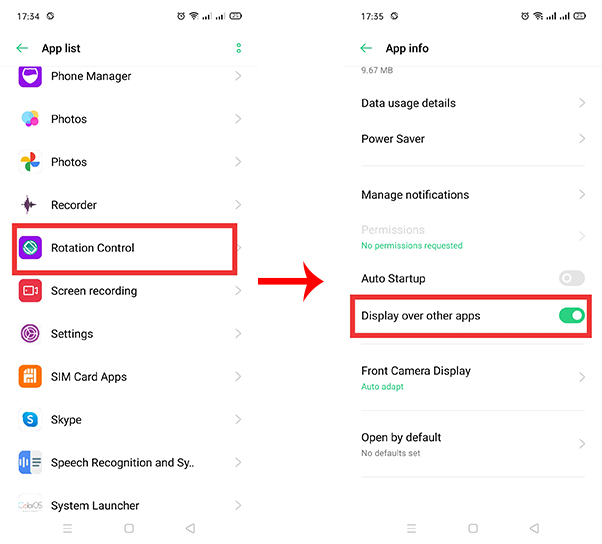
Note : Ensure you’ve given the app permission to “Display over other apps.” Go to Settings > App Management > App list and Find Rotation Control.
Here’s why we recommend Rotation Control:
- The app allows you to choose from various screen orientation features.
- It also lets you override system apps and settings that usually manage rotation.
- You can force the screen to stay in landscape or portrait mode.
Shortcomings:
- The app allows you to choose from various screen orientation features.
- It also lets you override system apps and settings that usually manage rotation.
- You can force the screen to stay in landscape or portrait mode.
2.2Custom ROM or Firmware Modification (Android Only)
You can also disable auto rotate on Android using Custom ROMs or do it by modifying firmware. Check below.
Method 1. Custom ROMs
ROM (Read Only Memory) is a firmware often saved on a device's internal memory. A user can modify ROMs to include certain features. These modified ROM versions are called Custom ROMs.
There are many out there, including LineageOS. These ROMS have settings that allow you to change the auto-screen rotation behavior or deactivate it permanently.
Follow these steps:
Step 1 Install a custom ROM of your choice.
Step 2 Go to Settings > Display > Auto rotate after installation.
Step 3 Turn off the Auto rotate; use additional settings to disable the function to your liking.
Method 2. Modifying Firmware
You can adjust the build-prop file to change settings, including disabling auto rotate for good. Follow these steps:
Step 1 Root your phone if needed.
Step 2 Open a file manager with root access and go to the /system/ directory. Then, launch the build.prop file.
Step 3 Add a line to disable auto-rotation, as shown in the screenshot below.

Step 4 Save the file, then restart your device.
2.3Windows-Specific Methods
Method 1: Device Manager
This method entails disabling the sensor driver responsible for screen orientation detection, such as the IntelⓇ Integrated Sensor Solution driver. In other words, this method only applies to devices that use sensor input to control screen orientation, including 2-in-1 laptops, tablets, and touchscreen laptops.
Follow these simple steps:
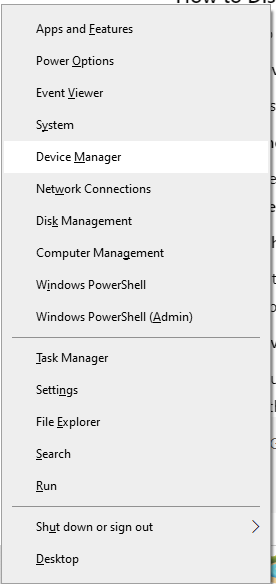
Step 1 Press the Windows + X buttons, then select Device Manager.
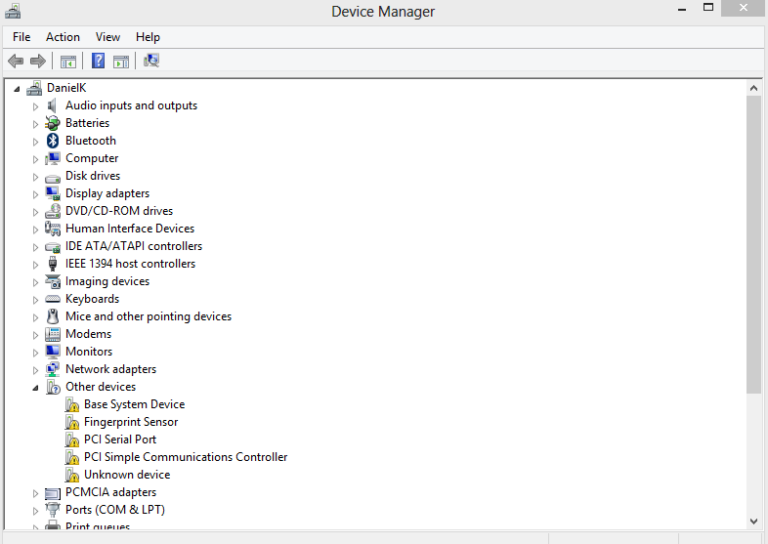
Step 2 In Device Manager, expand the Sensors category. Look for a name like HID sensor collection, Accelerometer, or Microsoft sensor. The exact entry varies, depending on your hardware. You can also find the relevant sensor under Human Interface Devices (HID).
Step 3 Right-click on the specific sensor to open a dialog box.
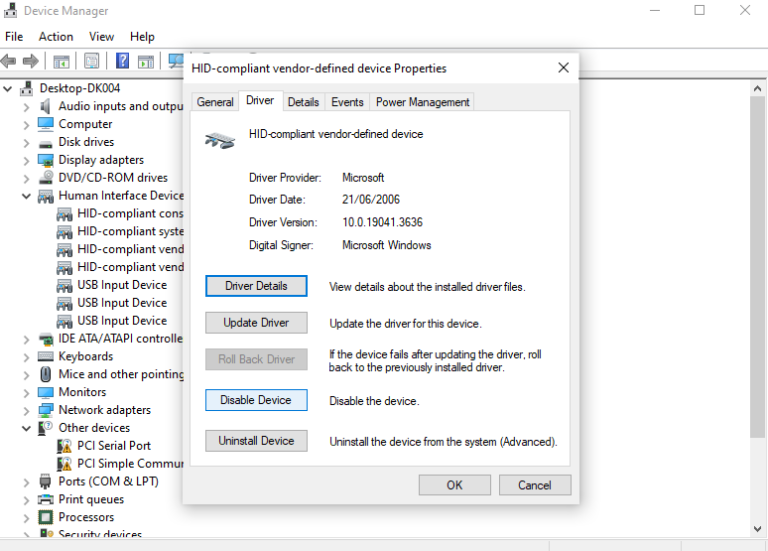
Step 4 In the Driver tab, click Disable, then tap Yes to confirm your action.
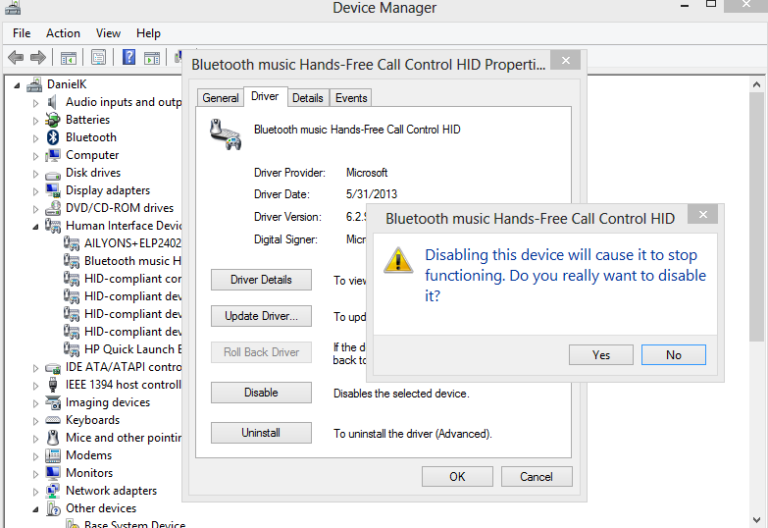
Step 5 Click OK to save the changes and exit the Task Manager.
Method 2: Registry Edit
This method involves modifying registry entries. Here’s how to go about it:
Step 1 Press Windows + R on your keyboard to launch Run.
Step 2 Type “regedit,” then click OK or hit the Enter button.
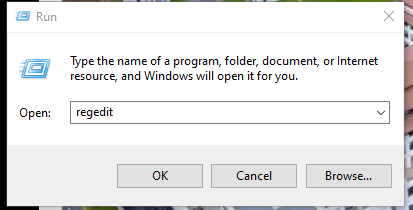
Step 3 You’ll see a prompt, “Do you want to allow this app to make changes to your device?” Choose Yes to open the Registrar Editor.
Step 4 Follow the path: HKEY_LOCAL_MACHINE > SOFTWARE > Microsoft > Windows > CurrentVersion > AutoRotation. Then, double-click on Enable on the right-hand panel.
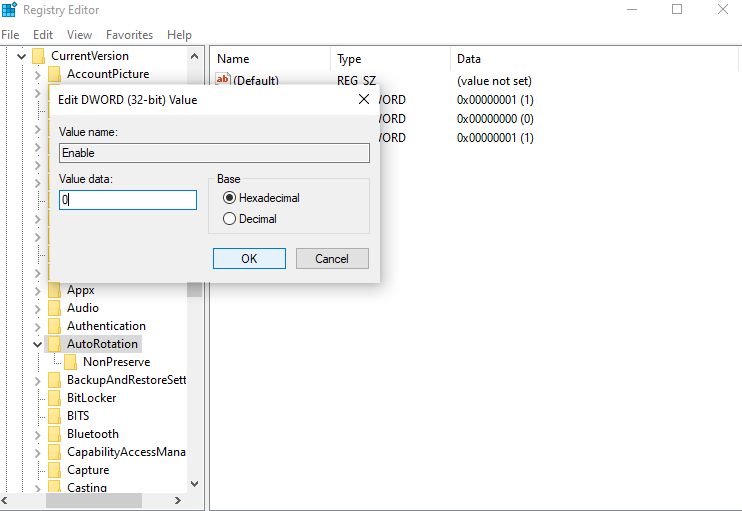
Step 5 Enter value 0 (zero) in the data textbox, then click OK to turn off the auto screen rotation feature. Close the registry editor and restart your computer.
Editing the registry requires caution. A slight mistake could lead to unwanted consequences, such as data loss. But the good news is that this modification is unlikely to affect any data. You're simply turning off auto-rotation, so the specific registry entry will only impact display behavior.
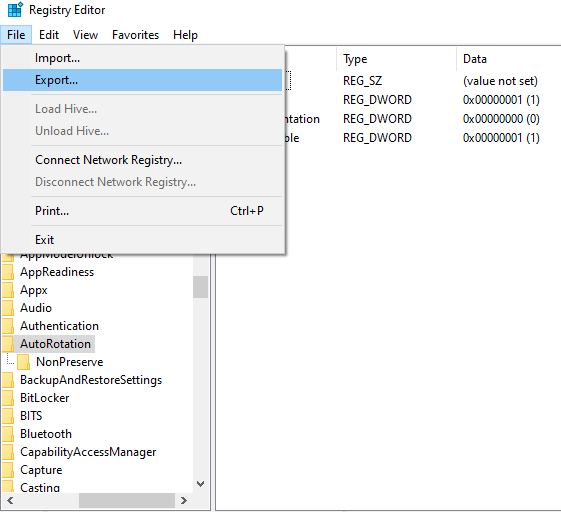
However, to ensure safety, you can back up the registry before making changes. To do that, open the Registry Editor, then select File > Export to save the registry.
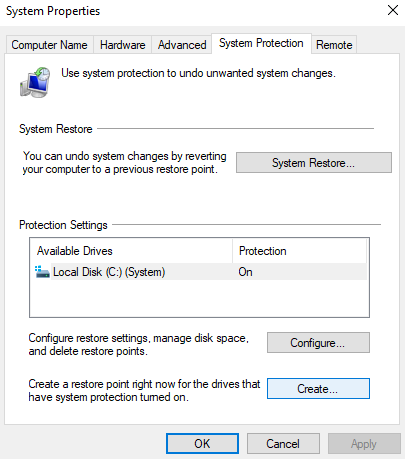
You can also create a system restore point to restore your PC to previous working settings if needed. Simply click the Start menu and search for "Create a restore point." Then click on Create in the System Protection tab.
Conclusion
We've discussed different ways to turn off auto rotation on Android and Windows. MDM tools are the best way to do this for enterprises. They allow you to configure multiple devices simultaneously from a centralized location. That enhances security and compliance and saves ample time for IT admins. Sign up for Airdroid Business now and control your enterprise-owned devices with a few clicks!


Leave a Reply.