How to Enable/Disable Windows Recovery Environment (WinRE) for Windows 10/11
Windows Recovery Environment (WinRE) is one of the crucial components of Windows, especially when it comes to system recovery. It allows troubleshooting the issues related to startup without a need to reinstall Windows. For example, it helps with startup problems like failure to boot or files getting corrupt. It helps in combating not just the booting issues but also the issues that relate to disruption of normal operation, e.g., stop error.
This article provides an introduction to what WinRE is, who would benefit from enabling it, and a step-by-step guide on how to enable or disable it using Registry Editor, Powershell, Command Prompt, and an MDM provider.
Quick Answer: How to Enable or Disable WinRE
The fastest way to manage the Windows Recovery Environment (WinRE) is by using the Command Prompt. To enable WinRE, open Command Prompt as an administrator and run the command reagentc /enable. To disable WinRE, use the command reagentc /disable. You can check the current status at any time with reagentc /info.
1 Understanding Windows Recovery Environment (WinRE)
1 What is Windows Recovery Environment?
WinRE is a handy set of troubleshooting tools for Windows that helps resolve issues related to normal booting and operation. It offers certain tools to take your system out of a situation where it is stuck with an error and doesn’t start or operate normally. For example, some of the common repair tools it offers are:
- Command Prompt: Run suitable commands for file management, diagnostics, and repair.
- System Restore: Wipe out the changes that are causing issues and bring the system back to a restore point.
- PC Reset: Reinstall Windows to get rid of major unresolved issues.
- Safe Mode: A minimal environment boot to diagnose and repair the problems.
- Uninstall Apps: Eliminate problematic software and apps causing hurdles in normal operation.
In short, WinRE helps you diagnose and resolve the issues quickly without needing a complete reinstallation.
2 Should I Enable WinRE?
While there are significant advantages of having WinRE enabled for Windows 10/11, in some cases there can be some drawbacks to it as well. Let us explore both the pros and cons on individual and enterprise levels.
Category | Pros | Cons | Example Use Cases |
|---|---|---|---|
| For Individuals | ● WinRE provides free-of-cost solutions to a number of common startup and performance issues. ● Using WinRE does not call for an advanced level of expertise and can hence be used by laymen as well without in-depth technical knowledge. | ● If the recovery partition gets corrupted, WinRE becomes useless. ● Some tools can cause loss of data, like Reset PC. | You have just recently installed a new app or software that makes the system act abnormally. For example, a blue screen, or stop signal, or frequent hanging. You can use WinRE’s tool ‘Uninstall Apps’ to get rid of the problematic software. |
| For Enterprises | ● Quick and simple diagnosis and repair through WinRE means significantly reduced downtime in case of any issues. ● WinRE allows IT managers to establish consistency across the company’s IT assets. ● It allows centralized management and also restricts unauthorized changes to the system because it requires admin credentials to operate. ● WinRE can be integrated with an enterprise’s recovery protocols. | ● With WinRE, cyber attackers get a way to enter the system and bypass the security, especially when it is not configured properly. ● Integrating WinRE with already existing security protocols is a complex process. | WinRE allows remote troubleshooting when any of the devices is facing issues and the admins can use it to resolve the issue without accessing the device. |
2 How to Check If WinRE Is Enabled?
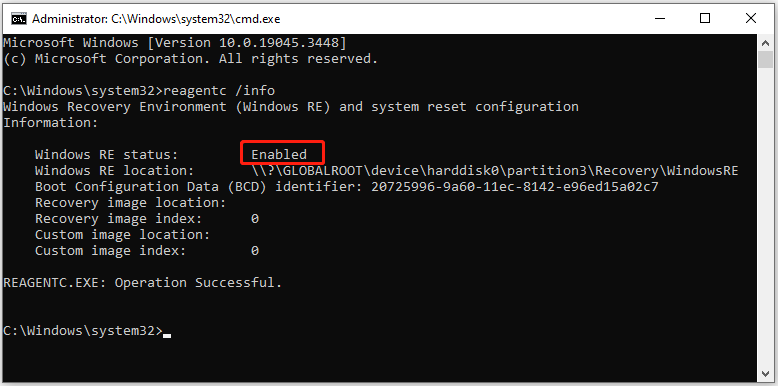
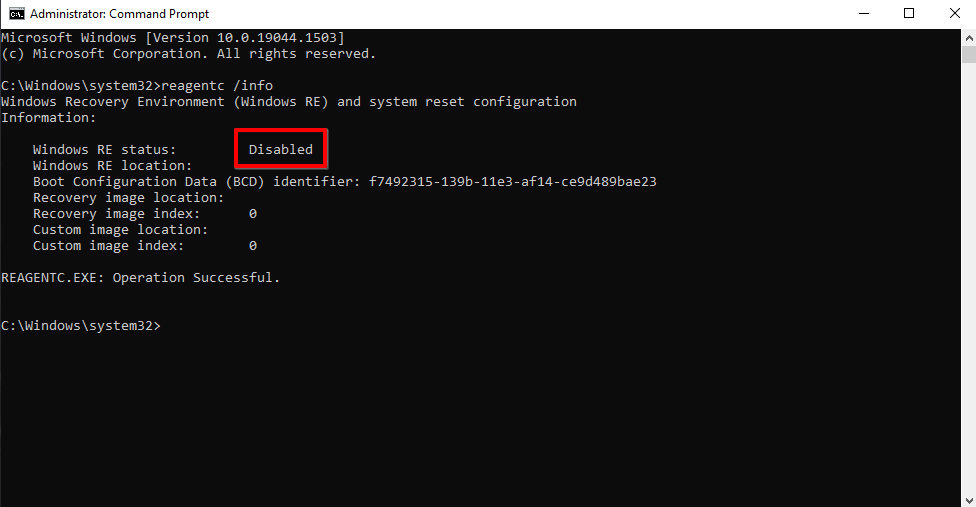
In order to check the status of WinRE, i.e., whether or not it is enabled on your PC, follow these steps:
- Step 1: Open a command prompt (press the Windows key and type cmd in the search bar, in the list right-click Command Prompt or Command Prompt Admin, click ‘run as an administrator’).
- Step 2: Now paste the command ‘reagentc /info’ in the command prompt and press the enter key.
- Step 3: Next to ‘Windows RE Status’ you will either see ‘enabled’ or ‘disabled’.


3 How to Enable/Disable Windows Recovery Environment (WinRE) on Windows 10/11?
There are several ways to enable or disable WinRE on Windows 10/11. Some of the common ones include using Command Prompt, Registry Editor, Powershell, and an MDM service for enterprises. Let us explore these options one-by-one.
1 Method 1: Enable/Disable Windows Recovery Environment (WinRE) By Using Command Prompt
- Step 1: Open an elevated command prompt (press the Windows key and type cmd in the search bar, in the list right-click Command Prompt or Command Prompt Admin, click ‘run as an administrator’).
- Step 2: Copy this command and paste it into the elevated command prompt: reagentc /enable

- Step 3: Once pasted, press enter and you are done.
- Step 4: In order to disable WinRE, use this command instead: reagentc /disable

2 Method 2: Enable/Disable Windows Recovery Environment (WinRE) via Registry Editor
- Step 1: Press Windows+R keys simultaneously to open a Run Dialogue.
- Step 2: In the provided space, type ‘Regedit’ and click ‘ok’ to open Windows Registry Editor.

- Step 3: Now follow this path: Computer\HKEY_LOCAL_MACHINE\SYSTEM\CurrentControlSet\Control\Session Manager

- Step 4: In the right pane, navigate and open ‘BootExecute’ and type ‘autocheck autochk’ in the value data field and click ok. The WinRE is enabled.
- Step 5: If you want to disable it, remove the text in the value data field and press ok.

3 Method 3: Enable/Disable Windows Recovery Environment (WinRE) via Powershell
- Step 1: Open Powershell as an admin.
- Step 2: Use this command reagentc /enable to enable WinRE if it is disabled. (you can use reagentc /info to check the status first).
- Step 3: To disable, use the reagentc /disable command if you want to disable WinRE using Powershell.


4 Troubleshooting Common WinRE Issues
Although WinRE is a handy set of tools for resolving a number of issues, it too can undergo issues sometimes. Let us have a look at some of the common problems people and organizations face while trying to use WinRE and how to resolve them.
1 REAgentC Does Not Enable Windows RE
This issue arises mostly when an RE Image File in \\Windows\\System32\\Recovery folder is either missing or has been corrupted. In such cases, you get an error every time you try to enable WinRE. Here are some of the possible solutions to the problem:
- Look for the Winre.wim file in \Windows\System32\Recovery folder. If it is missing, copy it from a computer with the same version of Windows or from Windows installation media.
- To set a location for the image file, run this command: reagentc /setreimage /path
. For instance, if the file is located in C:\Windows\System32\Recovery, the command would look like this: reagentc /setreimage /path C:\\Windows\\System32\\Recovery. - Use the command reagentc /enable to enable WinRE. But if you are getting an error, try disabling it first using this command reagentc /disable and then try enabling again.
- Another possibility is that your system files for WinRE might have been corrupted. You can run a scan and fix the corrupted files using SFC (System File Checker). To do so, open a command prompt and use this command: sfc /scannow. Once SFC has found corrupted files, it will try to fix them.
2 The Windows RE Image Was Not Found
If this error appears while trying to enable WinRE, the most appropriate step to resolve it would be running an SFC (System File Checker) scan. To do this, open the command prompt and type this command: sfc /scannow. SFC will then run a scan and try to fix the missing or corrupted files.
3 Issues After Conversion to GPT
If you’ve converted to GPT (UEFI) and an error appears ‘failed to update reagent.xml, please try to manually disable and enable WinRE’. But can’t enable WinRE because it can’t find the files, try copying an image file ‘winre.wim’ from a computer with the same version of Windows or from installation media.
After doing so, if the partitions have been created but the REAgentC still gives an error (i.e., an error encountered by users by the name b7), try deleting files like ‘Reagent.xml’ and ‘Reagent_merged.xml’ on C:\Windows\System32\Recovery. After deleting these files, the reagentc /enable command will create a new .exe file and hopefully, the error will be fixed.
5 Advanced Tips for Managing WinRE
For advanced users, here are a few handy tips for managing WinRE efficiently.
Enabling WinRE with BitLocker On
When you have your BitLocker encryption turned on, enabling WinRE can encounter problems, especially when you have not installed the latest Windows updates or are using an older Windows version. For example, one of the common problems encountered by some users is that their WinRE cannot be enabled using the command reagentc /enable because the BitLocker is on.

If you face this problem, turning off BitLocker, then turning WinRE on, and finally turning on BitLocker back again and then running the command reagentc /enable might solve the problem, but it is a really time-consuming and tiring solution. To resolve this issue the easier way, here are the two appropriate things to do:
- Microsoft recommends installing the latest updates released after 13th August, 2024. These updates automatically fix the issue of Windows 10/11 automatically entering the BitLocker encryption recovery interface.
- If you have encountered the problem already, you need to enter the BitLocker recovery key to unlock.
Entering WinRE from Boot
Here are a couple of methods you can use to enter WinRE from boot:
- Method 1: Through Advanced Startup Options Menu
- Restart your computer.
- During boot, press down on the ‘shift’ key and select ‘restart’ from the power menu at the same time.
- As the system starts again, it will give you access to the Advanced Startup Options menu including WinRE.
- Method 2: Through Windows Installation Media
- Boot by using a DVD or USB with Windows Installation Media.
- Now select ‘repair your computer’ and you will be able to enter WinRE.
- Method 3: Powering off During Boot
- Power off your computer at least three times consecutively during boot, and as the Windows boot again, it will enter WinRE automatically.


Leave a Reply.