How to Activate Windows Defender? A Step-by-Step Guide
Windows Defender is a built-in feature in the Windows operating system that provides real-time protection against malicious attacks including spyware, ransomware, viruses, and ransomware on your computer. It does this by scanning the files, websites, and programs you run on your computer in real time to ensure your computer and respective files are secure.
For example, if you are running an enterprise and using multiple computers, activating Windows Defender will help safeguard your business files and data against malicious threats, ensuring that you have the peace of mind to concentrate on the most critical aspects of your business. In this article, we’ll tell you more about how to enable windows defender.
1 The Importance of Activating Windows Defender
Windows Defender does create a layer of security on your Windows powered machine. It’s essentially created to help thwart common security threats that can infiltrate your windows device.
Here are some of the benefits of activating Windows Defender and why you should know how to activate windows defender:
● It provides a 360-degree visibility on security threats like viruses to your computer and its respective data/files.
● It ensures threat monitoring automation and response since it provides real-time scanning and action on malicious activities.
● Activating Windows Defender reduces the cost of installing several other costly anti-malware apps/services on your computer because it protects you against a variety of attacks including spyware, ransomware, and virus attacks.
● It allows you to perform manual scans whenever you want to, thus making it useful especially if you suspect malicious activity on your computer.
2 How to Activate Windows Defender?
As aforementioned, it is important to ensure that your Windows Defender remains active on your computer to protect your device. Now, if the Windows Defender on your computer is not activated, you can simply activate it! And, there are actually several ways to do so. Let’s look at how to enable windows defender in windows 10 and 11.
1Through Windows Security Center
Windows Security Center gives you the settings to activate or deactivate Windows Defender by simply moving the slider. Here, you can turn on the real-time scanning function for antivirus, firewall, account protection, and device security among other aspects of Windows Defender.
How to Activate Windows Defender through Windows Security Center:
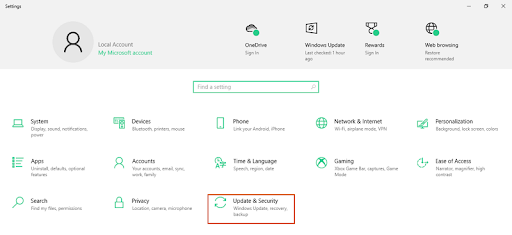
- Step 1. On your Windows 10 computer, navigate to the Windows Logo start menu. From the options displayed, select “Settings” to access the “Settings” window. In the Settings window, click the “Updates & Security” tab followed by “Windows Security” on the next screen.

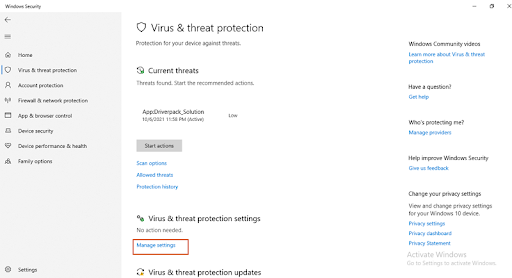
- Step 2. Now, click the “Virus & threat protection” option on the right. In the “Virus & threat protection” window, scroll down and click the “Manage Settings” link.

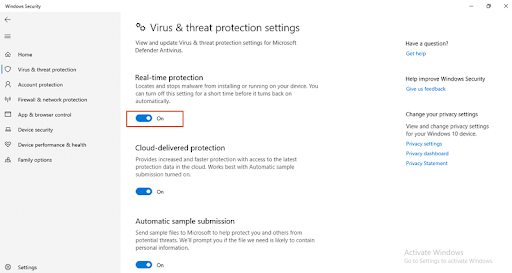
- Step 3. In the next screen, slide to activate the “Real-Time Protection” option.

- Step 1. On your Windows PC, press the combination of Windows Icon + R on your keyboard. In the subsequent “Run” pop-up box, type “gpedit.msc” and press “Enter” or click “OK”.
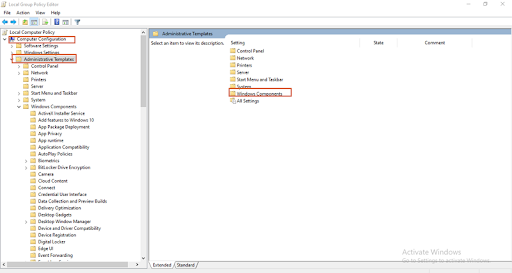
- Step 2. This command will load the “Local Group Policy Editor”. Here, go to the “Local Computer Policy” section on the left and choose the “Computer Configuration” option.

- Step 3. From the options displayed, click “Administrative Templates” followed by “Windows Components”.
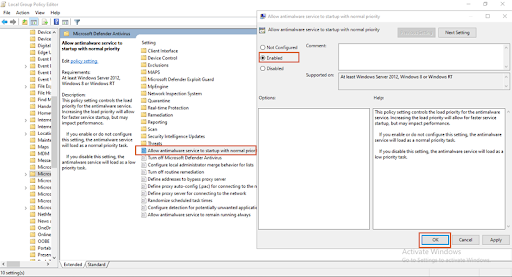
- Step 4. Next, choose “Microsoft Defender Antivirus” then click “Allow antimalware service to startup with normal priority” on the next screen.

- Step 5. In the subsequent screen, choose “Enabled” and click “OK”.
- Step 1. Simultaneously press the Windows Logo + R on your keyboard. Type “regedit” in the subsequent “Run” pop-up and press “Enter” on your keyboard. Alternatively, you can go to the “Start” menu and search for “Registry Editor.
- Step 2. When the Registry Editor opens, click the “HKEY_LOCAL_MACHINE” then choose “Software”.

- Step 3. Next, click “Policies”> then choose the “Microsoft” option.
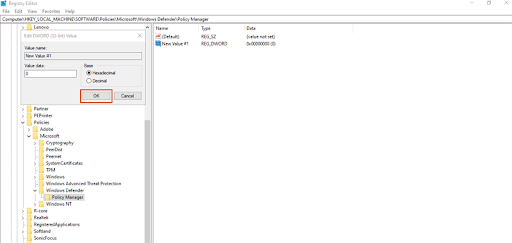
- Step 4. From the Microsoft options displayed, select the “Windows Defender” option.
- Step 5. Go to the right side of this window and right-click the file displayed. Select the “New” option followed by “DWORD (32-BIT) Value”. Click this new file and from the edit pop-up, enter the value “0” and close to enable Windows Defender.

- Step 1. Go to the “Start” button on your Windows computer and search “PowerShell”.
- Step 2. Once opened, right-click “Windows PowerShell” and select the “Run as administrator” option.
- Step 3. Now, run the command “Set-MpPreference -EnableNetworkProtection Enabled.”
- Windows Defender fails to turn on.
- Windows Defender not updating automatically.
- Windows Defender detects legitimate files or software.
- Windows Defender running into unexpected errors.
- Uninstall third-party antivirus or security software to solve conflicting issues with the Windows Defender configurations.
- Try restarting the security center service to help enable certain services that might not be working correctly. Just navigate to the Security Center, right-click it, and choose the “Restart” option.
- Run a System File Checker scan to check if there are any corrupted system files and restore them accordingly.
- Install the latest Windows operating system update because an outdated system might be struggling to keep your PC secure. Remember to back up your files because OS updates lead to data loss.
- Upgrade your OS to the latest Windows operating system.
- Consider a clean reboot to help clear background apps that might be conflicting or interfering with your Windows Defender and security.
2Using the Local Group Policy Editor
Group Policy Editor is a built-in service that enables policy-based administrations via Microsoft Active Directory. It allows administrators to configure, deploy, and manage several application and OS settings while allowing users to also change their configurations.
Therefore, you can always use Group Policy to manage some of the Microsoft Defender Antivirus settings. However, it is worth noting that you cannot turn off tamper protection using Group policy.
How to Activate Windows Defender using Local Group Policy Editor:
The following steps show how to activate Windows Defender on Windows 10 using the Local Group Policy Editor:
3Through the Registry Editor
The registry is a database in Windows systems that stores the low-level settings for the OS and the various applications/services. A Registry Editor on the other hand is a tool that enables Windows users to view and modify system registry. It lets you customize the settings that are not exposed in the Windows user interface including installed applications and policies like Windows Defender.
How to activate Windows Defender through the Registry Editor:
4Using PowerShell Scripts
PowerShell is a popular task automation solution that also allows configuration management. It is made up of line command line shell scripting language that can run on Windows, Linux, and MacOS. Therefore, you can use configuration commands to activate Windows Defender using PowerShell.
The following steps illustrate how to activate Windows Defender using PowerShell Scripts:
3Troubleshooting Windows Defender Activation Issues
When activating Windows Defender, it is not uncommon to experience some issues with varying complexities. Some of the common issues you might encounter while activating Windows Defender on your computer include:
Issues
Some of the plausible solutions to these Windows Defender activation issues include:
Solutions
4Summary
Activating Windows Defender on your PC is significantly important for device and data security. Whether you are using your Windows PC for personal or enterprise needs, Windows Defender adds a vital security layer to protect you. Remember you can use Windows Defender in tandem with other third-party security services and hence there is no harm in always ensuring your Windows Defender is activated. As you’ve seen, there are several methods to activate Windows Defender on your PC. So, simply pick a method that works for you best!





Leave a Reply.