Turn off Automatic Updates on Windows/iPhone/Android
Keeping your devices' system updated is important for its security and efficient. However, when updates are downloaded and installed automatically, they can occur at inconvenient times or use up data without warning. This is why it’s extremely useful to learn how to turn off automatic updates on your Windows, iPhone, or Andrdoid devices.
1 How to Turn Off Windows Automatic Updates?
On Windows laptops and computers, you can decide whether to turn off automatic updates permanently or only temporarily.
How to Turn Off Windows Automatic Updates Permanently
When you turn off automatic updates permanently, they are going to remain off until you decide to (manually) turn them on again.
Method 1. Change Windows Update Service into Disabled/Manual
To change the Windows Update Service into Manual, follow these simple steps on your computer or laptop:
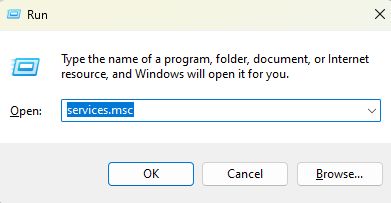
Open the Run dialog box by pressing Win + R.
Type services.msc and press Enter.
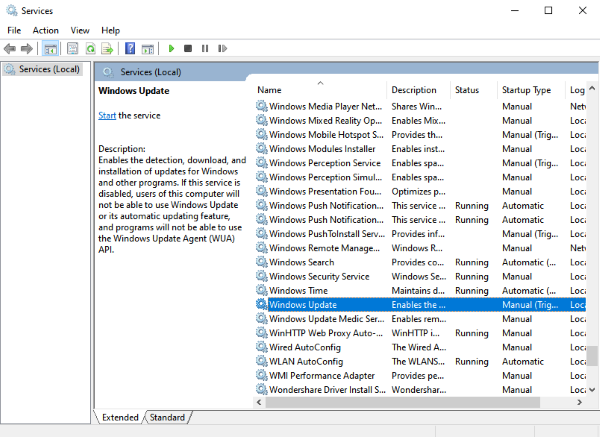
The Services window would open. Here, scroll down until you find Windows Update.
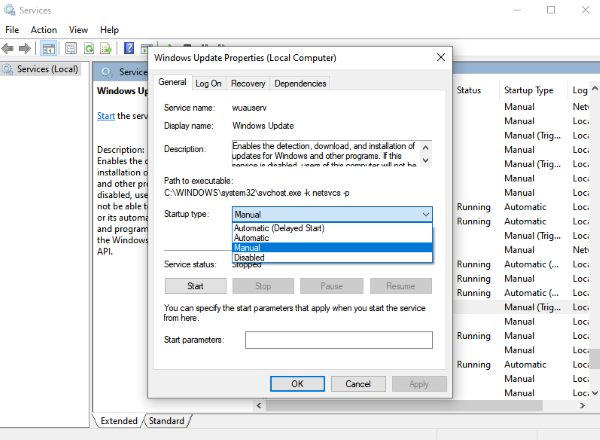
Right click on Windows Update and select Properties.
Next to Startup type, you’ll find a drop-down menu. Here you can select Manual or Disabled.
Click on Apply and then on Ok.
Method 2. Disable Windows Update in Group Policy Editor
To disable Window Automatic Update through the Group Policy Editor, follow this guide:
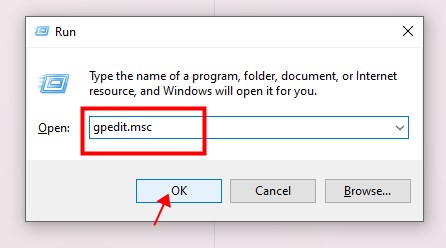
Press Win + R to open the Run dialog box.
Type gpedit.msc and press Enter.
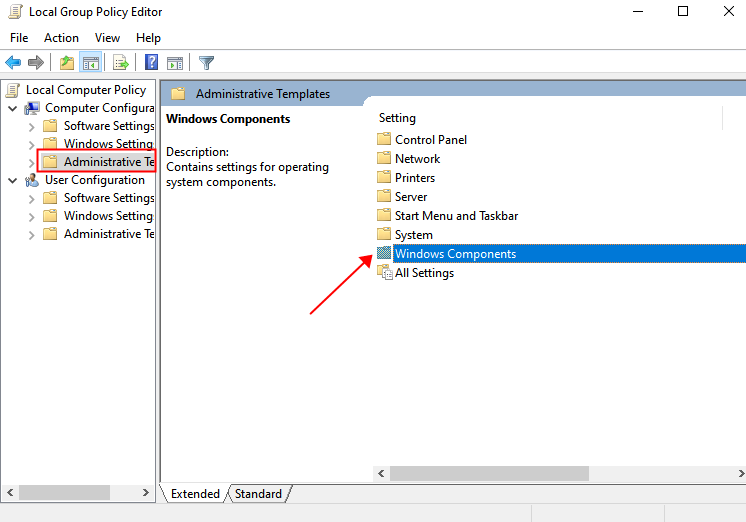
The Local Group Policy Editor would open. Here, on the left vertical menu, click on Administrative Templates, and then on Windows Components.
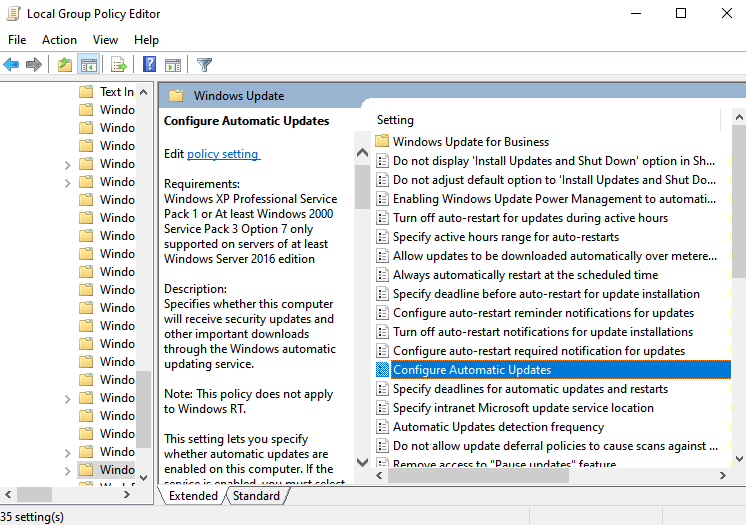
Still on the vertical menu, scroll down until you find Windows Update.
Inside the Windows Update folder, double click on Configure Automatic Updates.
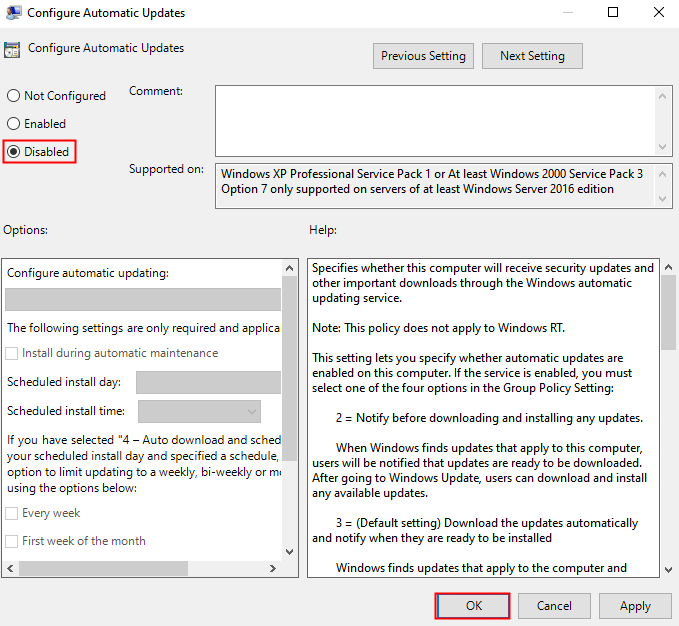
On the window that opens, you’ll find three options in the upper left corner. They are Not Configured, Enabled, and Disabled. Select the Disabled option.
Click on Apply and then Ok.
Method 3. Disable Windows Update in Windows Registry
To disable Windows Automatic Updates in the Windows Registry, follow these steps:
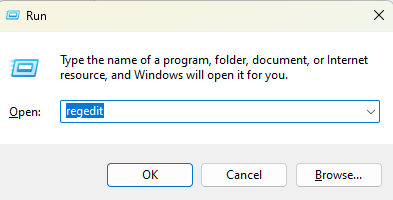
Open the Run dialog box by pressing Win + R.
Type regedit and press Enter.
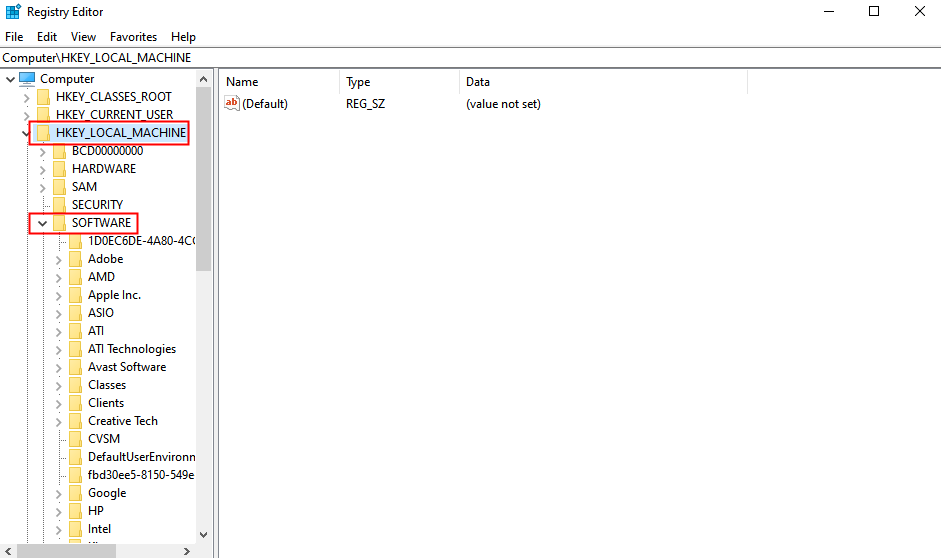
The Registry Editor would open. Here, one the left vertical menu, click on HKEY_LOCAL_MACHINE.
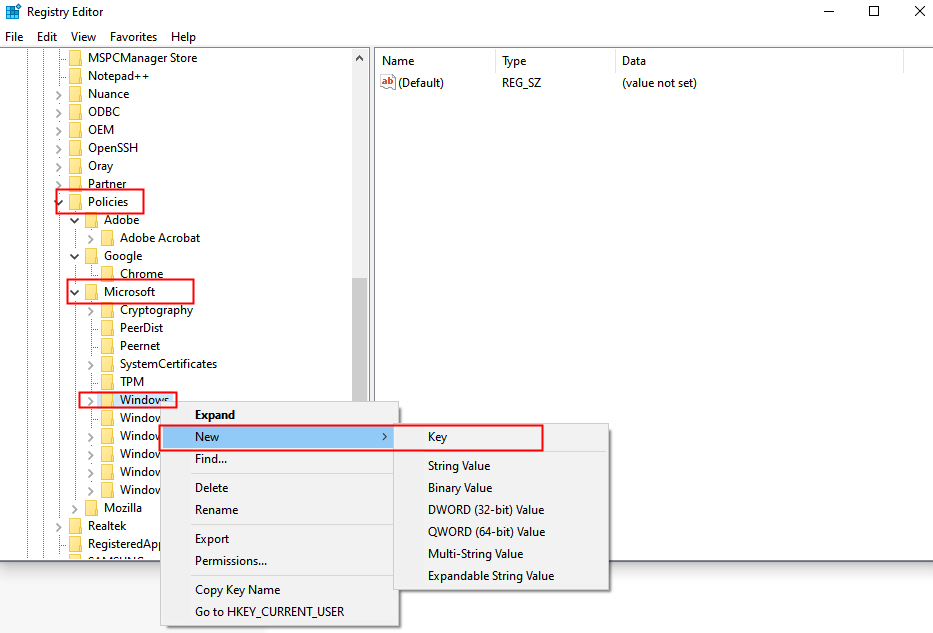
Inside this folder, open the SOFTWARE folder, then Policies - Microsoft - Windows.
Right-click on the Windows (folder) key, navigate to the New submenu, and select the Key option.
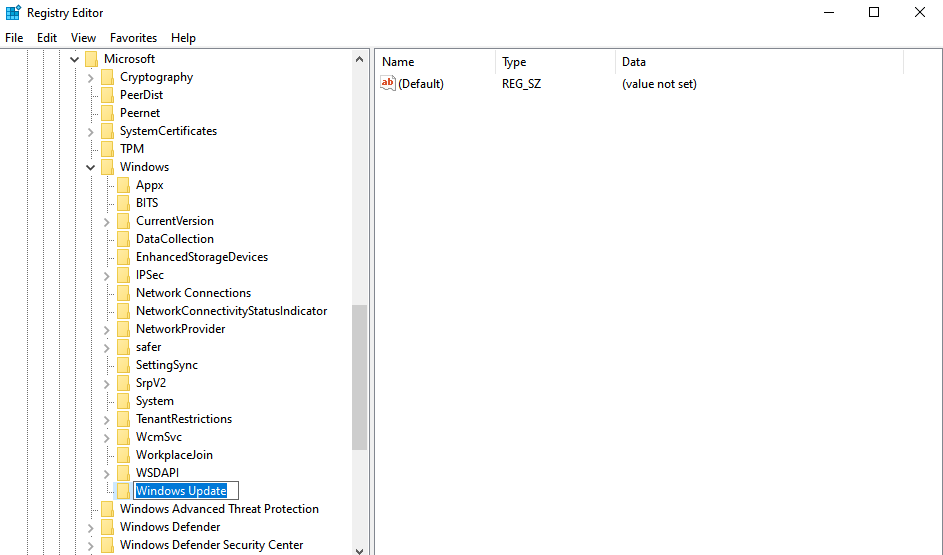
Enter "WindowsUpdate" as the name for the new key and press Enter.
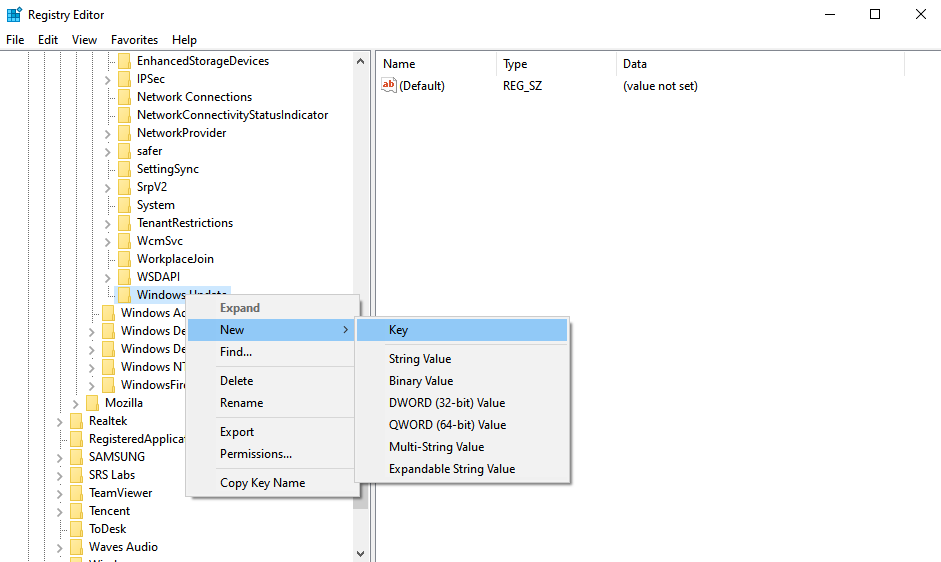
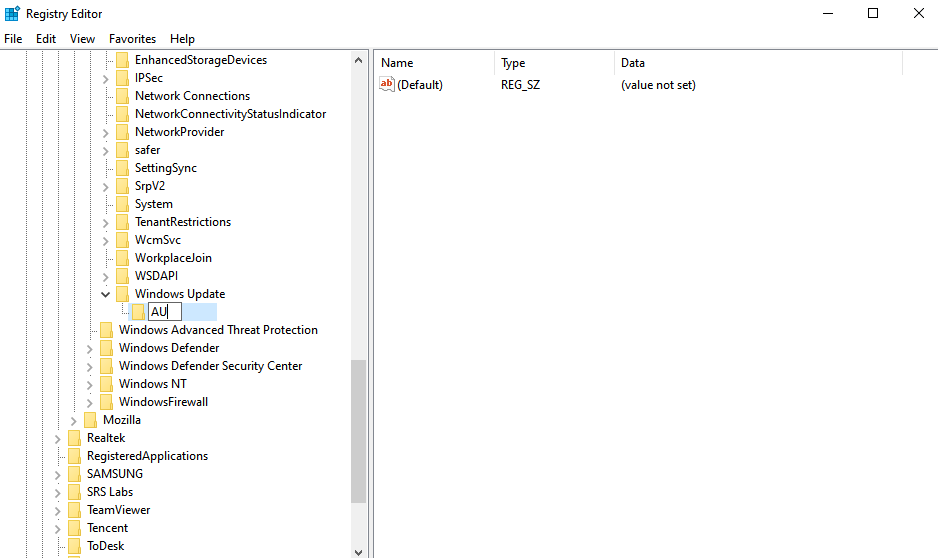
Right-click on the WindowsUpdate key you just created, go to the New submenu, and choose the Key option.
Name this new key "AU" and press Enter.
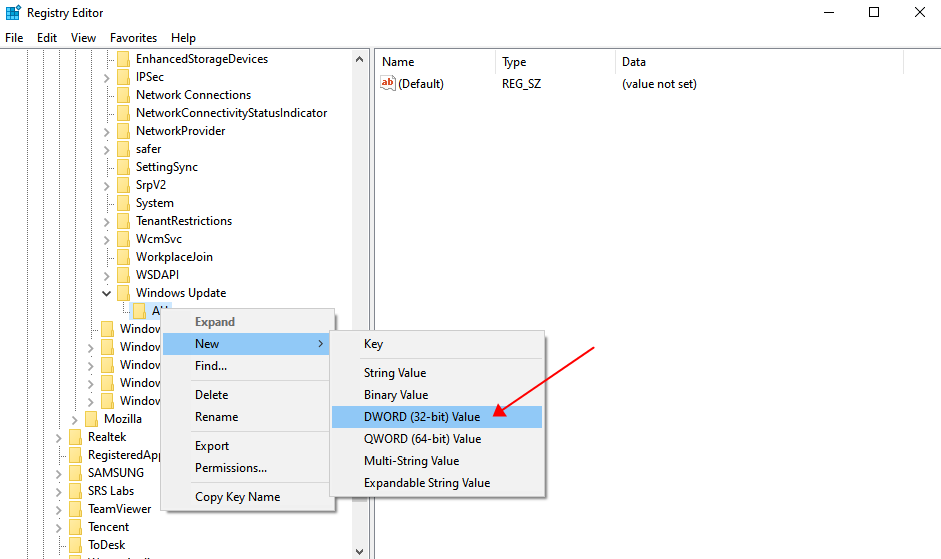
Right-click on the AU key, navigate to the New submenu, and select the DWORD (32-bit) Value option.
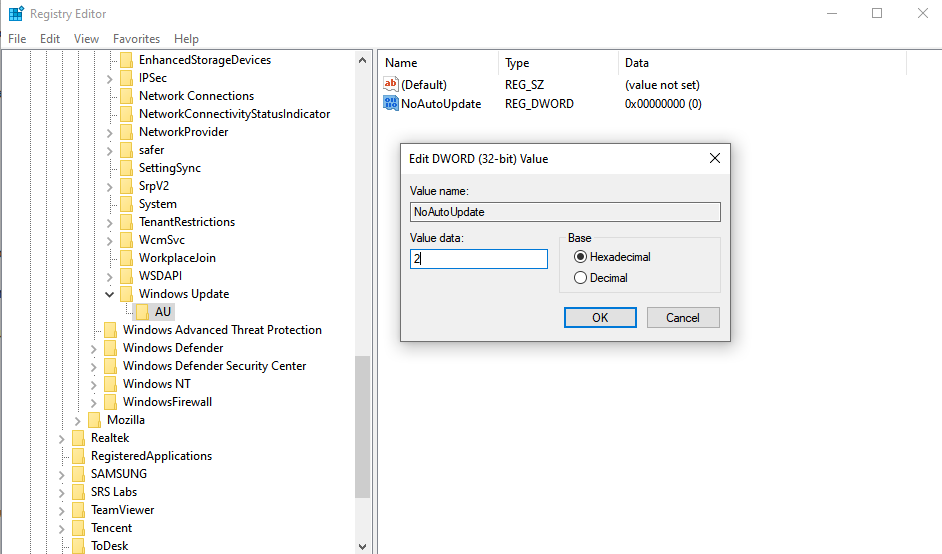
Name this new value "NoAutoUpdate" and press Enter.
Double-click on the NoAutoUpdate value you created and change its value data to 2(Notify for download and auto install).
Click the OK button to save, and restart your computer.
How to Turn off Windows Automatic Updates Temporarily
When you turn off Windows Automatic Updates temporarily, it means that automatic updates will remain off under certain circumstances (for example, when the laptop is connected to a specific network) or for a preset period of time.
Method 1. Set Network Connection as Metered
When you set a connection as metered, the network will control and reduce data usage. As a consequence, the operative system and its applications won’t download the available updates automatically.
The paths to set a network as metered are different in Windows 11 and Windows 10.
In Windows 11:
To set a Wi-Fi connection as metered, go to Settings, then on Network & Internet, select Wi-Fi, select your Wi-Fi network, and finally turn on Metered Connection.
To set a mobile data connection as metered, go to Settings, then on Network & Internet, select Cellular, and turn on the Metered Connection.
In Windows 10:
Select Start.
Go to Settings.
Select Network & Internet.
Click on Wi-Fi.
Select Manage known networks.
Select your Wi-Fi network.
Click on Properties.
Turn on Set as metered connection.
Method 2. Pause Updates in Windows Settings
Windows allows you to pause automatic updates for an amount of time. After that period, the updates would be automatic again.
In Windows 11:
Select Start.
Go to Settings, and then Windows Updates.
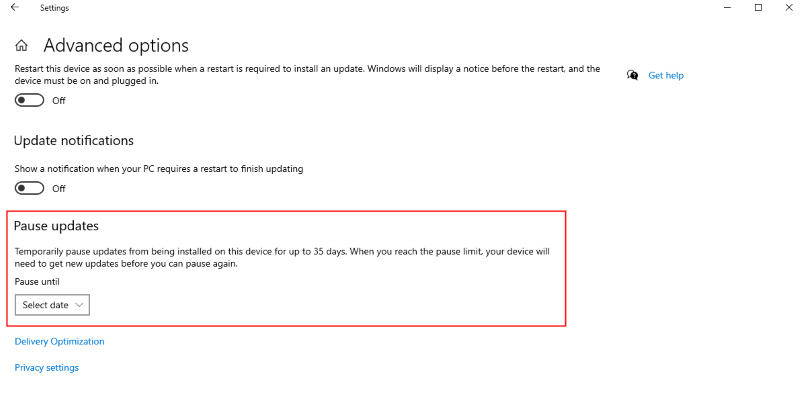
Select 'Advanced Options,' then 'Pause Updates,' and choose the desired update implementation date.
Click Ok.
In Windows 10:
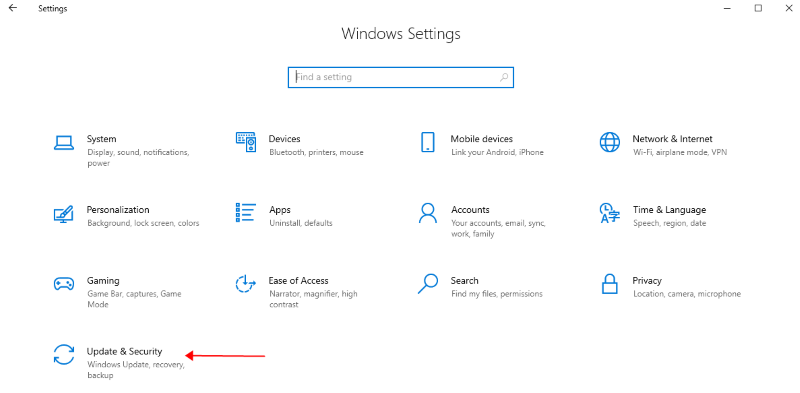
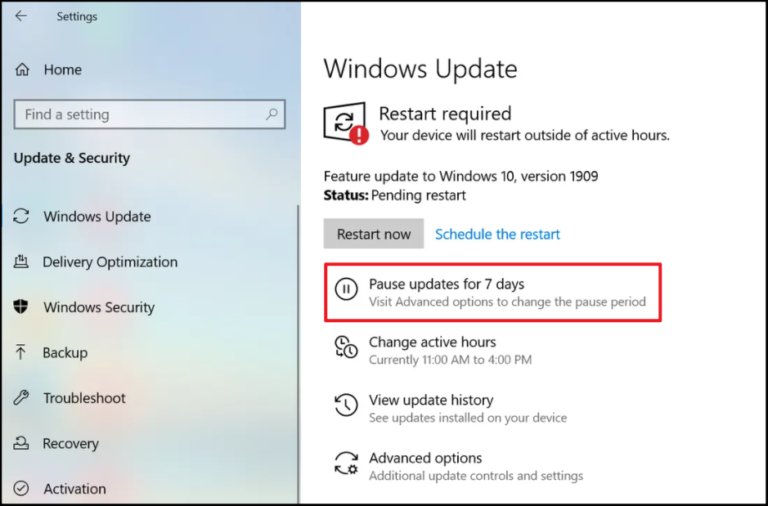
Select Start, then Settings, then Update & Security, and then Windows Update.
Select Pause updates for 7 days.
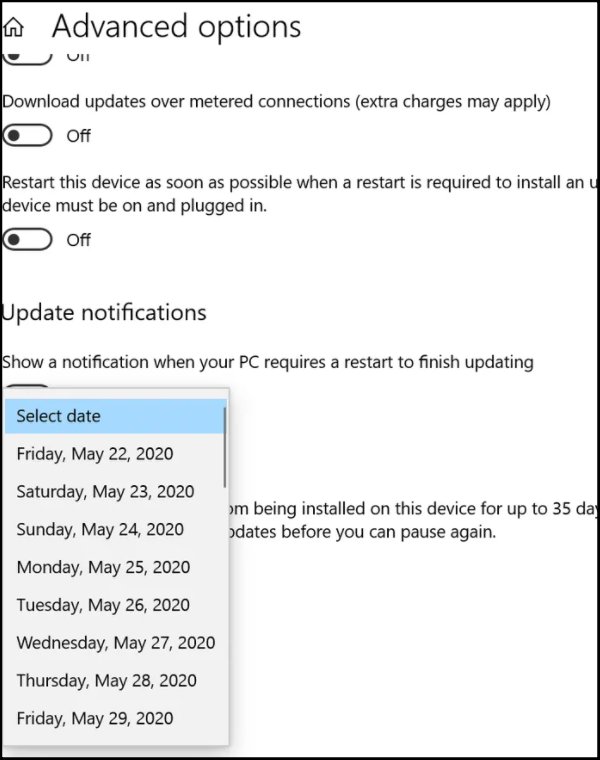
To personalize the pause limit, you can even select Advanced Options. Here, in the Pause Update section, specify a date using the dropdown menu.
2 How to Turn Off Automatic Updates on Android?
Individual Android Devices
When you need to turn off updates on a single Android device, you can use the built-in settings. Follow these steps:
Open the Settings on your Android device.
Select Software Updates
Turn off "auto download via Wi-Fi" to disable automatic updates.


Corporate Android Device Groups
In business environments, where admins need to manage fleet of devices, the most efficient way of turning off automatic updates in bulk is using AirDroid Business, an MDM tool that helps organizations manage and control their devices remotely.
With this tool, admins can implement policies to disable automatic updates for bulk mobile devices, and they can do it remotely.
This is how to implement such policies:
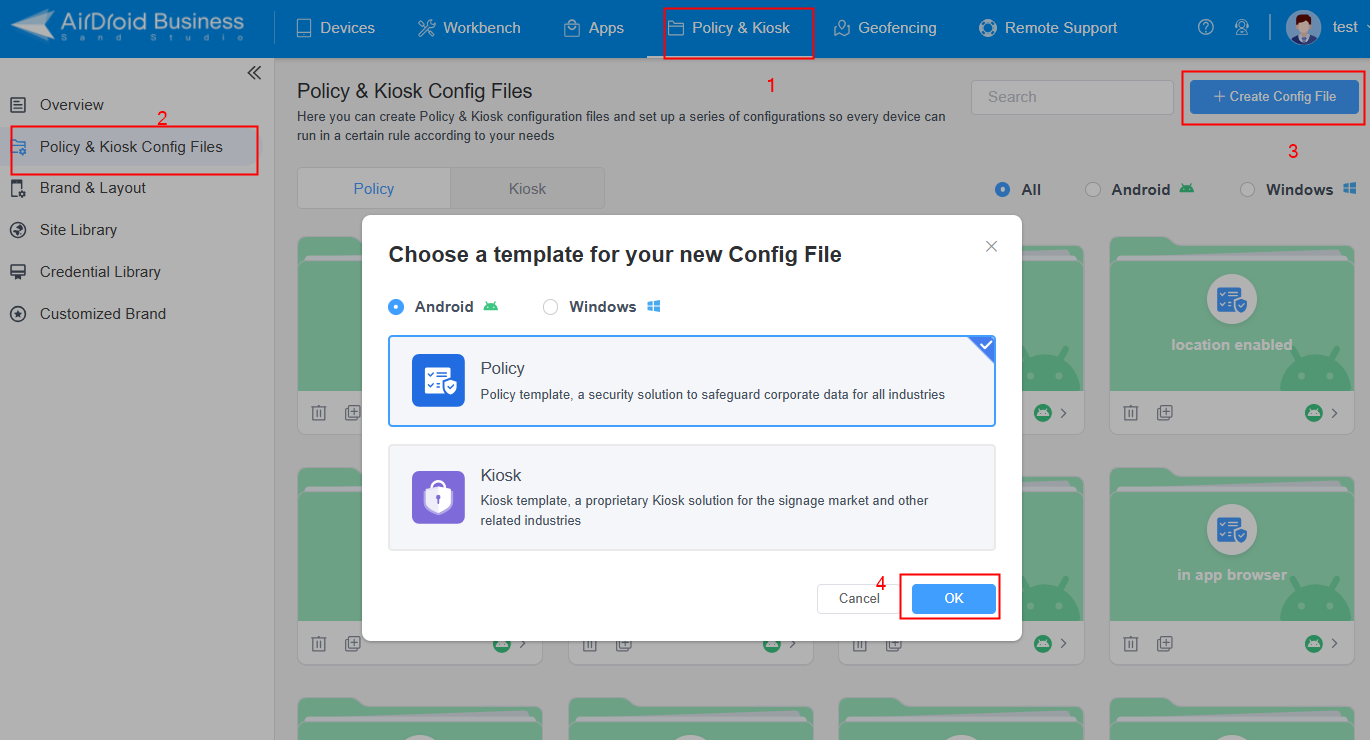
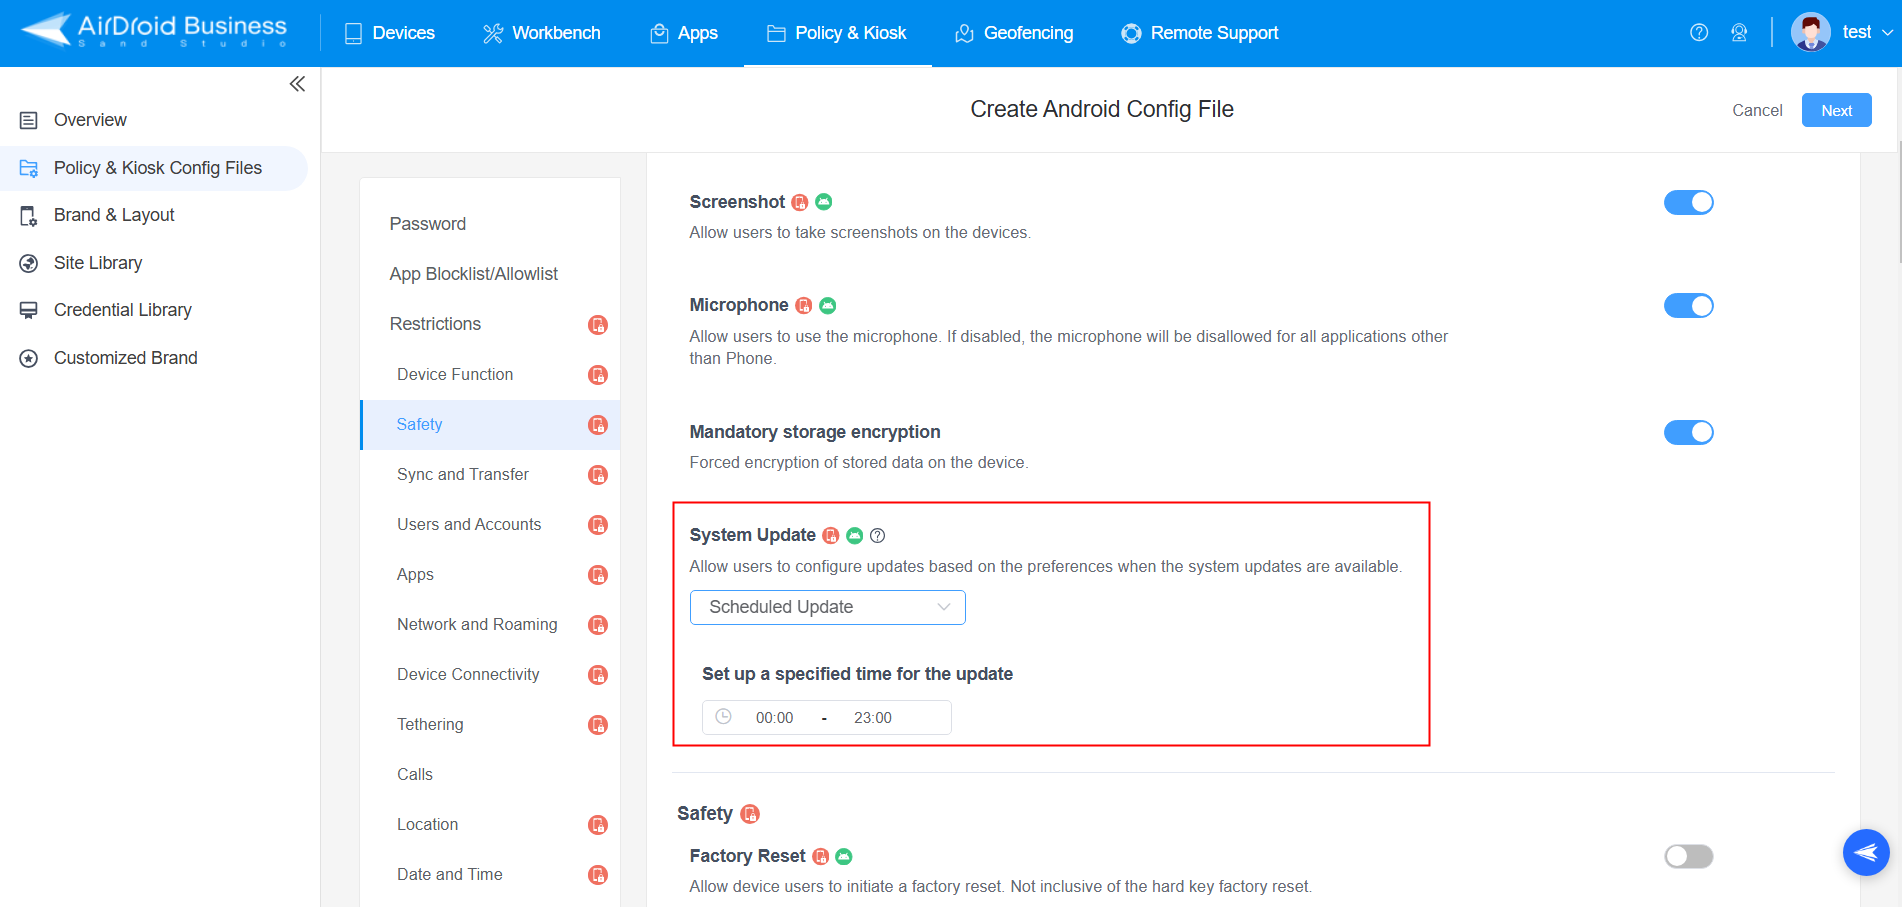
Log into AirDroid Business MDM dashboard, choose the Policy and Kiosk tab on the upper orizontal menu.
In the left vertical manu, select Policy & Kiosk Config Files. Inside the Create Android Config File tab, choose Safety from the vertical menu on the left.
Under System Update select: a. Defer updates / b. Schedule Updates(schedule a date for automatic updates).
Save settings and apply it to your target devices groups.
3 How to Turn Off iPhone Automatic Updates?
To turn automatic updates off on iPhones, follow these steps:
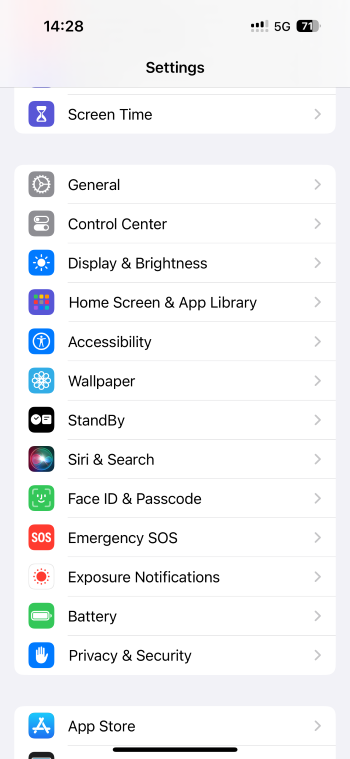
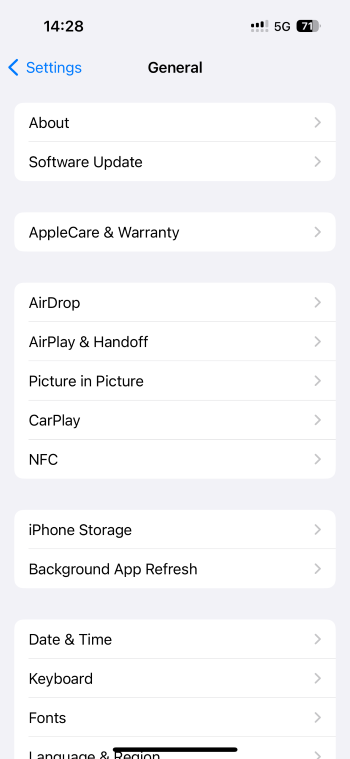
Go to Settings, and then on the General tab.
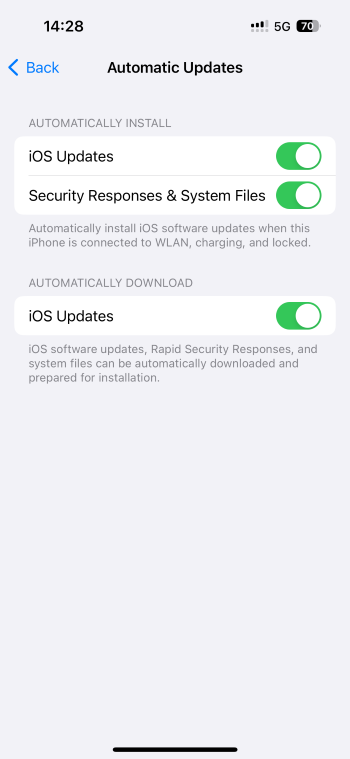
Tap on Software Updates - Automatic Updates.
In the Automatic Updates section that opens, turn off all the three options: iOS Updates, Security Responses & System Files and, under Automatically Download - iOS Updates.
4 Why Choose to Disable Automatic Updates
The regular update of systems and applications is important to maintain devices efficient and secure. However, there are several reasons why users may want to be able to decide when to install updates.
- Avoid Disruptions: As you can’t use your device while updates are being installed, it is more convenient to be able to install them manually, so that you can choose the most appropriate time to start the process.
- Prevent Potential Problems: Newly released updates aren’t always stable. When automatic updates are off, you can delay the update and install new systems after having confirmation that they are stable and safe.
- Compatibility Issues: New updates can cause software or hardware compatibility issues that could be problematic, especially on business devices. It’s safer to disable automatic updates and verify the impact of new systems before installing them.
- Validate Updates before Bulk Deployment: Disabling automatic updates allows IT admins to test updates on a few devices before enrolling them out to an entire fleet of devices. This is crucial to ensure continuity and safety in business environments.
Our Advice
Turning off automatic updates has its important benefits, but this doesn’t mean that users should completely renounce updates. Our advice is to turn off automatic updates so that you’re able to schedule updates and start them manually at the most convenient time.
When should you install updates? When you don’t need to use your device, and once you’re certain that the new update is stable and compatible with your device and applications.
FAQs
There are several third-party tools to disable automatic Windows updates:
Windows Update Blocker: It provides a user-friendly interface to turn off Windows automatic updates temporarily or permanently.
StopUpdates10: It’s a minimalist and free-to-use tool that offers several automatic updates block models.
O&O ShutUp10++: It’s one of the most used third-party tools to block automatic updates on Windows. There is no need to install this tool: it’s a web app that can be accessed from any browser.
On older devices that feature a Windows 8 operative system, turning of automatic updates require these steps:
Press Windows + F to open the Search panel.
Type Control Panel and then select the Control Panel.
Select Windows Update.
In the Windows Update window, click on Charge Setting.
Under Important updates, open the dropdown menu and select Never check for updates.
Click on Ok.


Leave a Reply.