How to Turn On BitLocker for Window Encryption?
According to Data Breach Today, in the healthcare sector alone, 54% of the yearly data breaches is a result of unencrypted data on stolen and lost devices. Data encryption is significantly important in hybrid environments with multiple users for each device. As stated by Absolute Security, 16% of devices in corporate settings are always unencrypted and at risk of a data breach.
To prevent these incidents of data breaches offline, Microsoft introduced BitLocker as an encryption tool. It is a data security app used to encrypt a device to make sensitive files unavailable to unauthorized users. It is used to counter offline data breach risks or unauthorized access to the data on stolen and lost devices.
In this guide, you will learn how to enable BitLocker, what are its key features, and requirements, and what are its alternatives.
1 Key Features of BitLocker
Before answering the question on how to turn on Bitlocker in Windows 10/11, let’s first have a look at what BitLocker can actually do for you. Here is a roundup of the key features:
1Authentication before System Starts
With BitLocker, even if your device is lost, or you want to avoid unauthorized access while using the device in a hybrid work setting, the user will be required to prove their identity even for starting the operating system. The identity can be provided through a PIN code, password, or a USB. Otherwise, the system won’t even start.
2Scheduling Automatic Encryption
When you have BitLocker activated on your device, you can schedule it to run automatic encryption to avoid the hassle of manually encrypting all the latest files. It includes the encryption of the system as well as data and is particularly useful in a corporate setting where large networks need to be encrypted regularly.
3Collaboration with TPM
BitLocker works in integration with the Trusted Platform Module. TPM saves the decryption keys within the device but it does not release them until it has verified the hardware and firmware. This is especially helpful in case of stolen or lost devices.
4A Variety of Authentication Options
It allows you to choose an authentication method that suits you. For example, USB keys, PINS, Passwords, Smart Cars, or a combination.
2Requirements to Enable BitLocker on Windows
To be able to use BitLocker on your device, you need to have the following pre-requisites:
Applicable Windows Edition
BitLocker is not enabled on all versions of Windows. For example, Windows Professional, Windows, Enterprise, and Education versions on Windows 10 and 11, Windows 8.1 Pro, and Windows 7 Ultimate and Enterprise support it but the Home version of Windows does not support BitLocker. The same is the case with older versions of the Windows.
TPM
A Trusted Platform Module is another requirement for BitLocker. If a TPM version 1.2 or later is not available, use a removable drive, although it isn’t as secure as a TPM.
NTFS File System
The boot drive on your device that contains the operating system must be using NTFS file system for storing and organizing the files for the BitLocker to work.
3How to Turn On BitLocker on Windows?
There are several ways you can turn on BitLocker in Windows. Here is a step-by-step guide on some of the simplest ones:
1Via Windows Settings
This method can be used only for TPM-supported devices. Here are the steps:
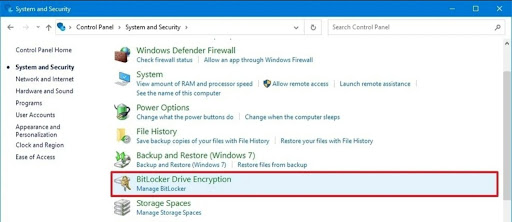
- Step 1. Go to the start menu and type ‘control panel’ in the search box. Then, click ‘system and security’.
- Step 2. Select ‘BitLocker Drive Encryption’ from the options.

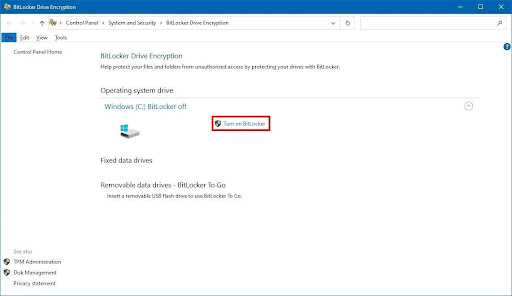
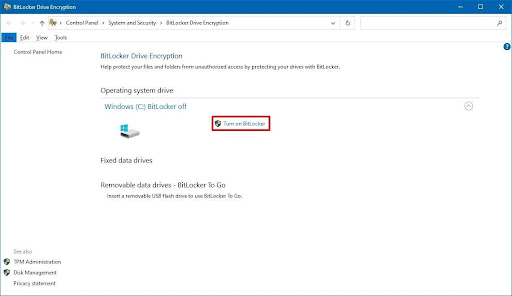
- Step 3. Navigate to the ‘operating system drive’ and select ‘turn on BitLocker’.

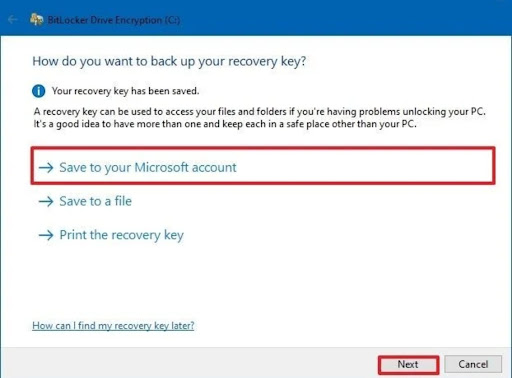
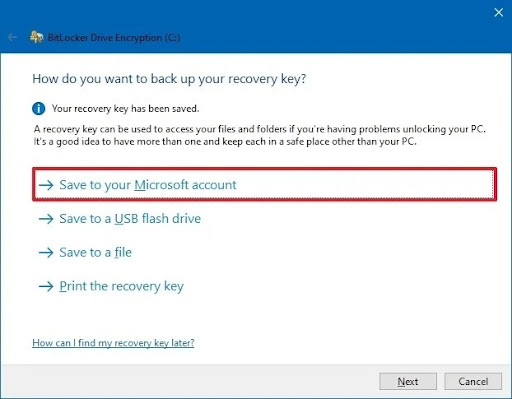
- Step 4. You will be asked to select where you want to store the recovery key, then select a preference and click ‘next’.

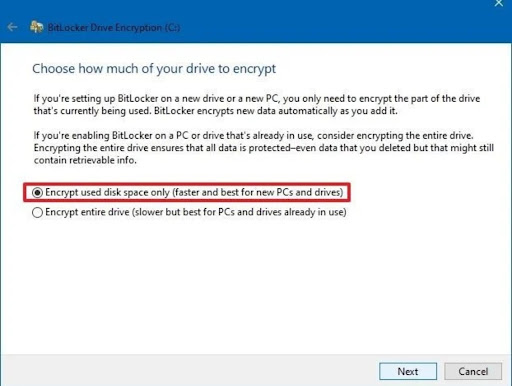
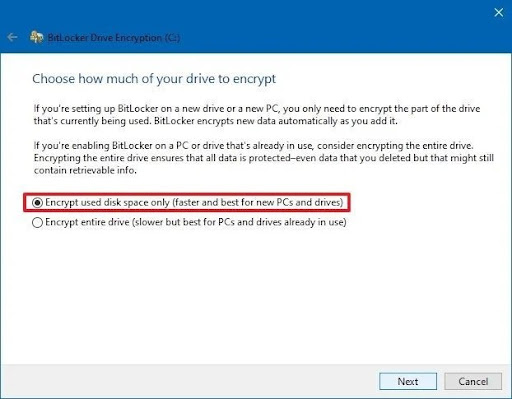
- Step 5. Then, choose how much of your drive to encrypt and two options are given and click ‘next’.

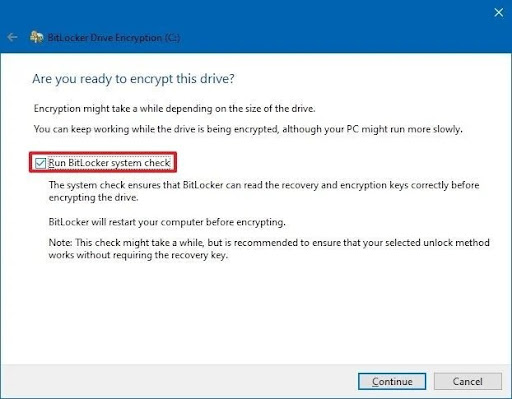
- Step 6. Click ‘run BitLocker System check’ and restart the device.
2Via Group Policy
For the devices that do not have a TPM security chip, BitLocker can be enabled using the Local Group Policy Editor. It applies pre-boot authentication and the system won’t start unless the user verifies his identity. It is especially recommended in a corporate setting as it allows enabling BitLocker across the entire fleet remotely. Here is how to turn on BitLocker via Group policy:
To enable BitLocker via Group Policy, you'll need to enable additional authentication at startup policy, here are the steps:
- Step 1.In the start menu, type gpedit and open Local Group Policy Editor. Then, go to the ‘computer configuration’.
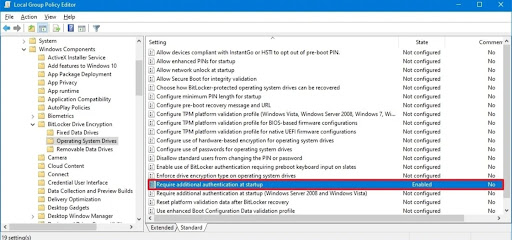
- Step 2.Open ‘administrative templates’ followed by ‘Windows Components’, you can click on ‘BitLocker Drive Encryption’ and select ‘Operating System Drives.
- Step 3.Scroll down to the option ‘Require additional authentication at startup policy’. And double click it.

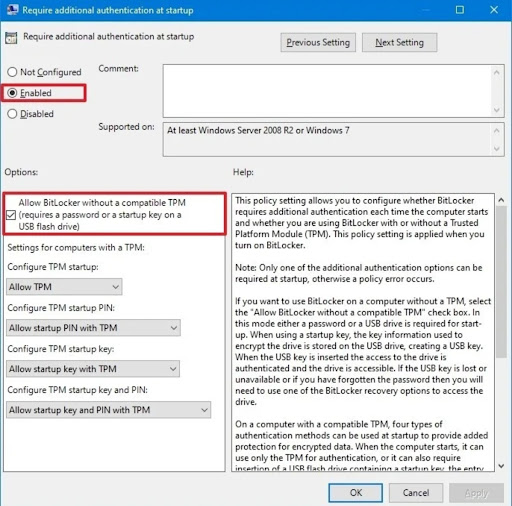
- Step 4.Select ‘Enabled’ and check the box next to ‘Allow BitLocker without a Compatible TPM (requires a password or a startup key on a USB flash drive)’. Then, click ‘ok’ and continue to configure the BitLocker setup.

Once done with this process, now you need to enable BitLocker as follows:
- Step 1.Open the control panel from the start menu and go to System and Security>Bitlocker Drive Encryption>Operating System Drive>Turn On BitLocker.

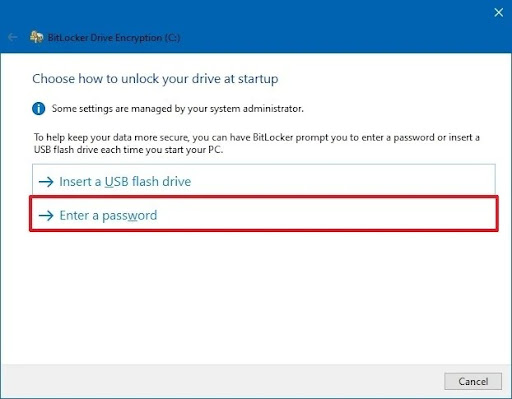
- Step 2.Choose how to unlock your drive at startup’.

- Step 3.Create password and press ‘next’. And then, choose an option from the given list for saving your recovery key and click ‘next’.

- Step 4.Now, select how much of your drive space you want to encrypt and click the ‘next’ button.

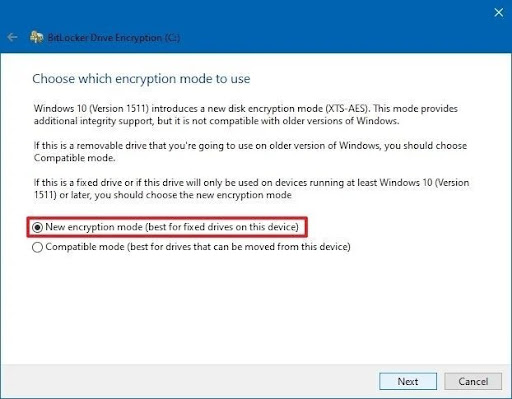
- Step 5.Choose an encryption method by the following options and navigate to the next step.

- Step 6.Next, check the box that says ‘Run BitLocker System Check’. Then press continue and restart the system.

3Via Powershell
Here are the steps to use Powershell to enable the BitLocker:
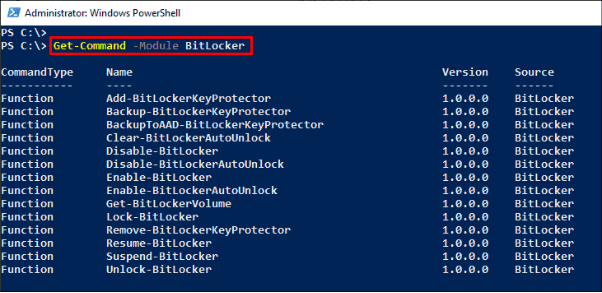
- Step 1. Start by having a look at the commands being offered by BitLocker module. Use the following command: Get-Command -Module BitLocker

- Step 2. Get a list of the drives that BitLocker can protect on your device by using the following command: Get-BitLockerVolume

- Step 3. Now specify the drive or volume that the above mentioned command Get-BitLockerVolume should return.
- Step 4. Select the key protector you would like to use to encrypt the VMK (volume Master Key) saved on the disk. You can choose from these options:
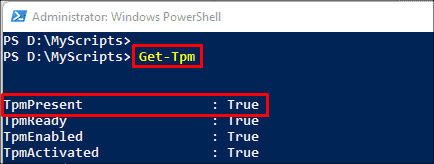
- TPM only: Use TpmProtector switch parameter for this protector. However, make sure your device supports a TPM. Use this commond to confirm : Get-Tpm.

- TPM+PIN: To go for a combination of TPM and PIN, use this parameter: TpmAndPinProtector and give a PIN.
- TPM + Startup Key + PIN: For this combination, use the switch parameter TpmAndPinAndStartupKeyProtector.
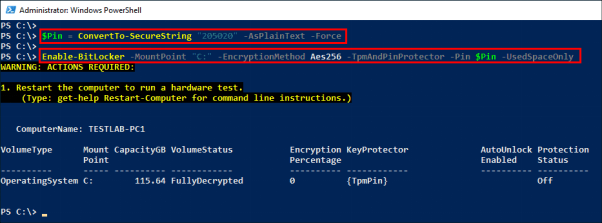
- Step 5. Now enable BitLocker by using the following two commands:
- ● Enable-BitLocker -MountPoint "C:" -EncryptionMethod Aes256 -Pin $Pin-
- ● TPMandPinProtector -UsedSpaceOnly

- Step 6. Restart the device as prompted.
- Step 7. As the device restarts, you will be asked to give the PIN.
- Step 8. Once you have logged in using the PIN, the encryption will be done automatically and you can see the progress through the command Get-BitLockerVolume.

4 BitLocker Alternatives for Windows Home
Although the Windows Home version does not have built-in BitLocker, but luckily, there are several trusted alternatives to it. Let us have a look at some of the commonly used ones.
Hasleo BitLocker anywhere
It is the first-ever BitLocker alternative for Windows Home, Windows Core, and Windows 7 Professional, allowing you to enjoy all BitLocker features.Here are the key features of it:
● lock and unlock BitLocker encrypted drives.
● Autounlock for BitLocker encrypted drives can be turned on and off.
● Apply pre-boot password or startup key with USB drive.
● Encrypt and decrypt drive C: and data partition with BitLocker.
Pros
- Supports the command line interface (CLI) and allows changing and exporting the BitLocker recovery key.
- Comes with a free trial.
Cons
- Beginners might have to spend some time understanding how various features work.
ESET Endpoint Encryption
It is a well-suited tool for enterprises looking to mass encrypt their fleet of devices. Some of the features it include:
● Encrypt hard drives, files, folders, data, and emails.
● Use the Full Disk Encryption option to encrypt the entire disk and removable media.
Pros
- It supports centralized, remote endpoint management.
- Offers 30-day free trial.
Cons
- its customization features can be a bit complicated at first, and it may not work well with certain apps.
Cryptomator
It is an encryption solution for those who rely on cloud storage. It is an open-source encryption solution to secure your cloud storage.Some features are shown below:
● Encrypt your data on Google Drive, Dropbox, Onedrive, and others.
● Encrypt your data and then securely upload it to a cloud service of your choice.
Pros
- You get to keep the decryption key for your data on cloud services.
- You can access your securely encrypted data from any device.
- It is seamless, easy to use, and totally free.
Cons
- one of the subtle disadvantages is the way it works. For example, if someone tries to open an encrypted folder with unlocking, he can see what files are contained in the folder although he can't open them.
5Conclusion
BitLocker has become a necessity when it comes to protecting data against unauthorized access. The characteristics like auto encryption, TPM integration, and pre-boot user verification ensure utmost offline data protection. It is specifically useful in workplace settings and in hybrid environments with more than one users for a device. Although, it isn’t available so far for the Window Home version but alternatives like Cryptomator, Hasleo, and ESET can fill the gap in that domain.





Leave a Reply.