How to List All Drives Using Command Prompt (cmd) and PowerShell on Windows 10/11?
Listing drives is done for various reasons in different scenarios by the users. They can use command Prompt (cmd) or PowerShell commands to view the list of all drives with other information. Both provide quick and easy access to the information regarding drives. Here are some of the use cases where one might need to access the drives list through the command prompt and PowerShell:
- A list of drives is accessed when the user wants to see the information about all drives. E.g. drive size, drive letter, drive type, and free space available on each drive.
- It is used to automate tasks. For example, using PowerShell to automatically and periodically check the drive status and generate storage reports.
- The user may sometimes need to check the drive information quickly through the command prompt when he needs to troubleshoot the system. It also helps identify problems. For example, a drive not being recognized or issues with mounted drives.
- Users may need to integrate command line operations into batch scripts to automate the system administration tasks.
- For an enterprise, MDM solutions like Airdroid business can use PowerShell scripts to remotely get information about any device’s drive and use it for troubleshooting or support.
- Storage status of any device can be remotely accessed and managed using a drive list generated through PowerShell scripts or Command Prompt.
Let’s now have a look at the step-by-step process on how you can list drives from the command prompt and PowerShell.
Part 1: How to List Drives Using Command Prompt?
You can get a complete list of all drives by using the command prompt (CMD). There are three ways to do so using CMD. Let’s discuss each one of them in detail.
Method 1: Using WMIC Command
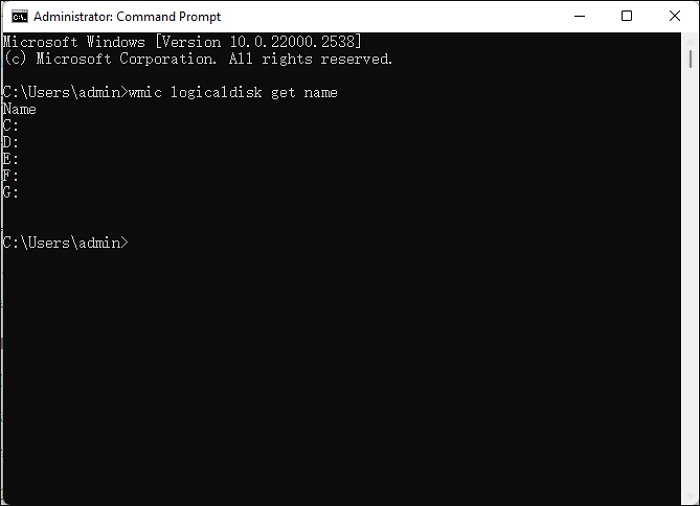
- Step 1: Open the command prompt and type any of these commands:
wmic logicaldisk get name
wmic logicaldisk get caption
Press Enter key.

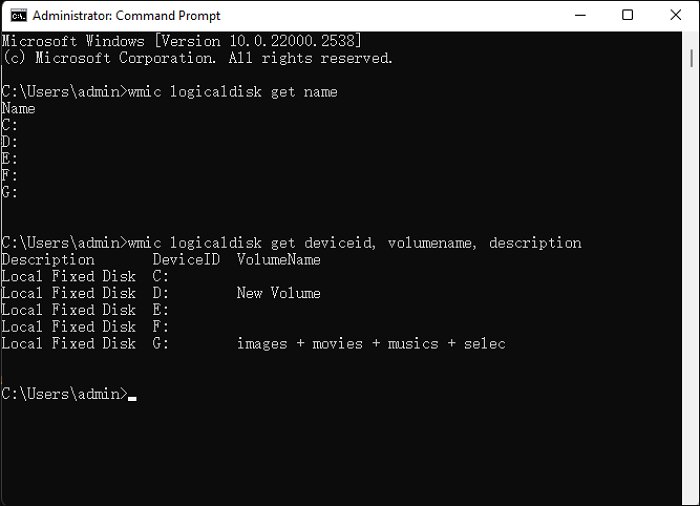
- Step 2: Use the command
fsutil fsinfo drivesand press Enter. You will get a list of drives on your computer. Or else you can also use the following command if you want to see the device ID and volume name:wmic logicaldisk get deviceid, volumename

Method 2: Using Diskpart
Diskpart is among the oldest and most used tools for listing and managing drives and partitions. Here are the steps to follow in order to get a list of drives using Diskpart:
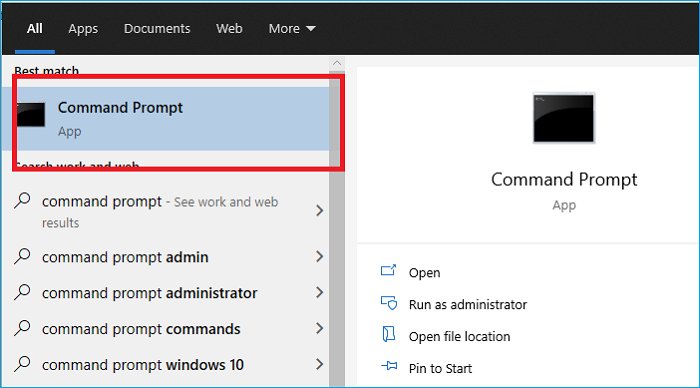
- Step 1: Open the command prompt by typing CMD in the search box and clicking ‘Command Prompt’ from the list that appears.

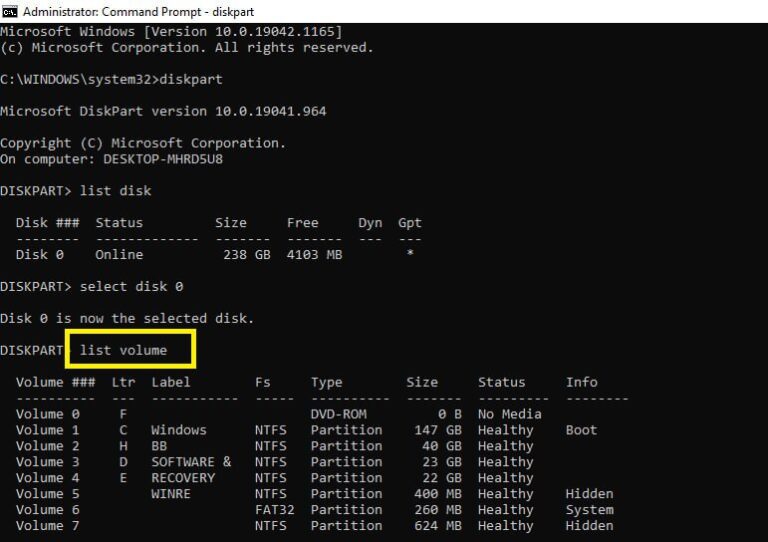
- Step 2: Now type the commands given below in sequence and press enter key after typing each command:
diskpart
list disk
select disk X
(Replace "X" with the disk number)
list volume
or
list partition

It will give you a list of drives on your computer along with the letter, size, label, volume number, and health status.
Method 3: Using Dir Command
You can get a list of all files in a directory by using ‘Dir’ command in the command prompt. It will show you the contents of the directory.
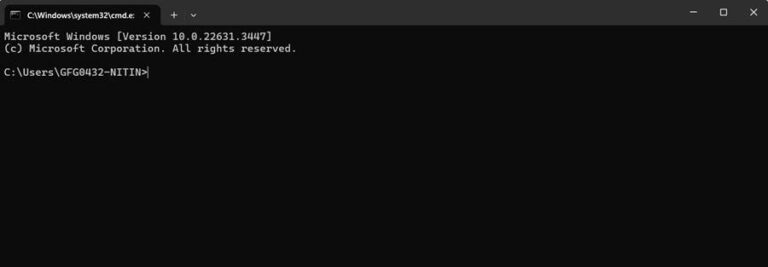
- Step 1: Open the command prompt by typing ‘CMD’ or ‘Command Prompt’ in the search box and click ‘Command Prompt’ at the top of the options that appear.

- Step 2: Now type the command ‘cd’ followed by the path you want to follow in the directory. For example, if you want to see the files in a directory called ‘documents’ in the user folder, your command will look like this ‘cd documents’. Once you’ve typed the command, press enter and you will enter your desired directory.
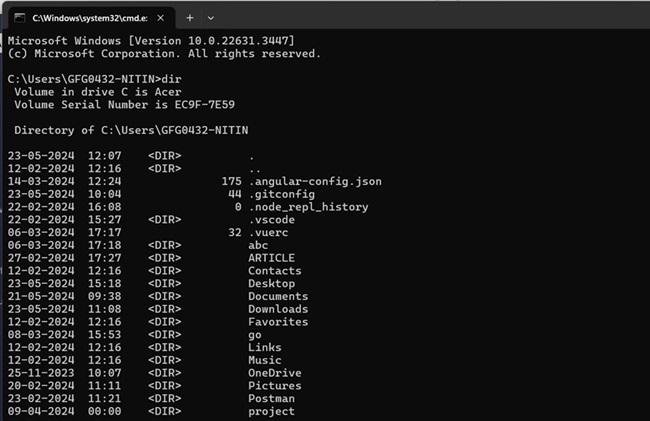
- Step 3: To list all the files in that directory, enter the command ‘dir’ and press enter. All the files in the directory will be displayed.

When the dir command is executed alone, without parameters, it shows the disk’s volume label and serial number along with the list of directories and files. You will see a result like this one below with and without parameters:
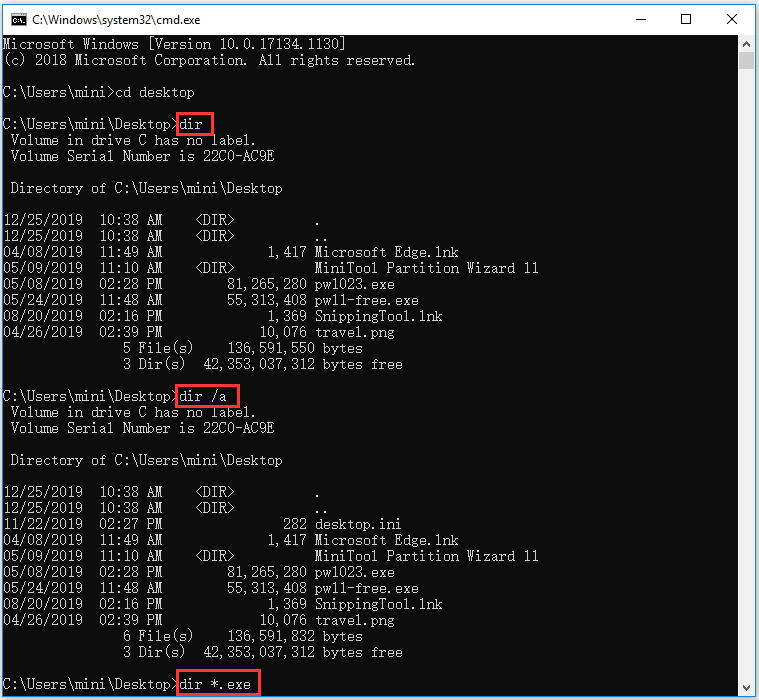
You can use the dir command with a combination of other options to list the files in a customized manner, e.g., here are some of the commonly used commands along with the list type they generate:
/A: Displays files with specified attributes.
/B: Uses bare format (no heading information or summary).
/O: Specifies the order in which files are sorted.
/S: Displays files in specified directory and all subdirectories.
Part 2: How to List Drives Using PowerShell
Another way of getting the list of drives on your computer is by using PowerShell commands. Given below are the four common ways in which PowerShell can be used to list the drives.
1 Get-PSDrive
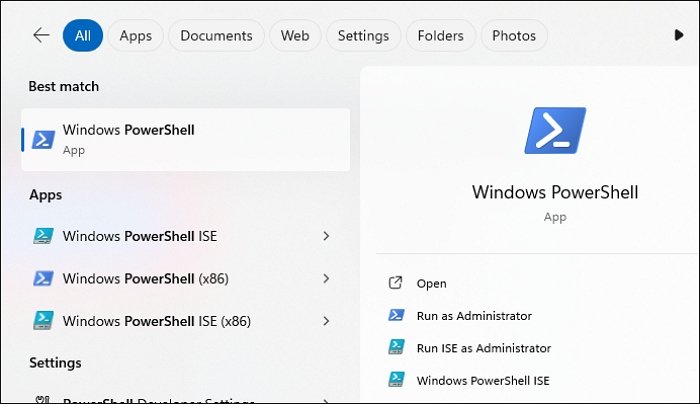
- Step 1: Open PowerShell by searching for it in the search box and clicking on it.

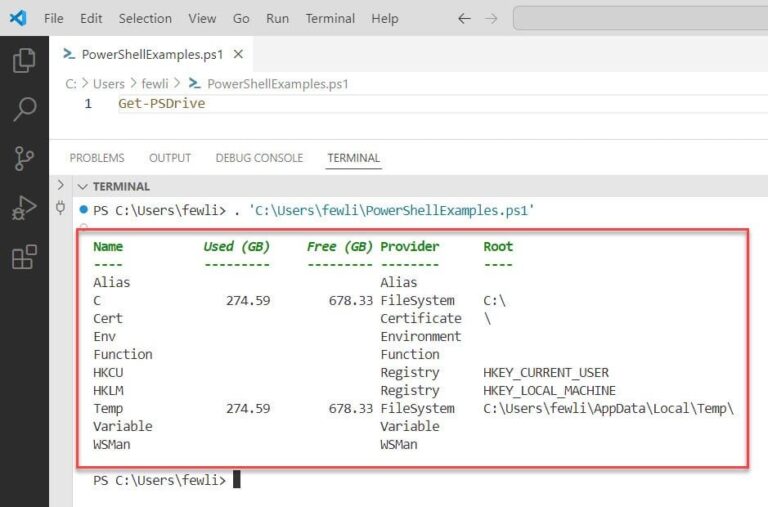
- Step 2: Type this command to display drives list in PowerShell:
Get-PSDrive
- Step 3: Press enter and you’ll see a list of drives.

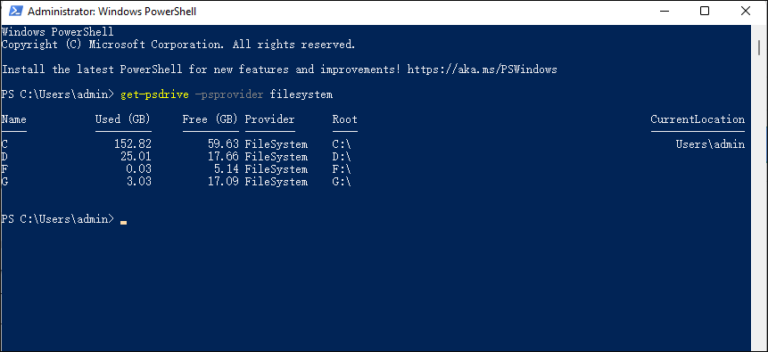
- Step 4: If you want to list the file system drives using PowerShell, use this command:
get-psdrive -psprovider filesystem
Press enter.

2 Get-Disk
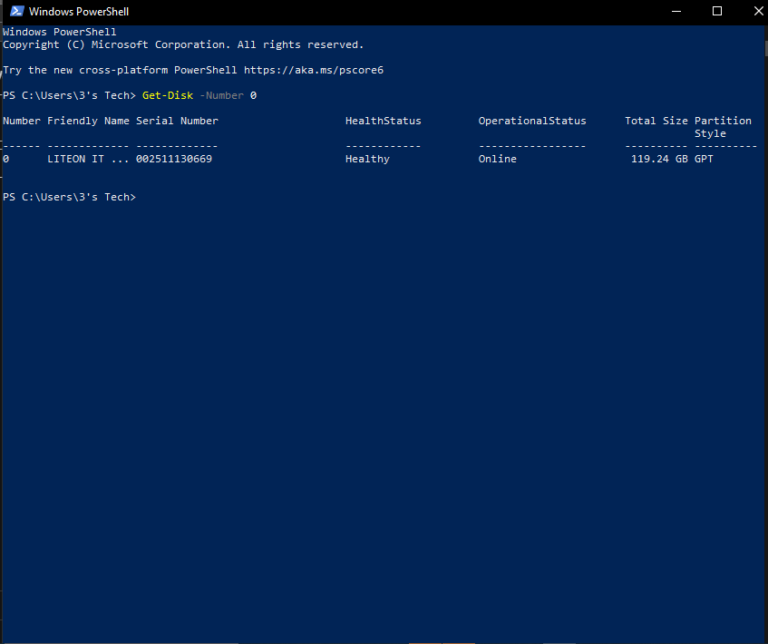
You can use the Get-Disk cmdlet to retrieve detailed information about the drives, including their health status and total size.

3 Use CMD Command
- Step 1: In PowerShell, use this CMD command to list the mapped drives:
Net use
- Step 2: To get the mapped drives on remote devices, use the following command:
Invoke-Command -ComputerName RemoteComputer -ScriptBlock{Net use}
4 WMI and CimInstance
Use WMI method with classname Win32_MappedLogicalDisk to get mapped network drives list.
- Local Computer:
Get-CimInstance -ClassName Win32_MappedLogicalDisk | Select SystemName, DeviceID, ProviderName
- Remote Computer:
Get-CimInstance -ClassName Win32_MappedLogicalDisk -ComputerName RemoteSystem | Select SystemName, DeviceID, ProviderName
5 Use Get-PSDrive Method
Run this cmdlet to list drives on the local computer:
- Local Computer:
Get-PSDrive
- Network Drives:
Get-PSDrive | where{$_.DisplayRoot -match "\\"} - Remote Computer:
Invoke-Command –ComputerName RemoteComputer -ScriptBlock{Get-PSDrive | where{$_.DisplayRoot -match "\\"}}
6 Specific Disk Information
You can use this cmdlet in PowerShell if you want to get information about a specific hard disk:
Get-Disk -Number 6
Replace the number above with the number of disks for which you need information. Press enter, and you will get results.
7 USB Storage Information
You can also get detailed information about a USB or any other removable storage devices connected to your computer using the following command for PowerShell:
Get-Disk | Where-Object -FilterScript {$_.Bustype -Eq "USB"}Part 3: How to Run DiskPart in PowerShell
You can access DiskPart through PowerShell and list the drives on your computers and even perform functions like creating partitions or volumes, deleting them, or even formatting them.
- Step 1: Open PowerShell by searching for it in the search box, right-click on ‘Windows PowerShell’ in the search results and click ‘Run as Administrator’.
- Step 2: Once PowerShell is open, type ‘Diskpart’ and press the enter key.
- Step 3: Now, to get the list of disks, you can type ‘list disk’ and press enter. This will provide you the information including disk number, total size, free space, and more.
- Step 4: Similarly, you can use ‘list partition’ command and press enter to access the information about the partition.
4 Troubleshooting Common Issues
Sometimes, you may encounter problems while trying to run Command Prompt or PowerShell to list the drives. Here are some of the common issues faced by the users along with their solutions.
1 Why is the Command Not Recognized?
Cause: The command was entered incorrectly or the command prompt is not running as an administrator.
Solution:
- Check the command syntax: Make sure the command is entered correctly without typos. For example,
wmic logicaldisk get nameshould be complete. - Run as administrator: Some commands require elevated privileges to run. Right-click the command prompt icon and select "Run as administrator".
2 Why Am I Getting Access Error?
Cause: Insufficient user permissions or incorrect file/directory permissions.
Solution:
- Verify user permissions: Make sure the current user has the permissions required to execute the command. If necessary, log in with an administrator account.
- Check file/directory permissions: If the operation involves a specific file or directory, right-click the file or directory, select "Properties", and check the permission settings in the "Security" tab.
3 Why is the Drive not Found?
Cause: The drive is not connected properly or is not recognized by the system.
Solution:
- Check the physical connection: Make sure the drive is properly connected to the computer.
- Refresh the drive list: Enter
diskpartin the command prompt, and then enterrescanto refresh the drive list.
4 Why Is the Drive Information Incorrect?
Cause: Cache issue or system information not updated.
Solution:
- Refresh system information: Restart the computer or use the
diskpartcommand to refresh the drive information. - Use the latest tools: Make sure you are using the latest version of the Command Prompt or PowerShell tool.
AirDroid Business - Windows and Android Device Management
AirDroid Business is an Windows and Android device management solution that can be used to enroll, manage, and monitor large fleet devices. With the centralized platform, organizations are able to deploy smartphones, tablets, rugged devices and others dedicated devices like kiosks and digital signage.
It's available for Cloud Deployment & On-Premises Deployment.
Key features include: remote access & control, Google Play apps & enterprise's apps management, policy, single & multi-apps kiosk mode, alerts & automated workflows, geofencing & location tracking, file transfer, notification, user management, reports, etc.




Leave a Reply.