How to Create and Install Provisioning Packages for Windows?
Perhaps you are an IT administrator of an enterprise or an organization and want to deploy provisioning packages for managed end-user devices like Windows. While these provisioning configurations will make it easier to specify configurations and settings you need to enroll your devices into management, the process of creating and installing packages for your specific devices and needs can be a bit challenging. Fortunately, this article takes you through a detailed guide on how to create and install provisioning packages for Windows.
1What is a Provisioning Package?
A provisioning package is simply a container with a collection of configurations and settings used to provision end-user devices without imaging. They are useful for environments that require quick provisioning of off-the-shelf hardware for use by students, employees, or simply the end-users of an organization.
Provisioning packages are generated using a Windows 10/11 device. However, the Windows Configuration Designer must be installed.
These configuration packages make it easier for IT administrators to enroll a fleet of devices with ease because they don’t need to install a new image every time they want to enroll a device in the organization. Provisioning packages offer flexibility as they can be installed via removable media, attached to an email, downloaded from a shared network, or deployed via NFC tags or barcodes.
A provisioning package is built from several configuration sources having separate provisioning packages. These packages have the following components:
- Package Metadata- This contains the basic information about a package such as name, version, and description.
- Asset Payload- This contains the payloads associated with a configuration setting of a specific app or data asset.
- XML Descriptors- As the name suggests, an XML descriptor describes a customization asset or configuration setting that is included in the package.
2How to Create and Install Provisioning Packages for New Windows Devices?
Provisioning packages can be created for new or pre-existing Windows devices using the Windows Configuration Designer. Once you have created these packages, you can then install them on the target devices with ease. In this section, we shall focus on how to create and install provisioning packages for new Windows devices.
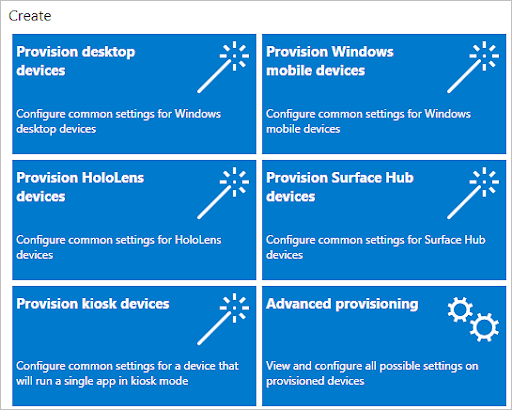
- Step 1.First, download and install the Windows Configuration Designer on your Windows 10/11 device. Once installed, open it and select the “Advanced Provisioning” option.

- Step 2.Now, enter the name of your project and hit “Next” to proceed. In the next screen, choose your preferred configuration settings and click “Next”. There are several settings for various Windows editions. Choose a provisioning package based on the type of device you want to enroll.
- Step 3. Ignore other options in the “Import a provisioning package optional” page and click the “Finish” button to create your provisioning project.
- Note : If you want to create different provision packages with similar settings, you can use the “Import a provision package” option. This is useful because you only import an already created package to other packages to avoid reconfiguring packages with common settings.
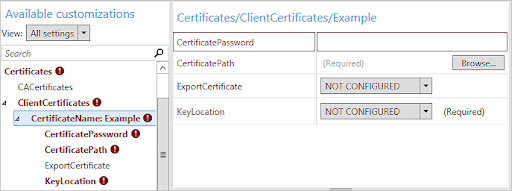
- Step 4. Now, you can configure the settings in the “Available Customizations” pane. The process of settings configuration is similar for all settings. You simply need to expand a setting category, choose the desired setting, enter a settings value, and click “Add”. Once the settings are configured, they will be displayed in the “Selected Customizations” section.

- Step 5. Next, click the “Export” option and then select the “Provisioning Package” option. Although optional, you can provide the provisioning package description details and desired security details then click “Next” to proceed.
- Step 6. Now, choose your desired output location for your provisioning package then click “Next”. Once done, choose the “Build” option to build the provisioning package. When the build is complete, click the “Finish” option to close the wizard.
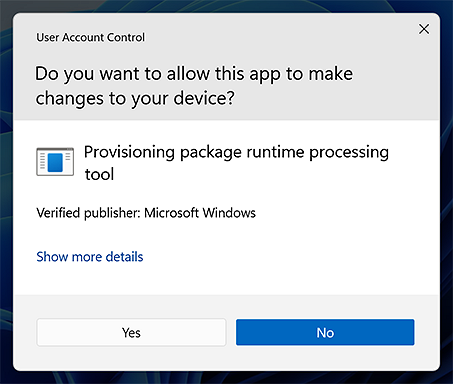
- Step 7. You can now apply the provisioning package directly via a USB drive, network, or folder. Simply go to the provisioning package on the device and double-click it. You should see a prompt on the screen asking you whether you want to install the provisioning package on your device. Click “Yes” and verify on the subsequent page by clicking the “Yes, add it” option.

Remember you can also apply provisioning packages using the Windows Settings or during the device's initial setup via a USB drive.
If you want to know more details about it, here we will share you a video for you.
3What You Can Configure with Provisioning Packages?
There are several settings that you can configure in Windows Configuration Designer to create provisioning packages. They range from basic to advanced configuration settings and you can always switch to an advanced editor for the later settings based on your needs. In this section, we are going to focus on the configurations for desktops. The table below shows the various configurations for desktop and their descriptions.
| Task | Description |
|---|---|
| Set Up Device | This assigns your device details such as name, and product key, configures for shared use, and removes preinstalled software. |
| Set Up Network | This enables you to connect your device to a Wi-Fi network. |
| Account Management | This configuration lets you enroll your device in Active Directory or Microsoft Entra ID. It also allows you to create a local administrator account. |
| Bulk Enrollment in Microsoft Entra ID | This setting lets you enroll your device in Microsoft Entra ID via Bulk Token. |
| Add Applications | This package lets you install applications on your device using the provisioning package. |
| Add Certificates | With this configuration, you can include a certificate file in your provisioning package. |
4How to Remove Provisioning Packages?
There are several instances you would want to remove provisioning packages on your device. Perhaps you don’t need these packages anymore or you just want to reset your device to its original settings/configurations. Whichever the reason, it is important to note that you can use various options to remove provisioning packages on your device as highlighted below.
1Uninstall Packages from Built-in Settings
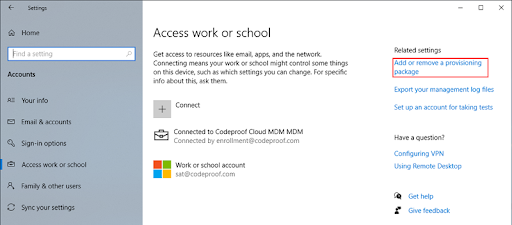
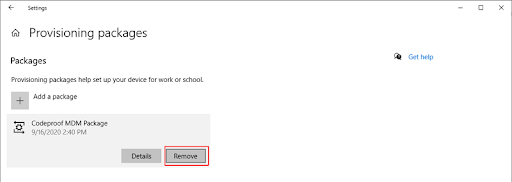
Windows 10/11 allows you to remove provisioning packages from the settings as illustrated below.
- Step 1.Open the “Settings” app on your Windows and head to the “Access work or school” section.
- Step 2. Click the “Add or remove provisioning package” link on the right pane.

- Step 3. Select the provisioning package you want to remove then click “Remove”.

2Uninstall Packages using PowerShell
If you are using the Windows 11 client operating system, you can use PowerShell commands to uninstall provisioning packages based on the package ID, path, and metadata. You can also uninstall all the packages at the same time.
- To uninstall all the packages, use the PowerShell command:
“Uninstall-ProvisioningPackage –AllInstalledPackages”. - To uninstall a package based on package ID:
“Uninstall-ProvisioningPackage -PackageId "ID".
3Factory Reset the Device
Another practical way to remove provisional packages on your device is via device reset. When you factory reset your Windows device, it will wipe all the installed packages and settings including provisional packages. It simply takes your device settings to default settings. However, doing a factory reset means you lose personal files/data and settings you probably didn't want to lose. To prevent this, make sure you backup your data before the factory reset.
If you are using Windows 10/11, you can factory reset as follows.
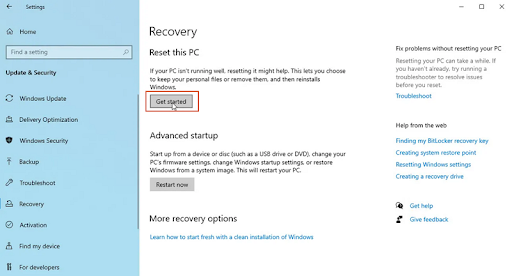
- Step 1.Open the “Settings” app and head to the “Update & Security” section.
- Step 2.Click the “Recovery” option then “Get Started” under the “Reset This PC” section.

Yes: Saves provisioning packages that let this PC use workplace resources
No: Removes provisioning packages that let this PC use workplace resources
Choose the "No" option to remove the package.
5Summary
Provisional packages can immensely help you configure settings for easy enrollment in your management. However, without proper information, you might struggle to execute this process. Nevertheless, you need to understand your target device and your needs to make it easier to create, install, and even remove these configurations.
Manage Windows Devices with AirDroid Business
Do you looking for a easier way to manage your enterprise' devices? AirDroid Business provides a comprehensive solution that help you to manage both Windows and Android devices at same time. It allows you to set configurations, manage patches, monitor apps usage, and more.




Leave a Reply.