Whitelisting Applications in Windows 11/10 – Methods and Recommended Tools
With organizations running in digital mode, it's significant to ensure security. There are numerous methods to add the essence of security to the organization’s information architecture. Considering the vast usage of Windows devices, it’s the responsibility of the management to set up employee devices in abidance with the security standards and practices.
Among those security practices, the Windows application whitelist is a significant one. For example, by defining a list of Windows 11 whitelist applications, you define a set of applications that are allowed for the employees to use. It restricts the usage of all the other applications other than the whitelisted ones.
This article explores the methods of application whitelisting on Windows 11/10 along with certain useful tools.
1How to Whitelist an Application/Program in Windows 11/10?
This section covers the steps of five methods to whitelist an application or program on Windows 11/10 devices.
Method 1: Use the Application Whitelist Policy
Windows has a feature of defining application whitelist policies, which restricts the usage of all applications except the whitelisted ones. Note that this method is applicable for Windows Pro and Enterprise editions. To whitelist an application on Windows 11/10, follow the steps below:
- Step 1: From the Start menu, search for Run and open the application.
- Step 2: Type secpol.msc in the search field and hit Enter.
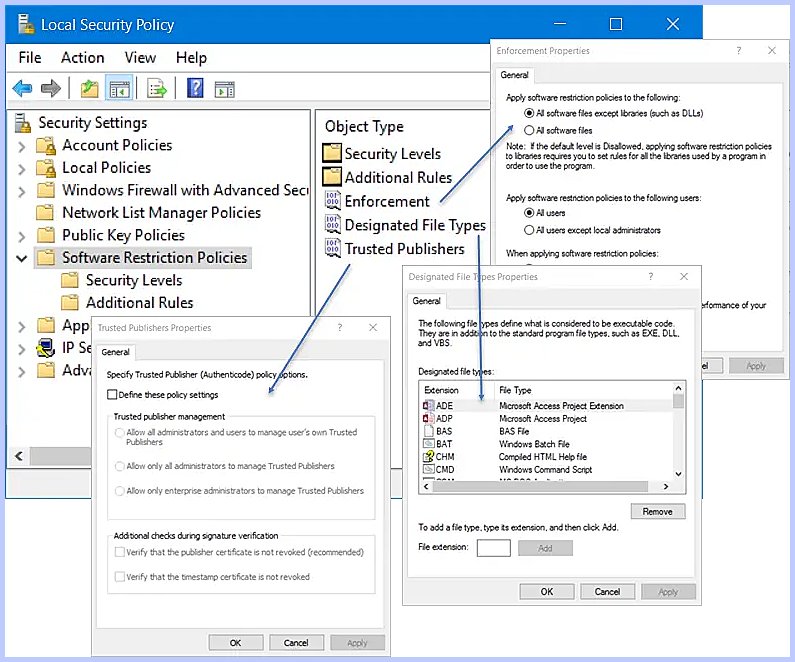
- Step 3: This opens the Local Security Policy window.
- Step 4: Expand the Software Restriction Policies folder from the sidebar.
If there is no existing policy, right-click on the Software Restriction Policies folder and select Create a new policy option. - Step 5: Open the Enforcement, Trusted Publishers, and Designated File Type to access the relevant properties. In the opened properties prompt(s), you can define the applications you want to whitelist by setting Disallowed as the default option. This will set all the applications on disallowed mode except for the whitelisted ones.

Method 2: Use Windows Defender Application Control (WDAC)
WDAC is a PowerShell script that allows you to automate the process of Windows application whitelisting. Note that WDAC requires the installation of the latest version of PowerShell Core and Windows 11 as well as the administrator privileges. To whitelist an application, follow the steps below:
- Step 1: Install the module using the following command:
Install-Module -Name 'WDACConfig' -Scope 'AllUsers' -Force- Step 2: Apply the required configurations using the WDACConfig module’s cmdlet. All the specialized classes and their relevant functions can be accessed here.
- Step 3:Once the configurations are applied, you can access them via this directory:
C:\Program Files\WDACConfig
Method 3: Smart App Control (For Windows 11 only)
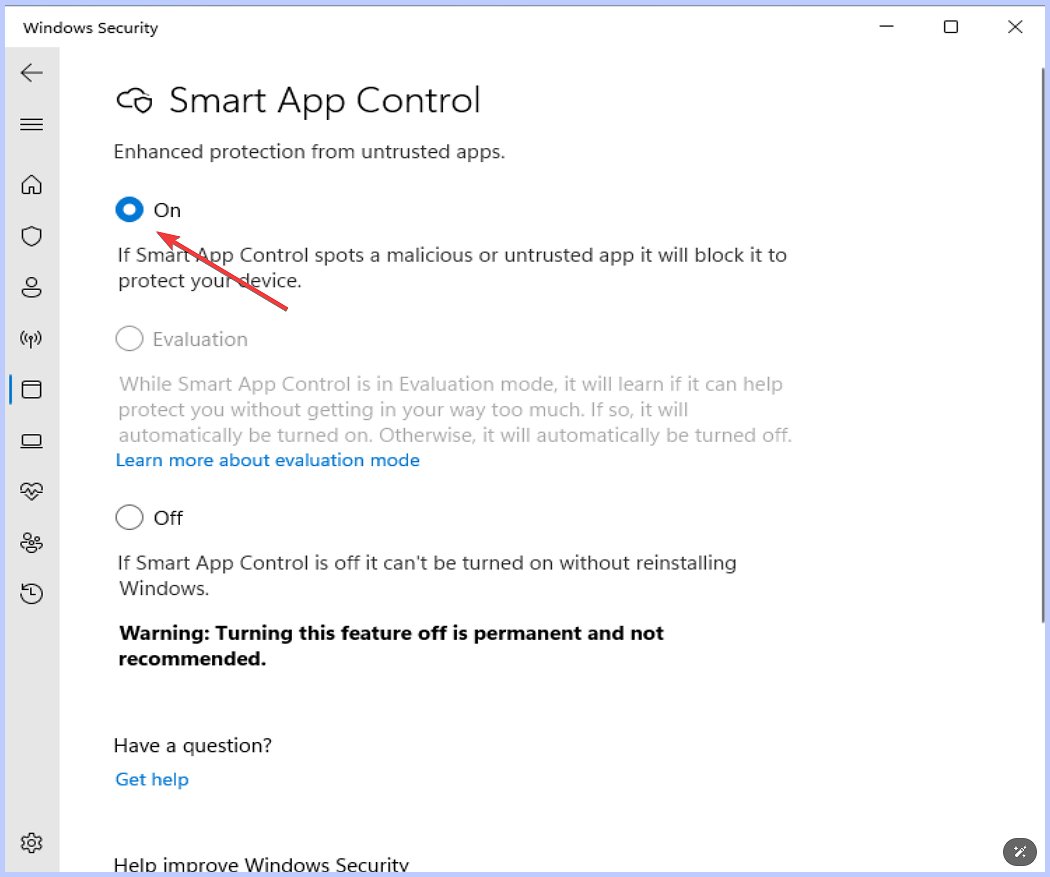
Smart App Control is a security service powered by the cloud that is intelligent enough to allow users to only run safe applications. Note that it is available for Windows 11. To enable/disable or access the settings of Smart App Control, follow the steps below:
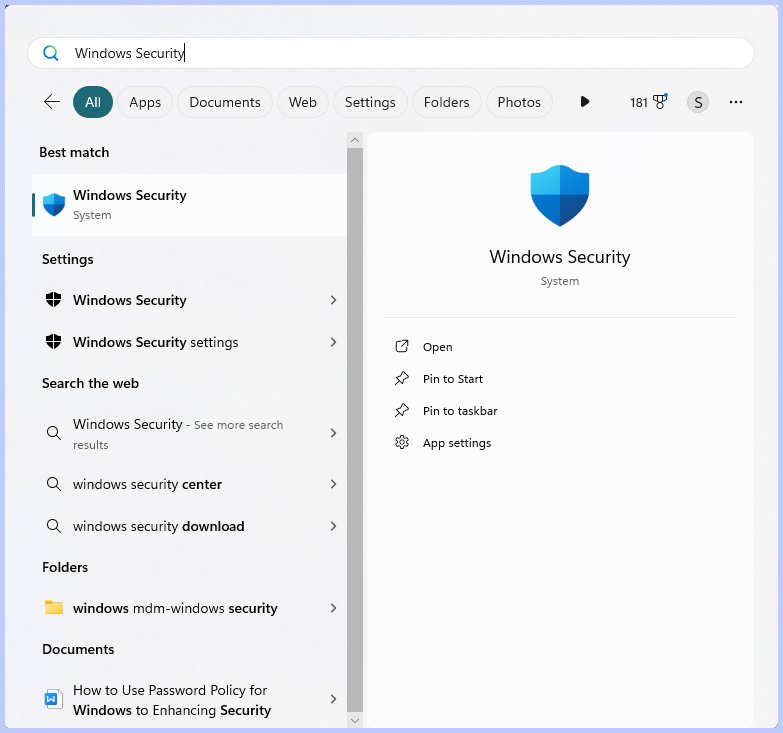
- Step 1: From the Start menu, search for the Windows Security application and open it.

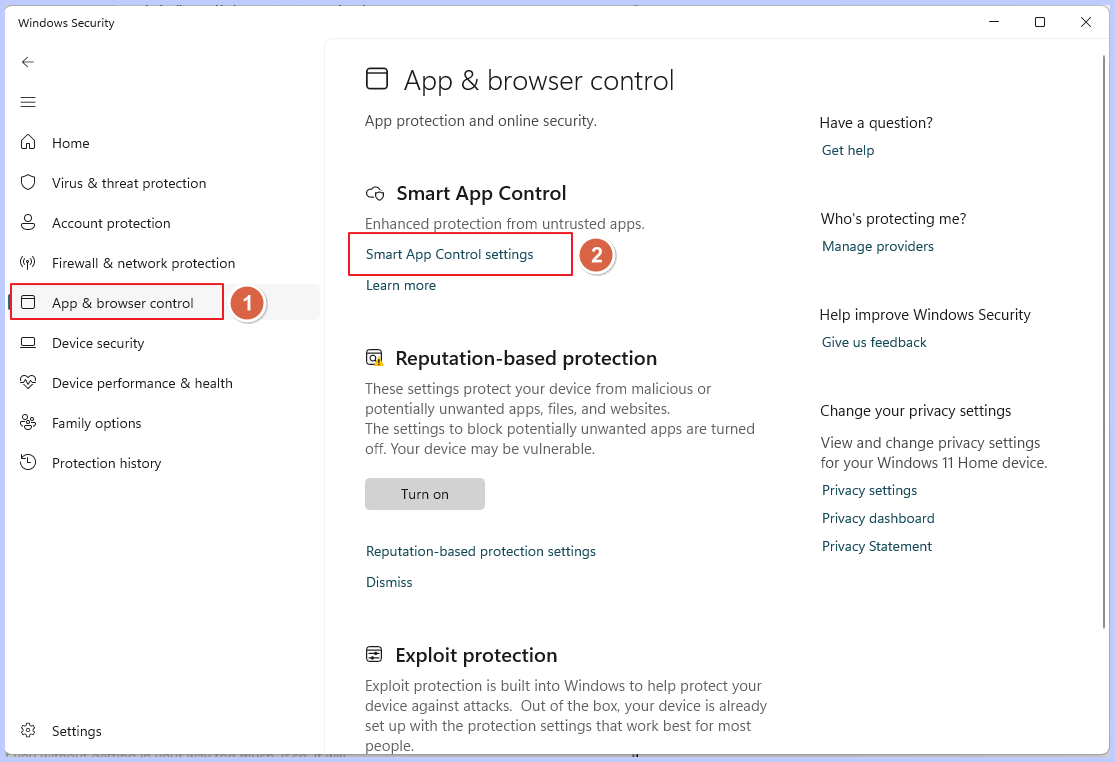
- Step 2: Click on the App & browser control.
- Step 3: Look for Smart App Control settings. From here you can turn it on/off or configure the settings per requirements.


Method 4: Add Application Whitelist to Firewall
Windows comes with a powerful firewall, Microsoft Defender. Its job is to block the execution of unsafe applications and programs on the device. However, if you want to turn on/off access for a certain application through it, follow the steps below:
- Step 1: From the Start menu, search for the Windows Security application and open it.

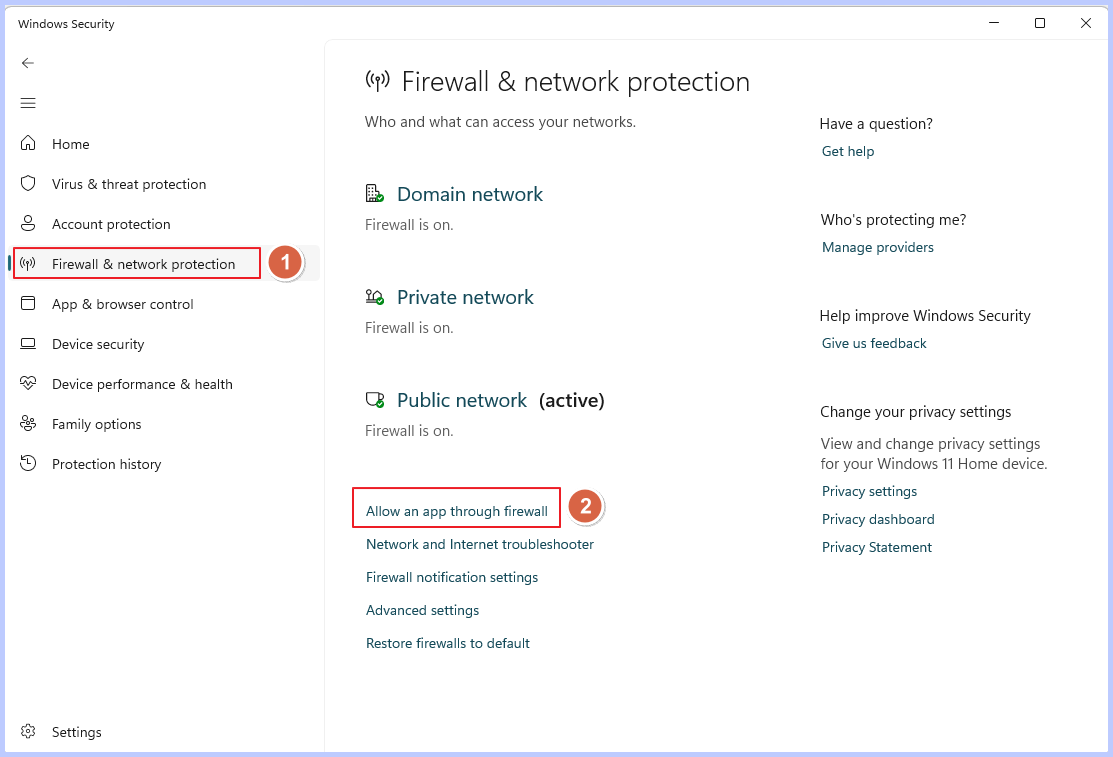
- Step 2: Click on the Firewall & network protection.
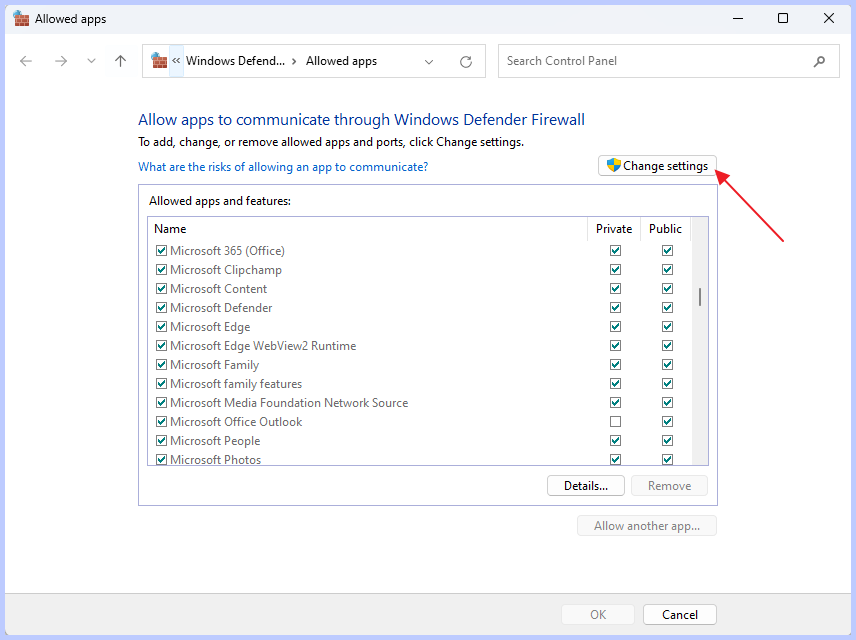
- Step 3: Navigate to the end of the opened page and click on the Allow an app through firewall option. Click on Change Settings.


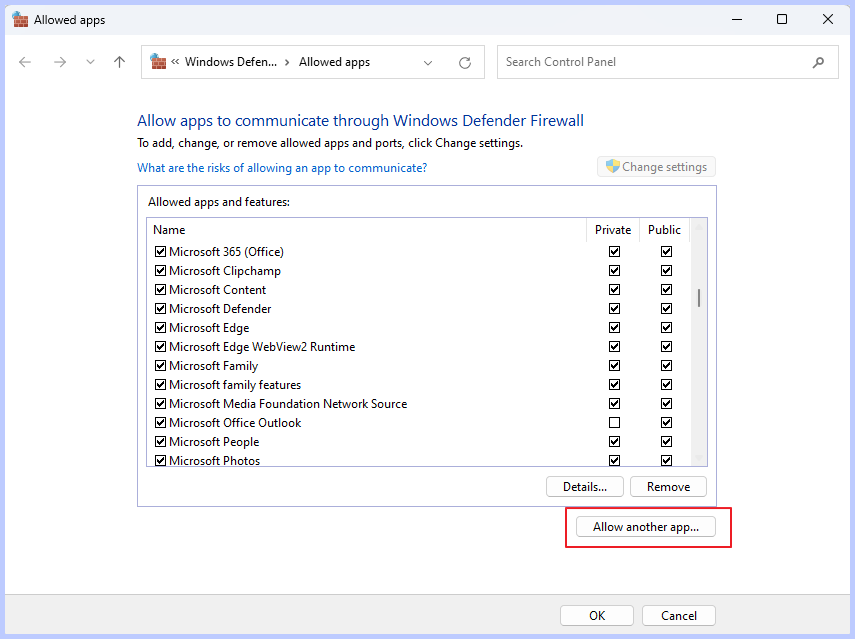
- Step 4: This opens the Allowed apps window. Look for the required application in the list and mark the checkbox to allow its access. If the app is not available in the list, click on Allow another app… button to search for it.

- Step 5: After making the changes, click on the OK button.
Method 5: Use AppLocker
You can use App Locker to restrict the user from using certain applications on Windows 11/10/8 devices. To do so, follow the steps below:
- Step 1: From the Start menu, search for Run and open the application.
- Step 2: Type secpol.msc in the search field and hit Enter.
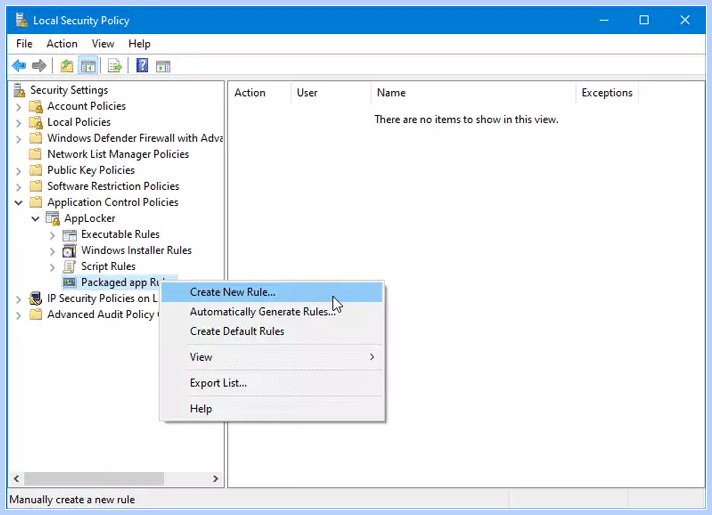
- Step 3: Under the Security Settings, expand the Application Control Policies followed by App Locker.
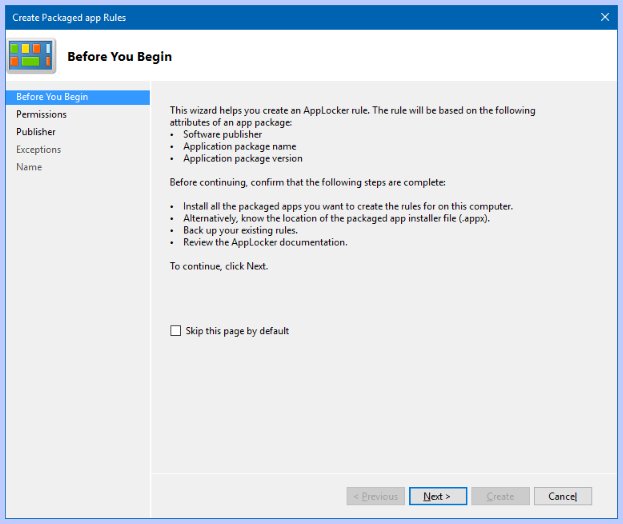
- Step 4: This gives you four domains in which you can create the rules: Executable Rule, Windows Installer Rules, Script Rules, and Packaged app Rule.
- Step 5: Right-click on the required file you want to create a rule in and select Create New Rule… from the options.

- This opens the rule setting windows where you can set up configurations of Before You Begin, Permissions, and Conditions.

25 Free Whitelisting Tools/ Software for Windows 11/10
This section covers the details of five free tools to help whitelist applications on Windows 11/10.
AirDroid Business
AirDroid Business MDM Solution is one of the most renowned and recommended tools when it comes to application whitelisting. It provides you with practical methods and functionalities to instill security into your IT infrastructure. Some of its important features include:
- Kiosk Mode – Allows you to customize and control the users’ browsing environment on Windows 10/11 by defining the App allowlist and customizing the browser settings.
- App Permission Policy – Set up consistent app permissions across all the devices by establishing a default response for the apps’ permission requests.
- App Allowlist and App Blocklist – Restrict the usage of the user’s device by setting up the visibility of the application in the App drawer. Apps in the Allowlist are the only ones that are visible to the users, similarly, the apps in the Blocklist are not accessible to the users.
Dell Authority Management Suite
It is a centralized and secure management solution to instill security in the user environment of Windows devices. Some of the significant features of Dell Authority Management Suite include:
- Allows the setup of secure and consistent user environments.
- Secures the infrastructure by ensuring users have access to only the required privileges and applications.
- Comes in hand with comprehensive tracking and reporting features.
Defendpointe
Defendpoint is an extensive solution that comes with privilege management and application control capabilities. It ultimately allows you to protect sensitive data from potential threats. Some of the significant features of this tool are:
- Allows application whitelisting in BYOD (Bring Your Own Device) environments.
- Comes with the ability to manage endpoint security.
- Instills security by malware detection and report management.
NoVirusThanks Driver Radar Pro
This tool helps protect your system from malware by giving you full control over all the processes running on your computer. Some of the significant features of NoVirusThanks Driver Radar Pro include:
- Allows you to manage kernel driver modes in multiple ways.
- Comes with the ability to load the kernel drivers with/without whitelisting modes.
- Notifies you as soon as any program requests to load the kernel drivers.
Centrify Server Suite
It is a comprehensive tool that equips you with the application whitelisting capabilities. Some of the significant features of Centrify Server Suite include:
- Allows the setup of privilege policies.
- Comes with the ability to control and manage applications based on their vulnerabilities.
- Provides you with the required information through its threats analytic feature.
FAQs
This section covers the answers to some of the frequently asked questions when it comes to application whitelisting.
- Prevents the users from using/executing unauthorized applications and programs.
- Helps defend the system and devices against potential malware and cyber risks.
- Introduces compliance into the IT infrastructure.


Leave a Reply.