8 Methods to Setup Windows Kiosk [Single/Multi-app Mode]
Windows kiosk is an essential feature for institutes and businesses that want to control unnecessary usage on corporate devices. Another significant use of Windows kiosks is to provide an interactive user interface for customers to process information, place orders, and make transactions.
They are used in different industries as information kiosks, POS, digital signage, and gaming kiosks for training and educational purposes.
- 1 :Setup Guide of Windows Kiosk Mode
- 2 :All You Need to Know about Windows Kiosk
- 3 :FAQs about Windows Kiosk Mode
1 Setup Guide of Windows Kiosk Mode
Method 1. Provisioning Package
- Tool: Windows Configuration Designer
- Apps: Win32 and UWP apps
- Supported Version: This method is applicable only on Windows 10 or 11 devices with Enterprise or Education Version.
- Supported Types of Kiosk Mode: Both single and multi-app kiosk mode
- Step 1. Windows Configuration Designer
- Launch the Windows Configuration Designer. Select “Provision Kiosk devices” from the start page.
- Step 2. Project
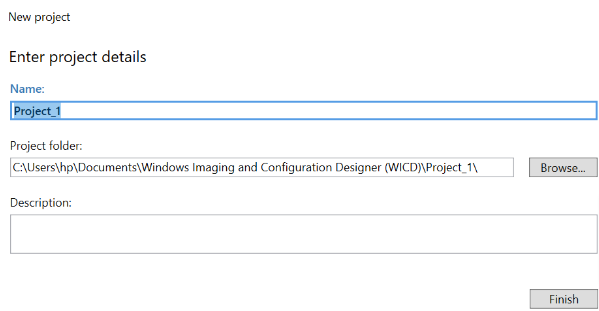
- Then enter the project details. Enter a project name, browse the project folder, and write a short description if you want to. Then click on finish.
- Step 3. Settings
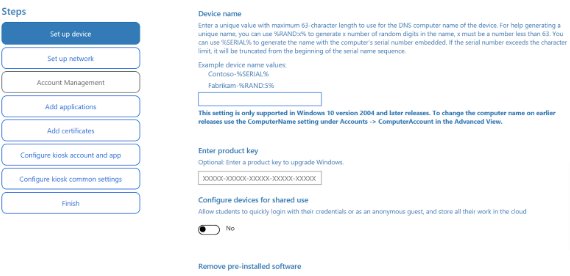
- Then, complete the configuration settings for setting up your device and network.
- Step 4. Finish details
- Coming to account management, select “enroll into active directory” and fill out your username and password details.
- Step 5. Add informations
- Now you may or may not add certifications and applications depending on your requirements. It is for verifying authenticity and securing applications.
- Step 6. Kiosk information
- Next, configure kiosk account and app. Enter your username and password. In kiosk mode app configuration, after you enter a username, select “Universal Windows App”.
- Step 7. Run Powershell
- After that, to generate an AUMID (Application User Model ID), run Windows Powershell as an administrator and type this command: Get-StartApps -name [application name] as we did here for MS Office.
- Now copy the app ID and paste it in the AUMID bar.
- Step 8. Apply kiosk mode
- Lastly, finish up with the kiosk common settings, review the summary, and click on the “create” button. And here you go! You will get a package file that you can take to the devices where you want to set up the Windows kiosk mode.
Method 2. Assigned Access in Settings
(It is the simplest way for non-technical users to implement kiosk mode)
- Apps: It only supports Universal Windows Platform (UWP) applications.
- Supported Version: Windows 10 and 11 devices
- Supported Types of Kiosk Mode: Single-app mode
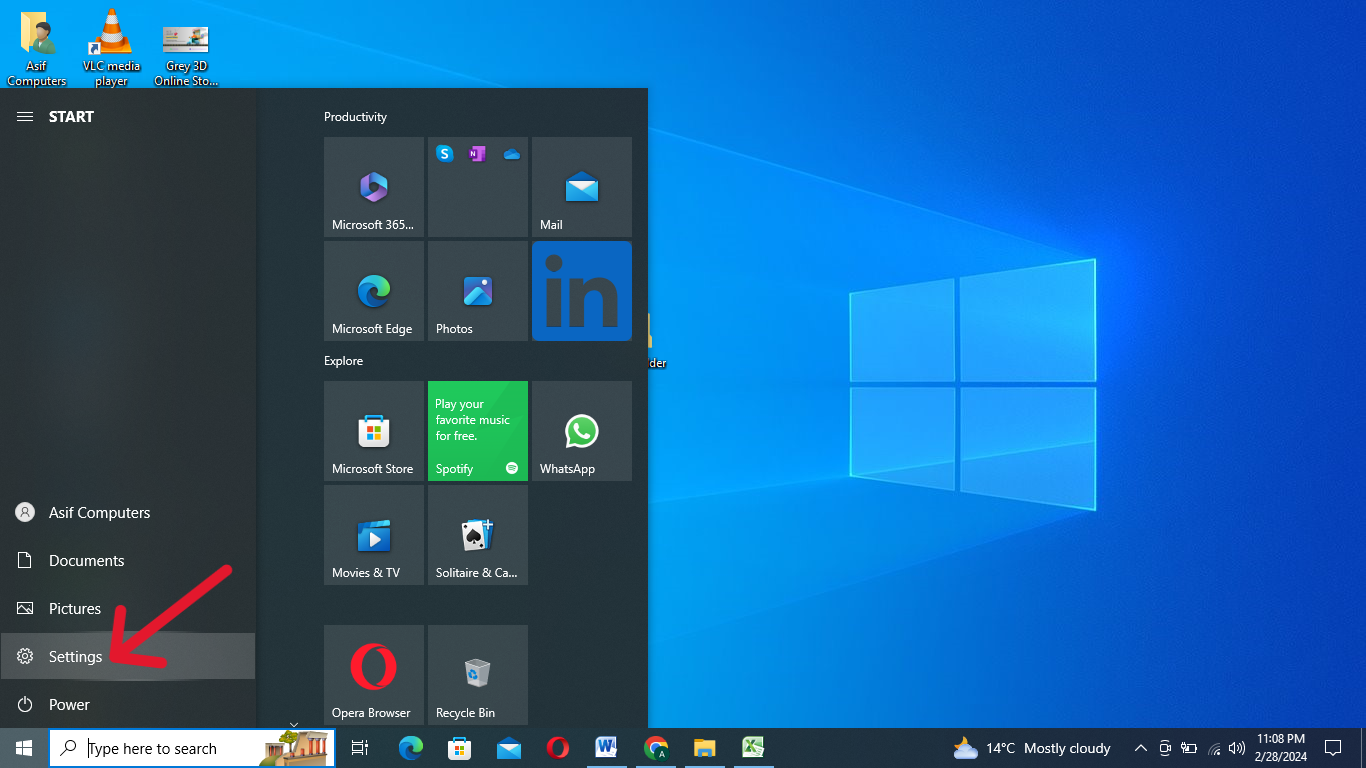
- Step 1: Click the programs menu from the main screen and select the Settings tab.
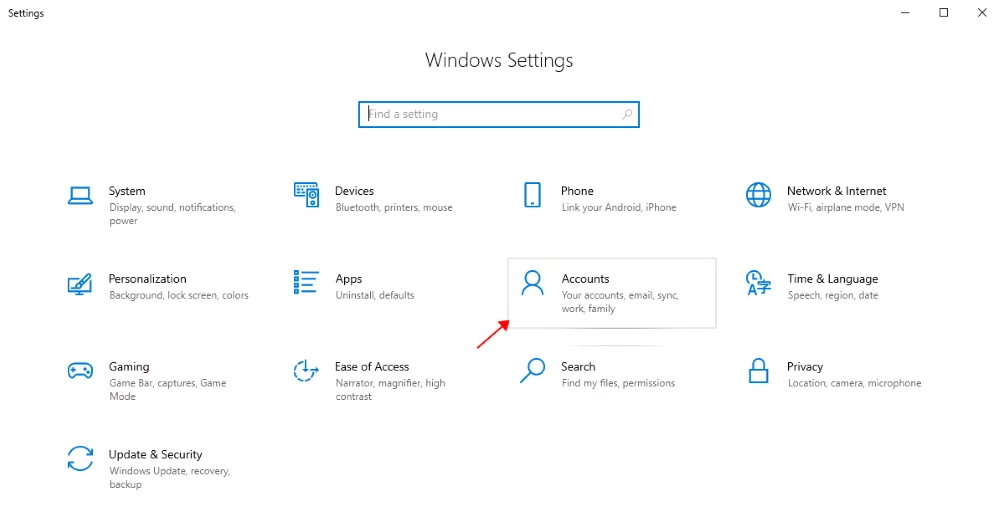
- Step 2: In the Settings tab, select the ‘Accounts’ tab.
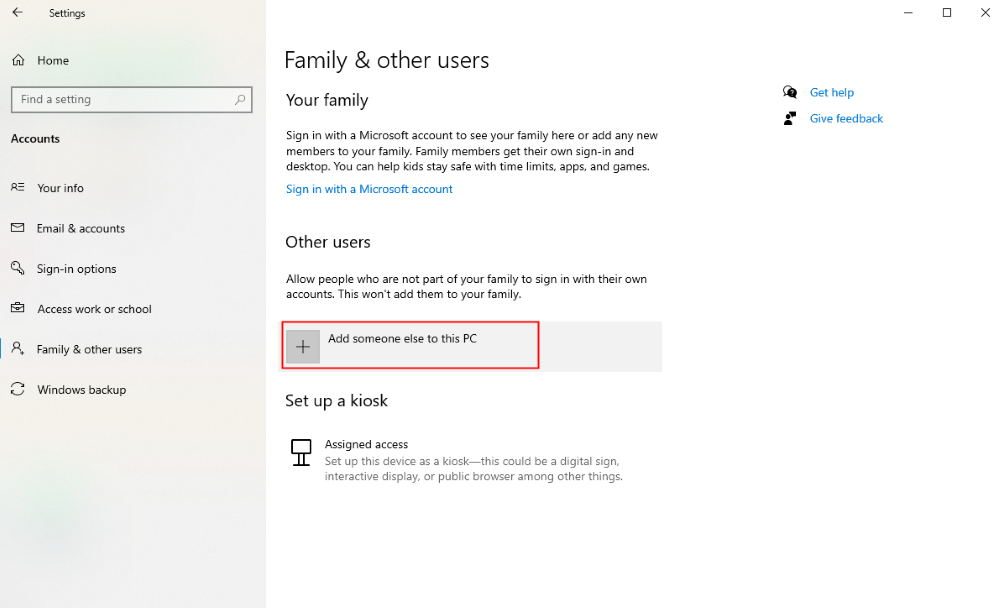
- Step 3: Select the ‘Family and other users’ tab to create a new account.
- Step 4: Click on ‘Add someone else to this PC’ and create a username with a password.
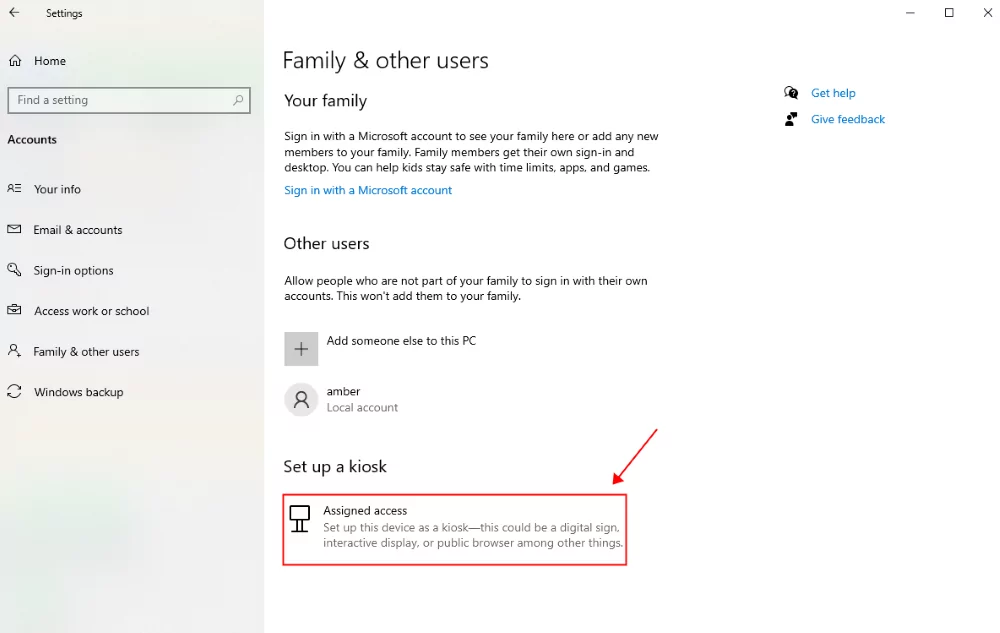
- Step 5: Select ‘Set up assigned access’ after creating an account.
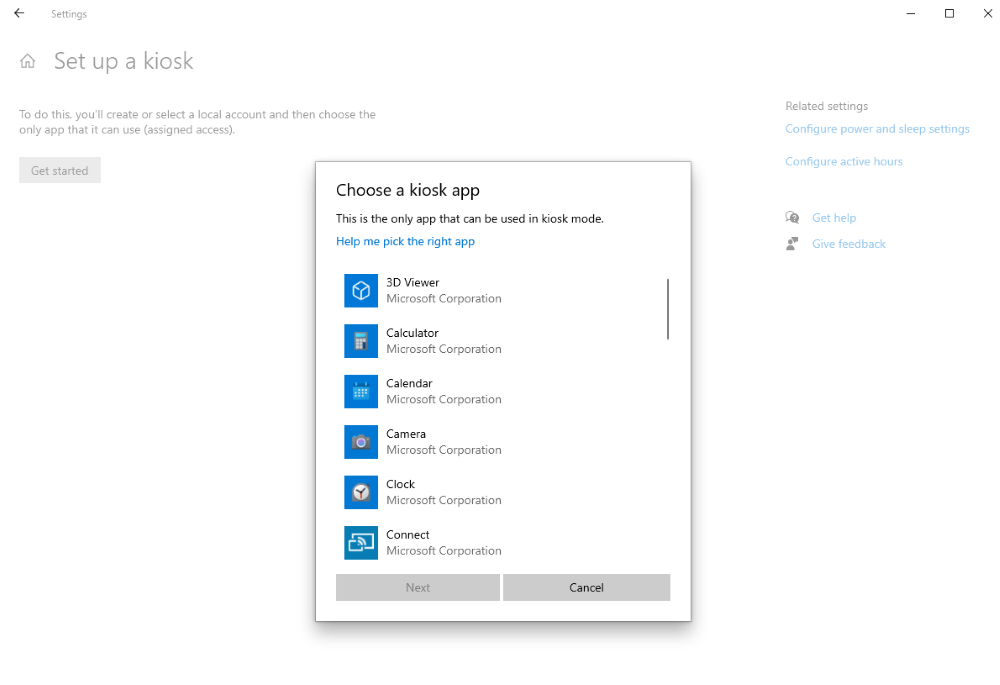
- Step 6: Choose the account you created for assigned access and the app you want to run in single-app kiosk mode.
- Step 7: Close all tabs and sign out the current account. Sign in with the kiosk account, which will open the selected app in full-screen mode.
- Step 8. Now, log in to the kiosk account and it automatically take user to the selected app.
Method 3. Assigned Access Cmdlets
- The device must support PowerShell and contain necessary cmdlets. The user must have administrative authority to run commands on PowerShell.
- Apps: It only supports UWP apps.
- Supported Version: Windows 10 and 11 devices
- Supported Types of Kiosk Mode: Single-app mode
- Step 1. Run PowerShell
- Run PowerShell as an administrator. Right-click on the start menu and select Windows PowerShell (Admin) for this.
- Step 2. Create Account
- Now, create a new account using the following command:
- New-LocalUser -Name "KioskUser" -Password (ConvertTo-SecureString "Password123" -AsPlainText -Force) -FullName "Kiosk User" -Description "Account for Kiosk Mode"
- Step 3. Get AppUserModelId
- Write this command to get the id of kiosk app:
- Get-StartApps | Where-Object {$_.Name -like "*AppName*"}
- Here you will replace the app name with your desired app like official private web application to run in kiosk mode.
- Step 4.Assigned Access
- Now, setup assigned access using the following PowerShell command:
- Set-AssignedAccess -UserName "KioskUser" -AppUserModelId "AppUserModelId"
- Here kiosk user specified the user name of the account while AppUserModelId is the Id you have got in the previous step.
Method 4. Shell Launcher
(Users who wish to have complete control can use this method as it offers full customization by replacing the default shell with a custom app.)
- You must have administrative access to configure ShellLauncher
- Supported Version: Windows 10 and 11 Enterprise and Education Version
- Supported Types of Kiosk Mode: Single-app mode, as it allows you to replace the Windows shell with a custom app to run in kiosk mode.
- Step 1. Create a User Account for kiosk mode
- Open the device ‘Settings’ tab and choose ‘Accounts’ option. Select ‘Family and other users’ option and click ‘Add someone else to this PC’ to create a local user account.
- Step 2. Install Custom Shell app
- Install the custom shell app on your Windows device to run kiosk mode.
- Step 3. Configure Shell Launcher
- Use PowerShell or Command Prompt to give instructions and execute them. Make sure you are running PowerShell as an administrator. Here are some commands that will help you configure Type the following code in PowerShell to configure Shell Launcher.
To Import the Shell Launcher module give following command: Import-Module ShellLauncher
To configure Shell Launcher type: Set-ShellLauncherConfig -CustomShellPath "C:\Path\To\YourCustomShell.exe" -RestartShellOnExit $true
To Add a Shell Launcher configuration for the user type: Add-ShellLauncherConfig -UserName "KioskUser" -ShellPath "C:\Path\To\YourCustomShell.exe" -ShellStartArguments ""
- Step 4.Automatic Logon
- Automatic logon is essential to run device in kiosk mode. Use shortcut key ‘Win + R’ to open run program. Type ‘netplwiz’ and press the Enter key. Now choose user created kiosk user account and press ‘Apply’ to enter password to set it up.
Method 5. AirDroid Business MDM Solution
AirDroid Business is mobile device management system used to centralize device management process for large enterprises to ensure uniformity, security, flexibility, and compliance.
Unlike other kiosk solutions, AirDroid Business is the simplest as it does not require creating an XML file or complicate setup steps to finish the kiosk lockdown. It is easily managed using the centralized Dashboard of AirDroid Business without any additional tool.
- Apps: Prepare your needed apps, AirDroid Business supports UMP and Win32 Apps(which includes exe and msi while UMP includes APPX, msix, appxbundle, and msixbundle).
- Tool: Create an account on AirDroid Business and purchase license for a specific number of devices you want to manage and install AirDroid Business Desktop client on management computer.
- Supported Version: Windows 10 or higher
- Supported Types of Kiosk Mode: Both single-app and multi-app kiosk mode
- Step 1.Sign Up AirDroid Account
- Click the free trial button to sign up an AirDroid Business account.
- Step 2.Enter the dashboard
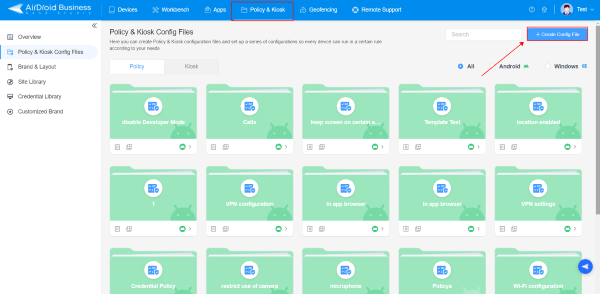
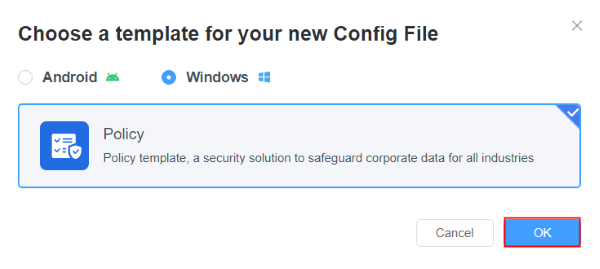
- Go to the AirDroid Business MDM dashboard, click on "Policy & kiosk" > "+Create Config File" > "Windows Policy".
- Step 3.Kiosk Settings
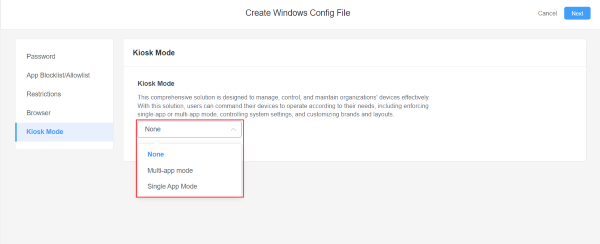
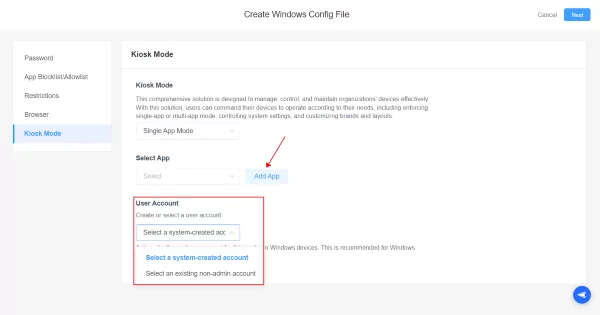
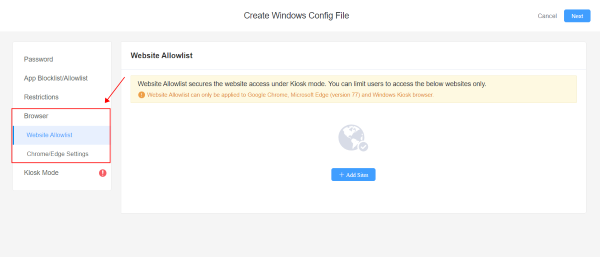
- Open "Kiosk," choose single-app or multi-app mode, select the app(s) to lock down, and choose the user account for this setting. Then, apply the configuration file to your target Windows devices to complete the kiosk restriction.
Method 6. Microsoft Intune
Microsoft Intune is a comprehensive tool which has integration with various Microsoft products to enhance its features and support.
- Supported Version: Intune support single-app kiosk mode for Windows 10 and 11 while it only support multi-app kiosk mode for Windows 10. So, for Windows 11 multi-app kiosk mode Assigned Access XML configuration is required.
- Supported Types of Kiosk Mode: Both single-app and multi-app kiosk mode.
Method 7. XML+PowerShell+WMI Bridge Provider
- Administrative access to Windows devices supporting Windows Versions and WMI Bridge Provider (enabled).
- App: Win 32apps, UWP apps, and custom apps.
- Tools: Verify that the WMI Bridge is available to import in PowerShell.
- Supported Version: Windows 10 Enterprise and Education Version 1703 or later, and Windows 11 Education and Enterprise Version.
- Supported Types of Kiosk Mode: Both single-app and multi-app kiosk modes.
- Step 1. Create XML File
- Create an XML file containing the kiosk mode settings. You can replace the some attributes like app name and SID form the code to manage according to your needs.
- For example, to setup single-app kiosk mode use the following XML code:
copy Copied!<AssignedAccessConfiguration> <Profiles> <Profile Id="KioskProfile> <Applications> <Application> <AppUserModelId>Microsoft.MicrosoftEdge_8wekyb3d8bbwe!MicrosoftEdge</AppUserModelId> <Shell>explorer.exe</Shell> </Application> </Applications> </Profile> <Configs> </Configs> <UserSid>S-1-5-21-1234567890-123456789-123456789-1001e</UserSid> <Profile Id="KioskProfile"/> </Configs>
- Step 2. Apply XML file
- Open PowerShell and run it as an administrator. Use relevant commands to apply XML configuration. The commands in PowerShell also include importing the WMI Bridge Provider module. Here are the commands to execute in PowerShell:
To Import the WMI Bridge Provider module:Import-Module WMIBridge
To define the path to your XML file: $xmlPath = "C:\Path\To\YourKioskConfig.xml"
To apply the XML configuration:Set-WmiInstance -Namespace "root\cimv2\mdm\dmmap" -Class MDM_AssignedAccess -Arguments @{ InstanceID="AssignedAccessConfig"; ParentID="./Vendor/MSFT"; Data=(Get-Content -Path $xmlPath -Raw) }
- Step 3. Restart the device
- After applying the XML using PowerShell, start the device to apply changes.
- This method is suitable for single-app kiosk mode and the primary reason is precision and control provided with XML configuration and is not suitable for multi-app kiosk mode because it requires a complex XML configuration setup.
Method 8. XML profile+other MDM Solutions
Several MDM solutions support single and multi-app kiosk mode for Windows. Some of them require XML configuration(like Hexnode). This guide is built for this situation.
- This method requires creating an XML file.
- Supported Version: Windows 10 and 11.
- Supported Types of Kiosk Mode: Both single-app and multi-app kiosk mode.
- Step 1.Create XML file
- Create the file including specific instructions for implementing kiosk mode just like we create in method 7.
- Step 2.Deploy it to the MDM
- Sign in to the MDM solution and navigate to device configurations tab. Create a new policy for setting kiosk mode. Add the XML file in it to manage configuration accordingly.
- Step 3.Assign Policy
- Assign the newly created policy to devices on which you want to run kiosk mode. It might requires restart of the device to apply changes.
2 All You Need to Know about Windows Kiosk
Two Different Windows Lockdown Kiosk Mode
Single-app kiosk mode
Single-app kiosk mode allows only one app to run on managed devices, blocking all other apps and device functions.
- Organizations primarily use this feature to set Windows devices into information kiosks, points of sales, self-service kiosks, digital signage, and to run private business apps.
- Let’s take an example of KFC. At the reception, they have placed interactive screens showing attractive food images with prices on slides. These devices are set to kiosk mode because no other operation is accessible on these devices.
- Similarly, order-taking staff has kiosk devices with single-app kiosk mode. They can only use the KFC order booking app on these devices to take customer orders.
Multi-app kiosk mode
Multi-app kiosk mode is a special mode for organizations that allows them to restrict Windows devices to multiple but selected apps. It helps them utilize different apps that are necessary to run business operations.
- Business models like COBO (Company-Owned-Business-Only) devices need Windows multi-app kiosk mode to use a single device for multiple purposes.
- Large businesses like call centers hire employees in day and night shifts to manage more employees with less number of devices.
- Management uses multi-app kiosk mode so employees can access relevant apps without changing settings or using unnecessary apps.
Benefits
-Enhanced Security
Restricted access to applications results in enhanced security, as it prevents access to known vulnerabilities.
Users are restricted from performing any actions accidentally or unintentionally outside the restricted boundaries set via kiosk settings.
They are unable to minimize or close the kiosk application, preventing unnecessary usage and ensuring a secure working environment.
To ensure compliance, kiosk mode provides data security by preventing devices from connecting to a USB or any other external device.
-Tailored Experience
Kiosk mode set up by MDM solution is highly flexible that allows customization tailored to a company's needs.
Businesses can manage the themes and layouts of kiosk devices with their brand-specific scheme to enhance visibility and improve customer interactions, making it an effective tool for branding and displaying promotions.
-Define Task-Specific Devices
Kiosk mode is ideal for creating purpose-built devices dedicated to performing specific tasks, such as hospitality and self-check-ins, at hotels and other public places.
Limiting the devices helps streamline business operations, resulting in improved efficiency and reducing the risks of cyber-attacks.
Which Type of Kiosk Mode is Suitable for You?
Users can be allowed to choose different modes depending on the usage scenarios. Providing access to multiple apps on a self-service kiosk device will let users waste time on unnecessary usage instead to the prime purpose it is installed for, leading to time waste. Setting it to single-app kiosk mode with only app to perform transactions will save everyone’s time and transactions will be performed quickly.
The multi-app kiosk mode benefits organizations with multiple members accessing a single device to perform numerous operations. It is essential in offices to provide a broader area for employees to work, prioritizing the necessity of work.
Almost all hospitality, healthcare, education, transportation, and food industries need interactive kiosks. Healthcare institutes need self-service kiosks to help patients check doctors' availability and schedule appointments.
Airports and railway stations need interactive kiosks to enable travelers to seamlessly check flight schedules and book tickets. POS systems at retail help customers pay bills after purchasing.
Educational institutes need self-service kiosks for students to check results, get updated with current admission details, and contact relevant faculty members. All these operations are done using single-app kiosk mode.
Use Cases
-Educational Institutions
Self-service kiosks in educational institutes can streamline the student enrollment and registration process, allowing them to access the unique ID on which they are enrolled.
They can seamlessly update information and check classes, exams, results, and other schedules without delays.
Interactive kiosks installed in universities provide campus maps so students and visitors can easily navigate to concerned departments or offices without much trouble.
Kiosks also help the administration easily collect fees, fines, and other dues from students directly in their accounts by providing students with a user-friendly interface to pay online.
Kiosks also support library management. Students can easily interact with library kiosks to check in and out and take or return a book without physical assistance.
-Electronic Retailer
Kiosks at retail stores help display detailed information about each product, including its unique features, pricing, and discount offers. They also help customers categorize products and display kitchen items, medical items, or other products in a specific category.
Managers use kiosks to track real-time inventory to ensure no item is out of stock, and they timely order new products when they have limited stock.
Customers can pay bills online using POS systems at dedicated kiosks in retail shops. Some kiosks with barcode scanners allow customers to self-checkout, saving time and avoiding disturbance.
They are used to display promotions, new arrivals, discounts, demos, and tutorials for some technical items.
Kiosks can also help collect customer feedback so business owners can understand customer issues and resolve them to improve services.
-Transportation and Logistics
Kiosks display real-time information about different vehicles, such as trains, their schedules, including arrival or departure time, estimated time in case of delays, and route information, for effective planning. They also help customers book tickets online and pay for them without meeting physical staff.
Logistics companies use kiosks to track their shipments and update customers with accurate delivery times, thus improving cargo operations and customer satisfaction.
The kiosk also helps with way-finding and optimizing routes in emergencies and traffic issues.
Kiosks at different stations can help customers connect with customer service representatives to ask for schedules or request changes in booked seats for any emergency.
3FAQs about Windows Kiosk Mode


Leave a Reply.