
How to Screen Record on Mac with Internal Audio [2024]
A screen recorder is a helpful feature in Android, Macs, iPads, iPhones, and iPad Touch that helps you record your screen activity easily. The screen activity may involve recording online meetings, creating tutorials, or giving feedback on a project.
In this article we will discuss using a few apps to Mac screen record with system audio. So, without further ado, let's start.
Part 1. How to Screen Record with Internal Audio on Mac?
In this section, we discuss three methods for screen record MacBook with internal audio and how to use each one. But before we discuss each app, let's take an overview of all in a comparison table.
Here are the three apps and methods that can help you with how to screen record on MacBook with internal audio. We share the recording quality, how much each cost, and the review score.
| Methods | Recroding Quality | Pricing |
|---|---|---|
| 1. QuickTime Player | 1080p 720p 480p | Free
|
| 2. OBS Studio | 1080p 720p | Free and open-source |
| 2. ScreenFlow | 1080p 2K 4K | $169.00/year with a free trial. |
With the help of this table, you can make better overview decisions on which might be best suited for you if you want a MacBook screen record with internal audio.
Now, let's move on to discuss these methods in detail.
Method 1. QuickTime Player with BlackHole
One of the best screen recorders for Mac is QuickTime Player. It has several features and a user-friendly interface. It not only helps you make videos but also lets you edit and trim them.
If you want to record the internal sound with QuickTime Player, then you will need additional software like BlackHole.
The basic steps to use this application are stated below;
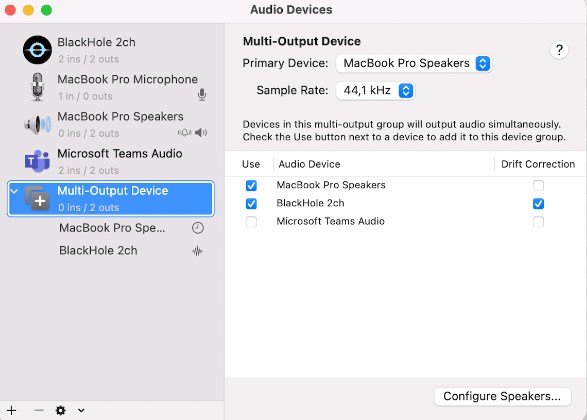
- Step 1. Before using QuickTime Player to Mac screen record with system audio, download and install BlackHole 2ch, which will be used for recording internal audio.
- Step 2. Set up your audio devices. Go to "Multi Output device" - Select "BlackHole 2ch"
- Step 3.Select the File option by double-tapping and then tapping on the new movie recording.
- Step 4. Once the app is opened, you will see a green light next to your built-in camera. You can also connect an external camera.
- Step 5. Afterward, click the options from the pop-up menu and choose any of the options if needed. For instance, you can connect a camera or microphone if you have more than one.
- Step 6. In this case, you will select “BlackHole 2ch” instead of “Built-in Microphone.”
- Step 7. Adjust the quality of the recording. Maximum high-quality recording involves H.264 video and 44100 Hz AAC audio.
- Step 8.
Once you are all done, click on the start button to record and the stop button when you are done with recording. - Step 9.
Choose the file to save and name the recording.


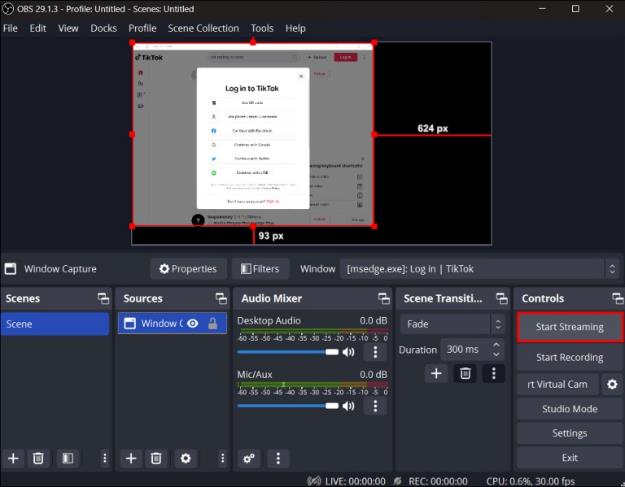
Method 2. OBS Studio
Out of many screen recorders for MacOS, OBS Studio is a great and intuitive screen recorder. It is free and open-source software that will let you record videos with internal sound, live streaming, and make additional customization.
Following are some steps to assist you in using OBS studio
- Step 1. Initially, visit the official website of OBS and choose your operating system, either Linux or MacOS.
- Step 2. Select the suitable version for your system and install it
- Step 3.Once you launch your OBS, make basic customizations like video quality to avoid any problems in the future.
OBS recording settings for high quality are as follows
Tips:
- The resolution should be HD (1920x1080)
- 60 Frames per second is suitable for smooth motion
- For high-quality video, select a 10,000 kbps bitrate
Method 3. ScreenFlow
In this section, we will discuss how to record a Mac screen with internal audio using the ScreenFlow app. However, this tool is only for the v8 and above. Furthermore, you need Mac OS 10.14 Mojave at least to use it.
- Step 1. Download the app on your Mac and start the app.
- Step 2. You can start a new project or import a pre-recorded video into the app. Please use the import feature for images and add audio to the media.
- Step 3.You can drag and drop different clips on the timeline, trim and clip them to edit the video, add photos to the timeline, and slow or increase their speed.
- Step 4.Once you are done, export the resultant into your output format. The higher the resolution of the output, the higher the file size.
Part 2. Bonus Tip: How to Screen Mirror Your Phone on Mac?
The above is the best method we have discovered about screen recording with internal audio on Mac. If you want to know how to mirror your phone screen to Mac, you can continue to learn about this Part.
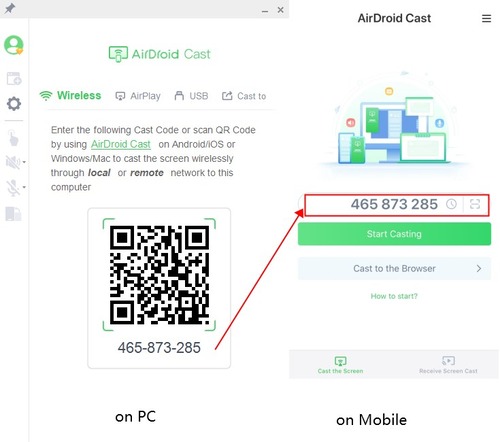
The best way to mirror your phone to your Mac is to use the AirDroid Cast screen mirroring app, which is available on Win/Mac/iOS/Android/Android TV and also supports real-time streaming of sound between your devices.

Here are the simple steps to mirror your phone screen to your Mac:
- Step 1. Download AirDroid Cast on your phone and Mac from the official website or App Store
- Step 2. Open AirDroid Cast on your Mac and click on the "Wireless" option. You will see a string of codes
- Step 3.Open AirDroid Cast on your phone and enter the code on your Mac into the input field
- Step 4.Follow the on-screen guidance, and your phone screen will appear on your Mac.
Part 3. Conclusion
In this article, we discussed the best methods for Mac screen record with system audio while getting the best quality and a few of the easiest apps to use. There are tons of apps to do that online, but the features and practicality that these three provide are enough for you, and you won't need to search for others.


Leave a Reply.